
SHARED FROM THE CTMH BLOG...
Back to the Basics with Cricut Design Space™
No matter your comfort level with Cricut Design Space™, it’s good for everyone to revisit the basics. Today, and in a few more blog posts in the upcoming months, we’re going to explain some of the basic tools in Design Space and then illustrate how to use these tools with images from each Close To My Heart Cricut® collection. Making sure you have the basics down will only increase your confidence as a Design Space user, unlocking so many creative options for your crafting!
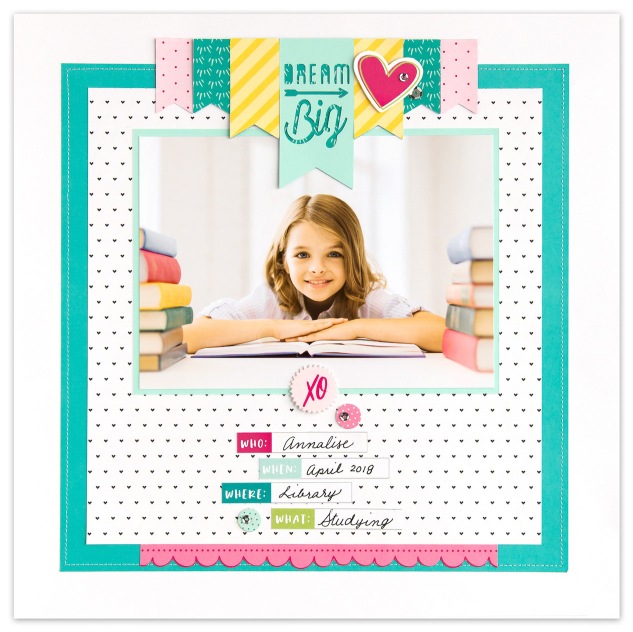
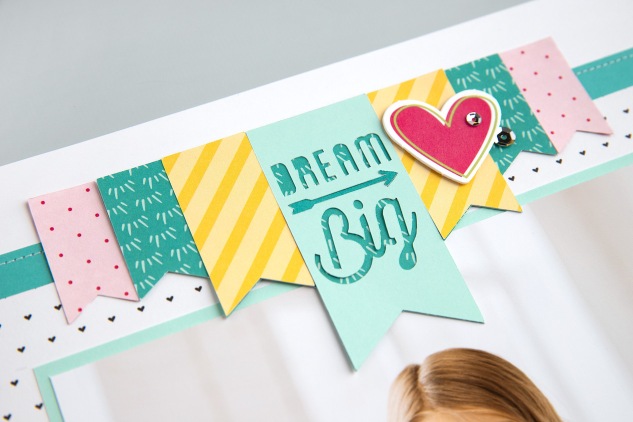
On the page above, we’ve used a banner from the Artistry Cricut® collection to create the title piece. Artistry has a wide variety of words and shapes including titles, sentiments, backgrounds, borders, and banners that you can use for any project theme. Whether you are celebrating a birthday or holiday, or scrapbooking everyday moments, you have lots of choices with this collection, and even more when using the tools in Design Space.
As you read along, remember that the steps below show you how to work in Design Space from a desktop or laptop computer. If you use the app on a mobile device, the buttons and tools will be located in slightly different places on your screen, but the same features are available on any device. Let’s get started by taking a look at the project canvas.
Your Canvas
Whether you are new to Design Space or a seasoned pro, it’s useful to identify the different parts of the canvas and where to find particular functions and tools.
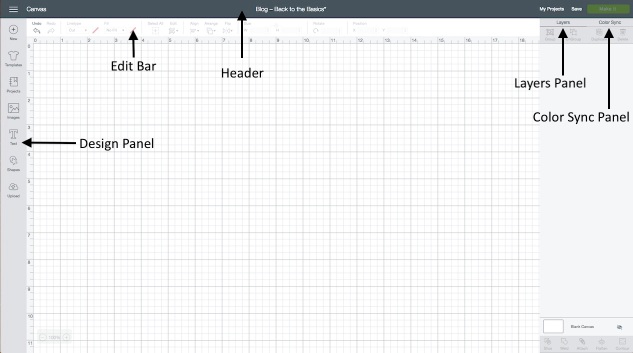
- Design Panel: This panel, on the left side of the canvas, is where you add new elements to your project like basic shapes, images, text, and more.
- Header: The Header is just the fancy title for the dark gray strip across the top of the canvas. This is where you can click to view the menu and see your project name. The Header is also where you’ll find a few more VERY useful things, like Save and Make It in the top right corner.

- Edit Bar: Below the Header, you’ll see the Edit bar. This section of the canvas houses many of the tools you’ll need to manipulate specific shapes and text. Here you can find tools like Linetype, Size, and Rotate. There are also options to Align and Arrange shapes, and most importantly, the top left corner is where you’ll find Undo and Redo, just in case you make a mistake. When you are working with text, more tools for adjusting the text will appear in the Edit bar.
- Layers Panel: The Layers panel holds tools that you might need when working with multiple images together. Tools like Group, UnGroup, and Duplicate are at the top of this panel. These tools let you copy, combine, or separate images. The Slice, Weld, Attach, and Contourfeatures are at the bottom of the Layers panel.
- Color Sync Panel: The Color Sync panel and the Layers panel share the same space on the canvas. To see this panel, click Color Sync, instead of Layers. This allows you to match colors used in your project’s shapes. Grouping them together by color makes it easy for you to cut shapes from the same paper.
Searching for Specific Shapes
#M4171A5
Have you ever wondered what this number means? You might see a number like this one in instructions or recipes we provide for artwork that use Cricut® shapes. This number is the image number in Design Space. When inserting an image on your canvas, you can search for a specific image by entering the entire number in the search box. Make sure to include the “#” symbol when you search.
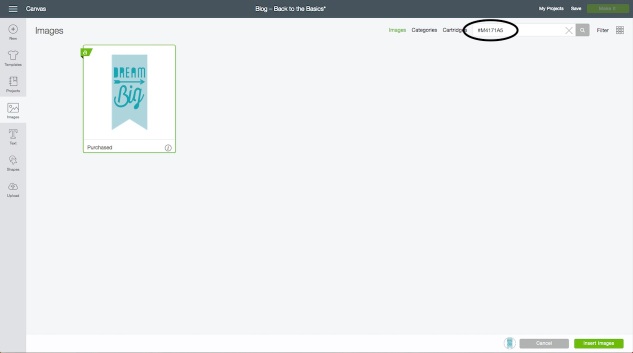
To search for a specific image, click Images on the left side of your canvas. Then enter the image number in the search box in the top right corner, just like we did to find a the banner used in this project.
Changing the Size of Shapes
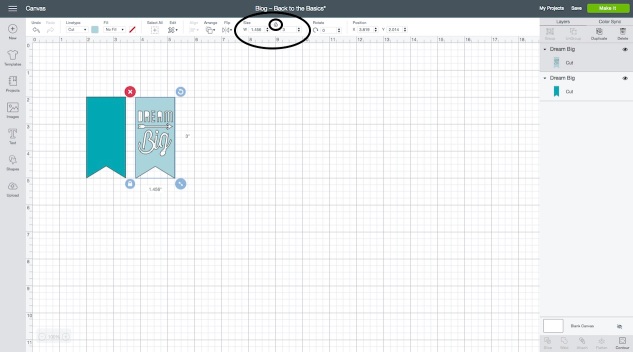
A simple tool you’ll use over and over again is Size. In the Edit bar, you’ll see Size and then the width and height of a selected image. You’ll also notice a lock symbol. When the lock is closed, if you adjust the width of the shape, for example, Design Space will automatically change the height to match the proportions. If you want to change both, simply click on the lock. It will unlock, allowing you to manipulate either one as desired.
Grouping and Ungrouping Shapes
Some images in Design Space have multiple layers. When you insert the image on the canvas, the layers will be grouped together. To manipulate each one individually, you have to use UnGroup. Simply select the image and click on UnGroup.
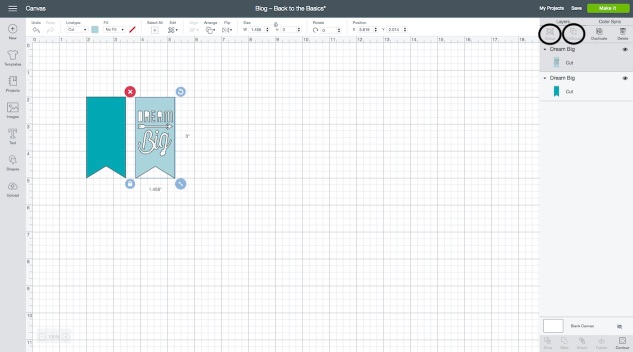
You can see that this banner image has two layers, one solid base layer and one overlay with the words “DREAM Big.” To make changes to each one individually, we ungrouped the image.
Duplicating Shapes
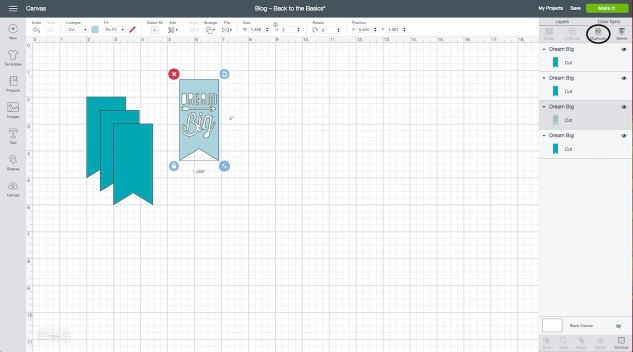
Another frequently used tool in Design Space is Duplicate. This lets you make a copy of any shape or shapes you have selected. Just click on the shape and click Duplicate at the top of the Layers panel.
Welding Shapes
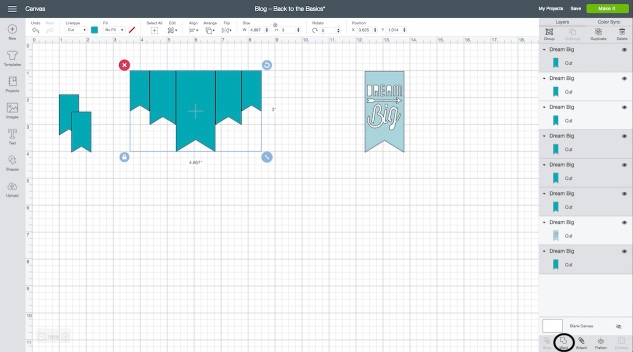
The word weld basically means to unite. While it often refers to metals, in Design Space, when you use this tool, you can combine, or “unite,” multiple shapes into one image, removing extra cut lines. Simply arrange the images as desired. Select all of them at the same time and click Weld. Now, instead of many separate images, they will be combined together as one single shape. This is how we created the solid base piece for our title.
Putting It Together (Search, Size, Duplicate, and Weld)
The title at the top of this page is made using the tools we’ve reviewed today to manipulate one image in Design Space. Follow the steps below to put it all together and make your own!
- First, search for the image, #M4171A5, and insert it on your canvas.
- Ungroup the image.
- Resize the solid banner to a height of 3″, leaving the width locked. Then, duplicate and resize to have six additional banners, two 2″ and four 1.5″.
- Arrange the banners like you see on the page with the solid 3″ banner in the center and one 2″ and 1.5″ banner on either side. Click and drag your cursor over all the images to select them all. Then, click Weld. This gives you the solid piece to go behind the remaining banners.
- We, then, went ahead and colored the additional 2″ banners light yellow, and the additional 1.5″ banners pink. This just helps you cut the right color of paper or cardstock.
- Select Make It in the top right corner and cut your project pieces. Then, assemble your title like you see on the page.
Keep in mind, to use the same image we did, you must own the Artistry Cricut® collection. You will also need a Cricut® machine that is Design Space compatible (any of the Explore or the new Maker machines).
No comments:
Post a Comment
Thanks for showing some {{{love}}}....