taken from ctmh's blog
Holiday Village

The winter village on the cover of our Holiday Expressions idea book has been getting a lot of attention, SO we are breaking it down on the blog today for you to make one of your very own!
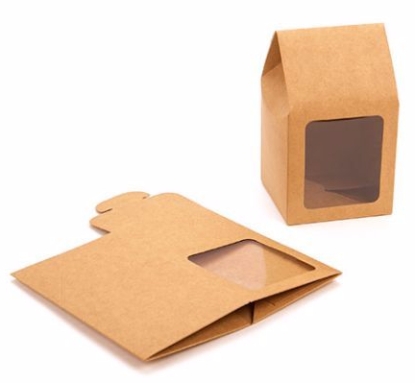
First things first—to replicate our little paper houses exactly, you will need 3 kraft tapered tote boxes, two 6″ and one 8″ like these:
When we assembled our village, these were readily available at one of our local craft stores, but we’ve found some similar options available online that you can use to get the same look (see the recipes’ below for the links).
Now, let’s take a look at how we transformed these boxes into festive holiday decorations!
9″ Sparkle House
Materials Needed:
X7225 Beary Christmas Paper Packet
X7226B Silver & Gold Paper Packet
1385 White Daisy Cardstock
X7226C Silver & Gold Complements
X7224C Cats & Bats Complements
Z3371 Gold Pearls
Z3348 Thin Cuts—Scallop Border
Z4037 Thin Cuts—Tree Line Border
Z2060 Thin 3-D Foam Tape
Z341 Glue Dots® Mini Dots
Z3372 Adhesive Runner
8″ Kraft Tapered Tote Box
Cotton Ball
Tips:
- Use Beary Christmas pocket scrapbooking cards for roof
- Trim holly from Beary Christmas zip strip to attach to front windows
- Front door is a sticker from Cats & Bats Complements
- Use a gold pearl as doorknob
- Dovetail “SPARKLE” sticker from Silver & Gold Complements and attach above door
- Fold chimney, cut to fit on rooftop, and attach with thin 3-D foam tape
- Attach cotton ball to roof inside chimney and pull up to create “smoke”
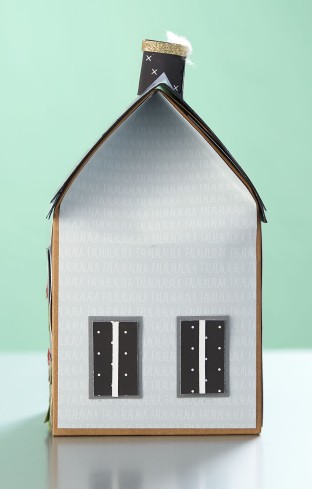
7″ Shine House
Materials Needed:
X7226B Silver & Gold Paper Packet
1385 White Daisy Cardstock
X7225C Beary Christmas Complements
X7226C Silver & Gold Complements
Z3371 Gold Pearls
Z3312 Gold Shimmer Trim
Z1799 Silver Shimmer Trim
Z2463 ShinHan™ Touch Twin™ Sap Green Marker
Z3348 Thin Cuts—Scallop Border
Z2060 Thin 3-D Foam Tape
Z341 Glue Dots® Mini Dots
Z3372 Adhesive Runner
6″ Kraft Tapered Tote Box
Cotton Ball
Tips:
- Use scallop border Thin Cuts to create the shingled-roof look
- Green tree on front is one of the white trees from the Beary Christmas Complements colored with marker
- Front door is a trimmed sticker from Silver & Gold Complements
- Attach black tree with thin 3-D foam tape
- Side shutters are a trimmed sticker from Silver & Gold Complements
7″ Bright House
Materials Needed:
X7226B Silver & Gold Paper Packet
1385 White Daisy Cardstock
X5954 Pewter Cardstock
X7225C Beary Christmas Complements
X7226C Silver & Gold Complements
Z3371 Gold Pearls
Z2463 ShinHan™ Touch Twin™ Sap Green Marker
Z1979 Marvy® Uchida® LePen Journaling Pen
Z2060 Thin 3-D Foam Tape
Z341 Glue Dots® Mini Dots
Z3372 Adhesive Runner
6″ Kraft Tapered Tote Box
Cotton Ball
Tips:
- Front door is a trimmed sticker from Silver & Gold Complements
- Draw a line with journaling pen to create double doors
- Green tree on front is one of the white trees from Beary Christmas Complements colored with marker
- Embellish green tree with red glitter stars from Beary Christmas Complements
- Attach black tree with thin 3-D foam tape
4½” Village Lamp Post
Materials Needed:
Z3366 Silver Foil Paper
1386 Black Cardstock
X7226C Silver & Gold Complements
Z1809 Black Shimmer Trim
Z2060 Thin 3-D Foam Tape
1772 Glue Dots® Ultra-Thin Dots
Z3167 Cricut® Artistry Collection
4″ Black Dowel
Glue Gun
Z3366 Silver Foil Paper
1386 Black Cardstock
X7226C Silver & Gold Complements
Z1809 Black Shimmer Trim
Z2060 Thin 3-D Foam Tape
1772 Glue Dots® Ultra-Thin Dots
Z3167 Cricut® Artistry Collection
4″ Black Dowel
Glue Gun
Cricut® Shapes:
Artistry
½” Shape (cut 4, p. 43)
1″ Shape (cut 2, p. 43)
Artistry
½” Shape
1″ Shape
Tips:
- Attach two 1″ silver foil paper circles to dowel by wrapping dowel with thin 3-D foam tape
- Attach silver foil circles to each other at top with glue dots
- Wrap black shimmer trim to one end of dowel
- Glue together four ½” black cardstock circles to form base
- Attach dowel to base with glue gun
Trees

Materials Needed:
X7223B Falling for You Paper Packet
X7225D Beary Christmas Paper Packet
Z2463 ShinHan™ Touch Twin™ Sap Green Marker
Z3167 Cricut® Artistry Collection
X7223B Falling for You Paper Packet
X7225D Beary Christmas Paper Packet
Z2463 ShinHan™ Touch Twin™ Sap Green Marker
Z3167 Cricut® Artistry Collection
Cricut® Shapes:
Artistry
2¾”, 3½”, and 4″ Icon-2 (cut 2, p. 48)
Artistry
2¾”, 3½”, and 4″ Icon-2
Tips:
- Trim stars and tree trunks off the Cricut® shapes
- Cut slit up the middle of tree shapes and slide them together to stand
- Color edges with marker
There you have it—our secrets to creating a paper winter wonderland! Please ask questions or share any tips of your own in the comments below!


 Make It from Your Heart™, Vol. 3: Pattern 17 (p. 38)
 Make It from Your Heart ™, Vol. 3: Pattern 1 (p. 6)
 Make It from Your Heart™, Vol. 3: Pattern 4 (p. 12)


 Make It from Your Heart™, Vol. 3: Pattern 5 (p. 14)

 Make It from Your Heart™, Vol. 3: Pattern 8 (p. 20)
