Thursday, October 31, 2013

Illuminate Blog Hop...

Welcome to November's SOTM Blog Hop using the stamp set, Illuminate!  It is ADORABLE and can be used for cards (as you will see below) or even layouts...I'm pictures some fun outdoor social pictures...firepits, campouts & anything else you can think of!

Here's a look at the stamp set...I told you it was CUTE!!!

If you've come from Krista's Blog, you're on the right track...keep on hopping 'till you get back around to where you started!  If you're just starting out, you'll hop from blog to blog...there's over 50 this month....'till you get around to ME!

----------------------------
Here are some close-ups...


-----------------------------------
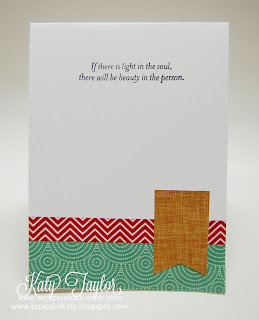
And here's the inside...I decided to go with Washi tape that complimented the colors on the front instead of the exact B&T...I think it's subtle which is what I was going for...plus I wanted an excuse to use WASHI!!!!


Thanks for stopping by!  Keep on hopping with Maureen...she'll be lighting your way (lol)...

Don't forget you have 'till the end of November to get your hands on this stamp set AND don't forget about the Holidays From the Heart Gift Guide...exciting NEW PRODUCTS!!!

Monday, October 21, 2013

Lace It Up with H2H...

This week over at H2H, we are challenging you to use lace...

You can interpret this however you'd like...

I looked up the definition of lace and briefly thought about doing a card "laced" with polka dots using one of CTMH's wonderful Cricut Cartridges but then I decided to do a more traditional form of lace. 

In this card, the Burlap is representing binding which to me is "lacing"...the sentiment is from Banner Wishes...also NEW from the Holiday Guide!
----------------------------------
Here are some close-ups to show the dimension - I pop-dotted the card front and covered the DE Stars with our NEW Washi!!!


--------------------------------------
And here's the inside...super SIMPLE...just use the same washi used for the DE Stars and added some Sparkles!


Hope you find a lot of inspiration from our DT and head over to H2H and play along!

Sunday, October 20, 2013

Holidays From The Heart Blog Hop- Sparkle & Shine Wreath...


Welcome to the Holidays From the Heart Blog Hop featuring the NEW items from CTMH's Holiday Guide.  Once you've checked out my project, you will see a whole BUNCH of lovely project links below...go check each and every one out and leave some love!
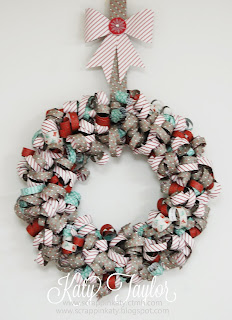
Although the Holiday Guide has non-Christmas products, I keep coming back to the Sparkle & Shine paper packet.  This wreath is a combination of wreaths I've pinned over the past few months.
--------------------------
Here are some closeups...

----------------------------------
I cut the bow from the Artiste Collection using the "fit to page" feature...it measures about 5" and the tails hang down about 4" for a total height of 6"... 
--------------------------
Here you can see the dimension of the bow...
----------------------------------
The center of the bow is a DE Compliment from the Sparkle & Shine Assortment...

Monday, October 14, 2013

Merry and Bright - hopping through the night...

This year, CTMH is issuing a Holiday Guide containing special products for their "Holidays from the Heart" campaign.  While some of these products are Christmas themed, most of them can be used at any time!
Over 50 consultants decided to do a Blog Hop where you will be able to see TONS of artwork by just clicking your mouse and progressing to the next blog. 
If you've come from Karen's Blog, you're on the right track...just keep hopping around 'till you get back around to where you started!
Now...onto the 5-1/2 x 7 card I made using Sparkle & Shine Paper Packet WOTG Kit that includes this SUPER CUTE stamp set...

---------------------------------
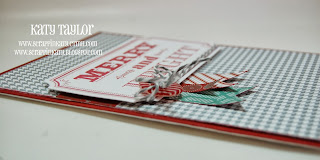
Here are some close-ups...

-------------------------------
And...while I was making the card, there were a lot of decisions to be made so I thought I'd include you guys on my little "creative process".  All it takes is a cell phone that has a camera on it and a little bit of patience.
I couldn't decide which "order" my pennants should be in so I laid them out, snapped a picture then rearranged them, snapped a picture, rearranged them again and snapped another photo...I did this as many times as it took to get the right "look".  After I snapped all the photos I just thumbed trough the photos 'till the right one jumped out at me.  Here are the options below...


----------------------------------
And this is the option that spoke to me...
-------------------------------
The next "option" was all about the embellishments...here's a look


--------------------------------------
Here's a tip at how to lay these embellishments out on your project without the option being permanent 'till you decide it's the embellishment you want to use...

-----------------------------------
Here's the option I finally chose...
-------------------------------
Want to know where you can get that button?  Here's how...cover your Clear Button with Sparkle & Shine Washi...


----------------------------------------
That's all the tips, tricks & hints I have for you EXCEPT one last MAJOR TIP: Get your hands on this Holiday Guide ASAP!!!!  Some of the featured products are while supplies last and we all know what that means with CTMH...it won't last long 'cause everybody loves them some CTMH goodies!!!

If you don't have a regular CTMH Consultant, leave me your contact information and I'll be sure to hook you up!

Now the FUN PART!!!

Keep on hopping to Georgia's Blog and see what she has to share...thanks for stopping by!

You better shape up....

...'cause I need a man...and my heart is set on YOU!

Oh...sorry, I was taken back to when I was 7 and I used to sing this song into my microphone hairbrush while dreaming that John Travolta was about to pick me up in his Thunderbird....lol

Really though, this week over at H2H we are challenging you to make a card using any shape except a square or a rectangle.

I have two cards to share...both made using the CTMH Artbooking Collection!

---------------------------
How FUN do these cards look!?!?!?!

Let me show you some close-ups of both! Starting with the "spooky house"....I'm usually all about hiding that little white core that shows through sometimes after cutting with CTMH cardstock but not this time...I let it shine through on my little 4-layer fence...it adds to the spookiness (I think).  And...on to my 4-layer fence...adhere all your cardstock/B&T pieces together BEFORE you cut...use the multi-cut feature on your Cricut...makes it MUCH EASIER than trying to adhere all those tiny pieces later!

---------------------------------------
See my glitter bat cut from the Black Glitter Paper....LOVE that stuff!!!  I also left the Laughing Lola fence all tattered and torn to add to the "spooky" ambiance.  It was cut so small that all the intricate details were hard for my Cricut to cut...

-----------------------------
How is this a card, you ask....well, just take a look!  I just cut off the top of the "spooky house" to make a pull-out.

--------------------------------
Here's the back-side to the pull-out...

----------------------------
Here's a close-up of the "pocket" it fits down into...I made the pocket by cutting 2 of the same image (the spooky house) then I adhered some Surf's Up B&T behind the windows (if you were doing this in CCR, you could hide contour all the windows and then cut 2 of the Surf's Up B&T "spooky houses" then stack all 4 layers on top of each other...remember to leave a pocket when adhering together!

--------------------------------
here's the back side to my house...looks exactly the same as the front except the fence...

-----------------------------------
Now on to my pumpkin!  You can get this AWESOME retired paper packet on my website in the "while supplies last" section for only $2.50!!!  But you better hurry before they're all gone!  Too late!!!

 -------------------------------
Here's a close-up...same concept here...I cut 2 pumpkins...one has the "face" and the back side is just a plain 'ol pumpkin.
------------------------------
For the insert, I just sized my plain 'ol pumpkin that I used for the back a little smaller that way it would slip in and out easily
----------------------------
I cut the same image and size out of White Daisy Cardstock so I could write my sweet little note on this side...
----------------------------
We would LOVE to see what your cards "shape" up to be this month...you have 'till the end of the month to link up your cards!

I'm already working on an ornament pull-out card and a snowman so check back to see how it's done!

Saturday, October 5, 2013

World Card Making Day #4...

This by far is my favorite one today...

To celebrate Breast Cancer Awareness Month, I made this card using the CTMH Cricut Artbooking Collection and the NEW Party Washi Tape (polka dot) as well as the NEW Sparkle & Shine Silver Washi Tape (both available October 15th).

---------------------------
I cut the image sized at 2-1/4 on a 4" x 5-1/4" White Daisy card front.  I pop-dotted the piece on a standard size card base for dimension...

-----------------------------------
Here's a close-up of the top left corner and the left side which I added Sparkle & Shine Silver Washi tape to...I used the Washi cut in dove tails wrapped around and adhered to the back of the card and I cut a piece of Black Shimmer Trim to a length that would wrap around and cut it down to 1/4" instead of 3/8"...it was super EASY to do with my trimmer. 
  • Cut Black Glimmer Trim to desired length
  • Since it's self-adhesive, peel back about 1/4" from each end
  • Adhere to your trimmer right over the blade track - this is where you will want to make sure that one edge is at the desired width you're wanting to cut it down to.
  • Close your trimmer track guard
  • And cut...
  • Don't forget to save the other piece too for something else...like the inside!
----------------------------------------
Here's a side view where you can see a peek at the inside of the card using more washi and the thin 1/8" strip I cut from the Glitter Trim.
---------------------------
Here's another view of the inside...I left the card blank so you can write whatever you want.
----------------------------------
Here's a look at the key I used...