Showing posts with label So Much Happy. Show all posts

Sunday, January 17, 2021

Mini-Paper Pad Class | Week #3 | Rich in Laughter...

We are in Week #3 of the She's Crafty Mini-Paper Pad Class and I have a fun layout of my husband and our middle son to share with you.

Here's a look at the kit...which when I created the kit several weeks ago, I had TOTALLY DIFFERENT photos in mind...lol

--------------------------------------------
And...here's a look at the layout - a sequence of events where I was trying to get a photo of the two of them but our son had a totally different idea (only to be blocked by my husband's quick hands)...
------------------------------------------------------
Here are some closeups of the embellishments (which by the way, this layout might have to MOST EMBELLISHMENTS I've ever used on one layout). You can also see the 'splatter' at the bottom left and top right - that's from a Sapphire Shimmer Brush (you can see all the shimmer in my IG photos)...
-----------------------------------------------------
Don't the little sentiments and embellishments fit this layout PERFECTLY! If you recognize that striped patterned paper and those yellow sentiment strips, they're from one of my ALL-TIME FAVORITE collections from CTMH - So Much Happy. The background pink patterned paper is from Sweet Girl.


Don't forget to check out my YouTube process video where I walk you through the method to my madness...

Monday, April 1, 2019

Love so Sweet SOTM Blog Hop...

ONE of the only "Mondays" I look forward to is one that is met with a NEW SOTM from CTMH! And...if you're a CTMH Consultant, THIS MONDAY also greeted you with an opportunity to order the NEW product that will be available May 1st (you can ask me how to get the hook-up in the comments 😁)

We have 19 Consultants joining us this month to showcase Love So Sweet SOTM so you will get a LOT of inspiration in a short hop!


If you've come from Darlys's Blog, you're on the right track...keep hopping around until you get back to where you started. If you're starting here, WELCOME!

Here is my card...very simple using the colors from So Much Happy....


------------------------------------------------
Colors are Sapphire, Sorbet, Sage & Peach...I added some of the I Heart Us Sequins to add some bling...

------------------------------------------------
I finished off the inside with the rest of the sentiment on the front of the card and one of the butterflies inked up in Peach...


Thanks for stopping by!

Don't forget to head on over to Krista's Blog and check out her project!


Friday, March 15, 2019

Emboss It! - CTMH Technique Blog Hop...

Welcome to this month's TECHNIQUE BLOG HOP featuring EMBOSSING!

We only have 8 CTMH Consultants participating this month so hopping around and seeing everything we have to share won't take long.

If you've come from Maz's Blog, you're on the right track...keep hopping until you get back to where you started! If you're starting here, WELCOME! 

Let's look at the card I have to share using our Simple Chevron Embossing Folder ***ON SALE RIGHT NOW*** and the So Much Happy line from CTMH...

--------------------------------------------
Here's a closeup of the chevron embossed pattern...I just ran my Mint Ink pad over the embossed lines and voila...a pretty, subtle pattern...

----------------------------------------------------
And...our embossing folders are rather big (5x7) so if you're making a standard-size card, like this one, you have some leftovers - PERFECT for the inside of the card!


Thanks for stopping by! Head on over to Lauren's Blog and see what she has to share!


Wednesday, March 13, 2019

CTMH Cards with Cricut Design Space...

SHARED FROM THE CTMH BLOG...

Back to the Basics with Cricut Design Space™—Card Edition!

Often the tools we show you in Design Space are illustrated with a scrapbook page or layout, but not today! In this next back to the basics post, we want to remind you that these tools can be used for many, many projects, including custom cards and envelopes. As we continue our review of basic tools in Design Space, you’ll see that it’s easy to create cards and envelopes that are both beautiful, unique, and most importantly, easy!
Design Space™ Basics #ctmh #closetomyheart #ctmhcricut #designspace #cardmaking #cards #diy #ctmhsomuchhappy
On the cards above, all of the shapes we used, including the sentiments, flowers, and even the envelopes, come from the Flower Market Cricut® collection. Flower Market has both flat and 3-D shapes, and you can see we’ve used both types on these cards. This makes it a truly versatile collection, useful for an entire year’s worth of seasons, celebrations, and creativity!
The steps below show you how to work in Design Space from a desktop or laptop computer. If you use the app on a mobile device, the buttons and tools will be located in slightly different places on your screen, but the same features are available on any device.
Basic Shapes
Design Space has a “basic shapes” feature in the Design Panel. The shapes in this section are available to you for free, and it’s an easy way to add simple shapes like circles, rectangles, hearts, or diamonds and also use them as a base for other projects. For example, you could insert a square and then size it for a variety of things, and this is exactly what we did to create our cards.
Basic Shapes Screenshot
To create a card front in Design Space, insert a square shape from the Shapes section. Adjust the size to 4.25″ x 5.5″. If you wanted to cut an entire card base, insert a square shape and size it to 8.5″ x 5.5″. In the next section, we’ll tell you how to add a score line to the card base.
Cut Lines and Score Lines
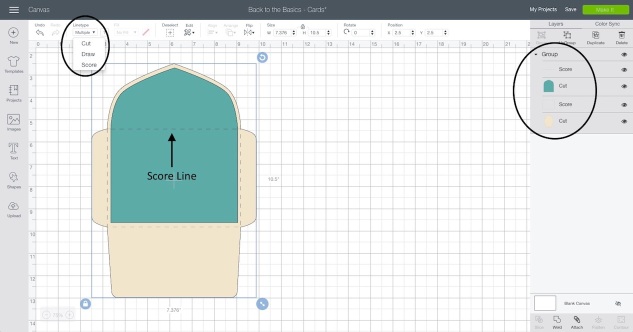
When you insert a shape on your canvas, the line of that shape is typically a solid cut line, but you’ll notice when you add an image, like the envelope from the Flower Market collection (#MD38C82) ←MAKE SURE YOU INCLUDE THE "#" WHEN TYPING THE TAG INTO THE SEARCH BAR IN DESIGN SPACE, there is a dash line as well.
Score Screenshot
This is a score line. Your Cricut® machine will both cut and score the envelope for you. You just need a scoring tool or scoring wheel, depending on the type of machine you have. You can change lines to cut, score, or even draw. If you aren’t sure what type of lines you have on your shape. You can always look in the Layers panel. It will tell you which ones will score or cut, and you can change the line type in the Edit bar.
Card Base Screenshot
To complete your card base, insert a score line. Score lines can also be added from the same Shapessection of the Design panel. Resize the score line to 5.5″, move it over your card base, and select both images. Then under Align in the Edit bar, select Center. Once the score line is centered, keeping both the line and the card base selected, click Attach in the Layers panel. Using Attachkeeps your score line exactly where you want it, even if you move the shape on the canvas.
Using the Slice Tool
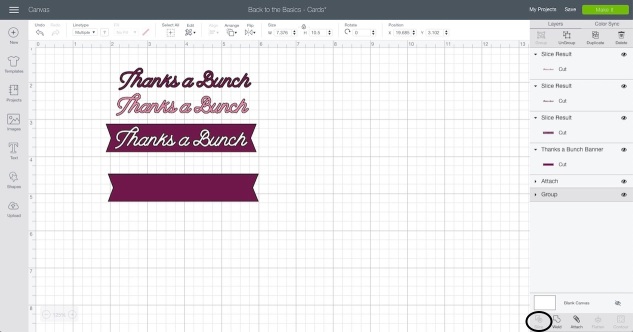
We used the Slice tool to create the sentiments for our cards. The Slice tool is one of the functions at the bottom of the Layers Panel, next to others like Weld and Contour. With Slice, you can cut an image or text out of another shape. Simply place your word or image over the one you want to cut it from. Select both shapes, and click Slice in the Layers Panel.
Slice Screenshot
Initially, it might not look like anything happened, but if you click on your images, you’ll have two of whatever you cut. One is the shape itself, and the other is the shape you cut from the background.
Image 2
There are a few important things to keep in mind. First, you can see in the “Thanks a Bunch” banner on this card, we sliced the sentiment from Lagoon paper and attached that to a solid White Daisy banner. For something like this, before you slice in Design Space, make sure you ungroup the image. Images that have multiple layers can’t be sliced. If your sentiment image has multiple pieces grouped together as one shape, like this one does, you’ll need to ungroup them and slice using just one image.
Another thing to remember is to duplicate the solid shape that goes behind whatever you’re slicing, if applicable. If you are slicing into the card base, you wouldn’t need a duplicate piece, but if you’re slicing into another shape, like the banner on this card, you’ll want to have a solid shape to layer behind it.
The last important tip we have for you is that you want to make sure when cutting your project that you keep small pieces that go inside letters or other shapes. With this card, that means you want to set aside the inside of each “a” and the “B” to attach to the banner.
Image 3
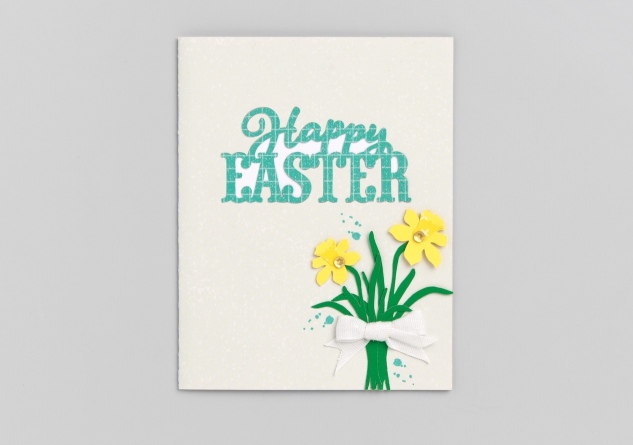
If you look closely, you’ll notice a similar thing happening on the Happy Easter card, but it’s also a little bit different. We sliced the sentiment from the card base, but instead of saving the inside pieces, we cut the sentiment separately and layered a solid piece of White Daisy cardstock on the back, behind the sliced shape.
 Put It Together (Basic Shapes, Score, and Slice)
Image 4
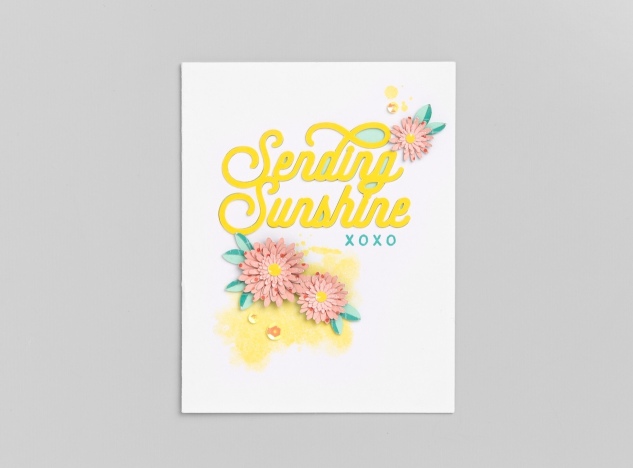
All of the cards in our post today use the tools we’ve talked about including a basic rectangle shape, inserting a score line, and slicing a sentiment. Follow the steps below to put it all together and make the Sending Sunshine card!
  1. First, search for the sentiment, #MD38CC3 (include the "#" when searching), and insert it on your canvas.
  2. Ungroup the sentiment, and delete only the “Sunshine” image. Then resize the sentiment to a height of 1.75″, leaving the width locked.
  3. For the card base, insert a square shape from the Shapes. Adjust the size to 8.5″ x 5.5″. Don’t insert a score line yet. You have to use the slice tool first, before attaching a score line.
  4. Slice the sentiment from right side of the card base. This is your card front. Place the sentiment where you want it, select both images, and click Slice in the Layers panel.
  5. Keep both extra sentiments. You’ll cut them from Lemon cardstock and layer the two in another step.
  6. Now insert a score line, also from the Shapes section of the Design Panel. Size it to 5.5″. Place it over the card base, and select both images. Then, under Align in the Edit bar, select Center, and then select Attach in the Layers panel.
  7. Insert other flowers and leaves on the canvas as desired. For our card, we used the Daisy image (#MFADCF2) cut in three different sizes, and we paired it with the Rhododendron leaf (#MD37FB).
  8. Color your project pieces to make it easy to cut on the right color of paper or cardstock. Then select Make It in the top right corner and cut your project pieces.
  9. Attach one 4″ x 5¼” piece of Mint cardstock behind the sliced portion of your card (on the inside of the card). Then layer the two Lemon sentiments and attach inside the sliced section.
  10. Embellish with stamped images, 3-D flowers, sequins, and more!
**Bonus Tip!
Are you unsure how to add a Close To My Heart digital collection to your Cricut® account? Simply visit www.cricut.com/CTMH and sign in to your account (or create one if you haven’t already). In the list of options in the menu on the left, you’ll see the last one is Redeem Promotion. Select that option. Then enter the code, click Redeem, and you’ll be on your way. Not sure if you’ve already linked your physical cartridges? In that same menu, you can select Linked Cartridges. This will show you the ones you’ve already linked to your account.
Next month, we’ll look at ways to manipulate text in the Edit bar on the canvas with the shapes and unique font from the You Are Here collection. Check back in April for more Design Space fun!

Monday, March 4, 2019

All about the GREEN, RAINBOWS & GOLD with H2H...

HAPPY 1st WEEK IN MARCH...a VERY COLD ONE for my neck of the woods...I feel sorry for those poor ladies trying to get beads tomorrow...lol.

Anywho...it's a NEW challenge over on the H2H Challenge Blog and I really {{{loved}}} this one. I even did a process video but accidently DELTED IT   😡😭  I'm devasted!

Here's a look at my layout featuring a WHOLE bunch of CTMH products...including Something Fierce, So Much Happy and I Heart Us...


-----------------------------------
I tore most of the B&T edges that stuck out past the stitching so the wonderful backside would show...
-----------------------------------------
I added the I Heart Us Sequins over the corresponding colored stripes for added BLING...


Don't forget to head on over to the H2H Blog and see what the other Design Team Members came up with and see how we're teaming up with Double Trouble this week!

Friday, March 1, 2019

This Happened - Blog Hop...

HAPPY MARCH, ladies & gents!!! I cannot believe we're already in the 3rd month of 2019 and SPRING IS ALMOST HERE!!!

Welcome to this month's SOTM Blog Hop featuring THIS HAPPENED, a wonderful stamp set full of sentiments perfect for everyday life!


We only have 21 CTMH Consultants participating this month so it should be a fast hop FULL of inspiration!

If you've come from my very talented friend, Carrie, you're on the right track....keep on hopping around 'till you get back to where you started. If you're starting here, WELCOME!

I wanted to make a layout featuring my kids' school pictures from last year...and this stamp set AND the So Much Happy line really made these photos pop...

--------------------------------------------
So...there's a lot going on so let me point out the SOTM images, in case you can't see them right away. The REMEMBER journlaing box is one (as well as the 2017 stamped in Peach ink inside the date box). And the diagonal striped pennant peeking behind the REMEMBER journaling box is a portion of one of the images....
------------------------------------
The LOVE THIS is another image...I used one of our water color pencils to color in the sentiment and used my Clear & Mint SHIMMER BRUSHES to add some shimmer to the stars and those CUTE classes from the So Much Happy Complements...
------------------------------------------------
And, finally...I used the little strip of polka dots (meant to look like washi tape, I think) to stamp by my torn elements (top left of the layout and this bottom right)....


Thanks for stopping by! Don't forget to head on over to Brandi's Blog and see what CUTE thing she's created to share with us!


If you're LOVING the SO MUCH HAPPY paper, you can get ALL OF OUR PAPER BOGO 50% OFF this month!!!

Hurry and check it out and don't forget to JOIN my party for a chance to share the HOSTESS FREEBIES!!!

Friday, February 15, 2019

Lovely Layers - CTMH Technique Blog Hop...

Welcome to the LOVELY LAYERS - CTMH TECHNIQUE BLOG HOP! We are happy to have you hopping with us so sit back and be inspired by our Lovely Layers!


There are 15 CTMH Consultants joining us this month and you should have arrived here from Danielle's Blog...just keep on hopping 'till you get back to where you started! If you are starting here, WELCOME!

I have a layout to share with you, using the SO MUCH HAPPY line...I love that's it's BRIGHT and CHEERFUL! This layout has a BUNCH of layers using the So Much Happy PML Cards as well as some of the elements that now come in the Cut-Aparts in every Paper Packet - see that little turn-down in the top right corner...that's a CUT-APART!!! I used to go to great measures to do this and on this layout, all I had to do was cut it apart and adhere to the page...
I also used the So Much Happy Puffy Stickers and Silver Glitter Gems to layer on the embellishments...


Thanks for stopping by! Make sure you hop on over to Terry's Blog and see what LOVELY LAYERS she has to share!

Have a GREAT WEEKEND! Here's a look at some of the products used...stop by my website to pick these up as well as any of our other FABULOUS products!