Friday, March 23, 2018

DIE-NAMITE Interactive Cards with Thin Cuts...

Taken From CTMH's Blog...

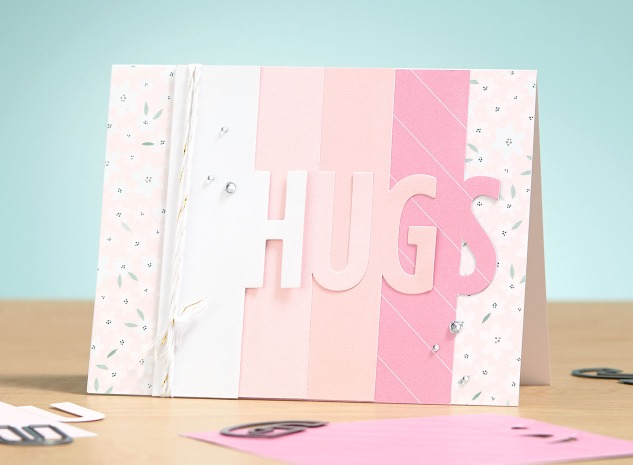
Creating Interactive Cards with Thin Cuts!

Let’s get crafty and use those Thin Cuts we’ve been talking about all month long on some fun interactive cards!
Today we are going to walk through making this astronaut in orbit card, since it is the harder of the two to make. Once you’ve got that one down, making others like it will be a breeze!
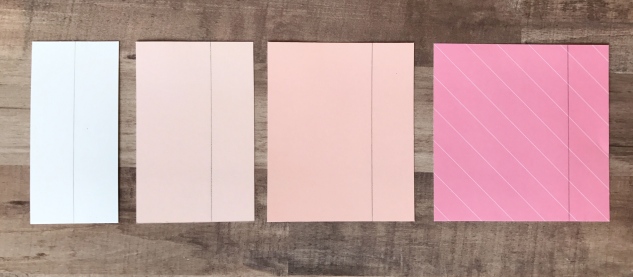
Prepare and Cut.
To replicate our card exactly, you will need the following pieces:
  • 1 standard card base
  • 4″ x 5¼” Pacifica planets paper (Stargazer paper packet)
  • 4″ x ¼” Poppy striped paper (Stargazer paper packet)
  • Trimmed zip strips to use as accents (Stargazer paper packet)
  • Astronaut die cut from White Daisy cardstock, stamped with Archival Black ink, painted in watercolor (Stargazer Thin Cuts)
  • Aliens/monsters die cut from White Daisy cardstock, stamped with Willow ink, pupils colored over with black marker (Monstrous Halloween Thin Cuts)
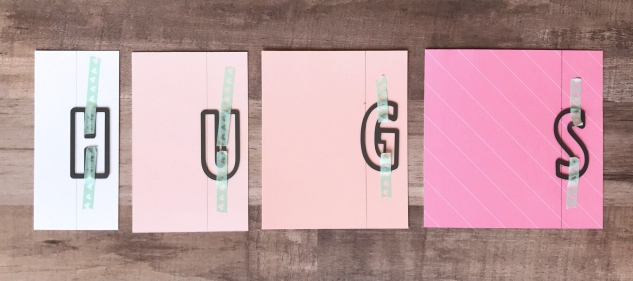
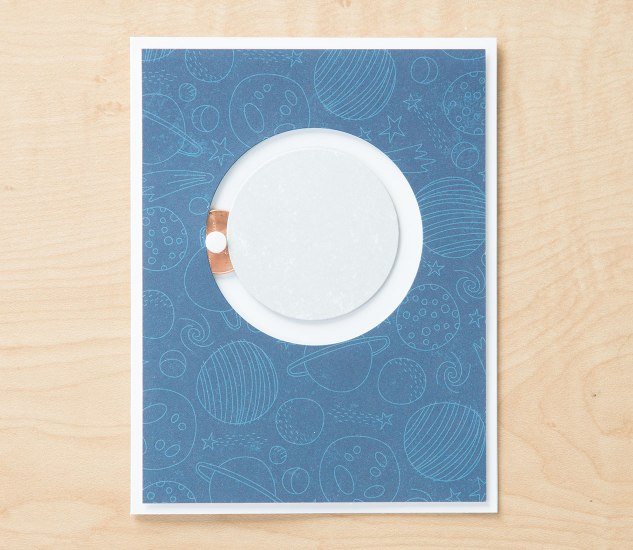
Step 1. Cutting the circle.Making Interactive Cards #ctmh #closetomyheart #astroboy #astronaut #boy #space #stargazer #star #moon #aliens #diy #cards #interactive #moving #parts #birthday #mission #control
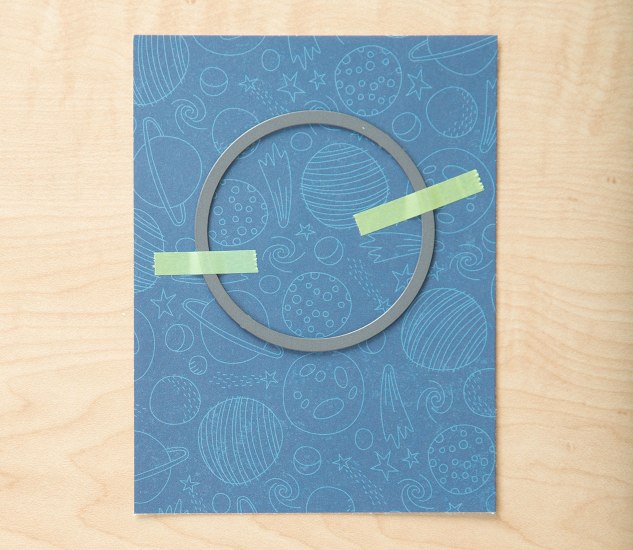
Place the 2½” circle die (the largest one in the set) ¾” from the top of the planets paper and centered, left to right. Attach it with washi tape to keep it in place as you run it through your die-cutting machine.
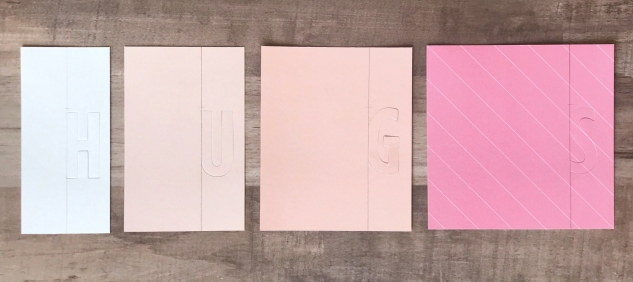
Step 2. Cutting the moon.
Once you’ve cut your first circle, use the inside circle to make the moon.
Making Interactive Cards #ctmh #closetomyheart #astroboy #astronaut #boy #space #stargazer #star #moon #aliens #diy #cards #interactive #moving #parts #birthday #mission #control
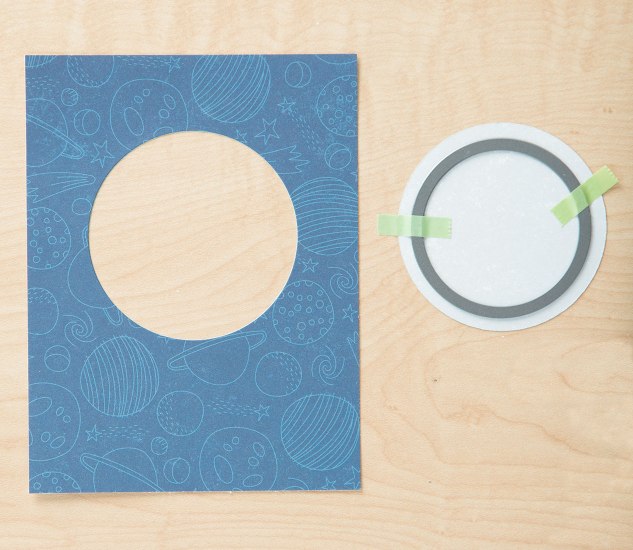
Flip the 2½” circle you just cut out over, to the side of the paper that looks like the surface of the moon. Attach the 2″ circle die to it with washi tape and run it through your die-cutting machine.
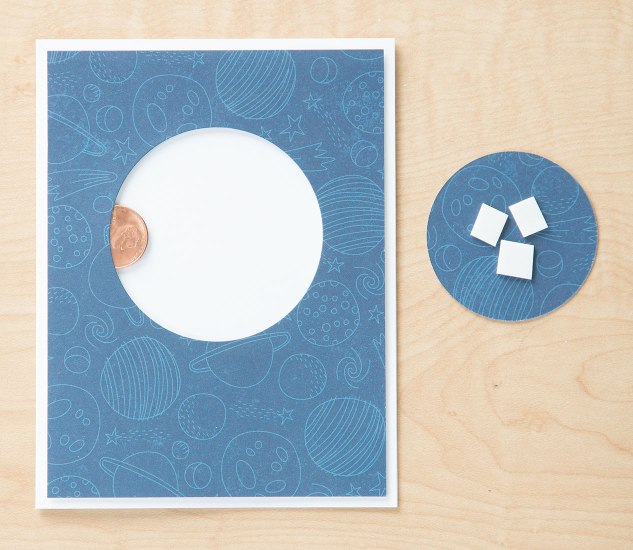
Step 3. Attaching the planets paper.
Making Interactive Cards #ctmh #closetomyheart #astroboy #astronaut #boy #space #stargazer #star #moon #aliens #diy #cards #interactive #moving #parts #birthday #mission #control
On the backside of your paper, add thin 3-D foam tape as shown here. You will need a small piece of foam tape near the circle to allow the movement later but make sure it isn’t too close to the circle or it will not work! Attach this piece to your card front.

Step 4. Adding the penny.

Making Interactive Cards #ctmh #closetomyheart #astroboy #astronaut #boy #space #stargazer #star #moon #aliens #diy #cards #interactive #moving #parts #birthday #mission #control
This step is pretty simple but also requires accuracy. With your card resting on a flat surface, gently tuck your penny (or flat button) behind the planets paper about half way. Be careful to not bump your card, the penny is not attached to anything at this point.
Step 5. Prepping the moon.
With your penny in place, it’s time to prepare the moon for attaching.
Making Interactive Cards #ctmh #closetomyheart #astroboy #astronaut #boy #space #stargazer #star #moon #aliens #diy #cards #interactive #moving #parts #birthday #mission #control
Flip your moon over to the planets side of the paper and add thin 3-D foam tape to the center onlyand attach it to the card. Don’t move the penny.
Step 6. Attaching the astronaut.
Remember our floating penny? Carefully attach a small foam dot to the center of it, between the two papers. Remove the adhesive from the top and attach the astronaut you’ve previously prepared.
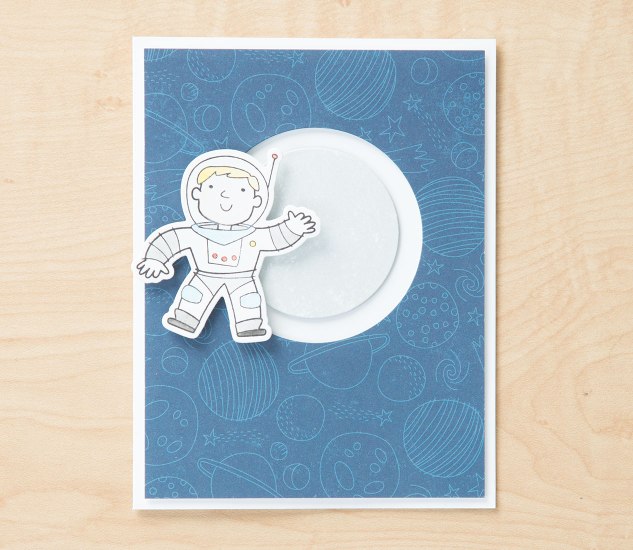
Making Interactive Cards #ctmh #closetomyheart #astroboy #astronaut #boy #space #stargazer #star #moon #aliens #diy #cards #interactive #moving #parts #birthday #mission #controlMaking Interactive Cards #ctmh #closetomyheart #astroboy #astronaut #boy #space #stargazer #star #moon #aliens #diy #cards #interactive #moving #parts #birthday #mission #control
Step 7. Embellish!
Add your sentiment, aliens, and all other embellishments to your card to finish it off!
Making Interactive Cards #ctmh #closetomyheart #astroboy #astronaut #boy #space #stargazer #star #moon #aliens #diy #cards #interactive #moving #parts #birthday #mission #control
I can't wait to get home and create my OWN Interactive cards using this FABULOUS technique!!!!

Monday, March 19, 2018

Beautiful Story with Rainbows & H2H...

What a WEEKEND (and Spring Break for us)...sometimes I feel like all we do is go, go, go!!!

Any-who...I've been looking forward to today so I can play along with this week's H2H Challenge which is all about RAINBOWS!

This layout is of a 7-yr old photo I've been wanting to do something with...it's of me, one of my best friends Angela and her Mother who was my minister in High School...she even co-officiated our wedding! 

Here's a look...

----------------------------------
This layout is FULL of color and patterns...I think I used every paper packet (except Fundamentals and the NEW upcoming "secret" paper packet that will come out SOON)...I also grabbed some stamps sets...current and retired!
----------------------------------------------------
I loved digging out my retired Little Dreamer stamp set for the sentiments at the top of my photo! They're perfect for multiple reasons...2 of which are - I believe in Heaven we get to do the impossible and I believe that all these things exist AND we need to LIVE before we die...run the race, buy the shoes, tell him you love him, take the chances before our time is up! You also get a sneak peek of my hidden journalling...I hide most of my journalling, some is blatant like this and others not so much. I like to be REALLY PERSONAL with my journalling so I hide it...
----------------------------------------------
You can't tell now but this top left corner of my photo had a LONG Peacock Ink Line from my block...one of the reasons I LOVE EMBELLISHMENTS is they hide all the imperfections...lol

-------------------------------------------------
I even used one of our Thin Cuts that is a part of the DIE-NAMITE sale going on 'till the end of March...how CUTE is that banner!!!! It was perfect spot for my date (the date stamp only went back to 2012 and then had a 20__ which I had to write in "11"....lol LOOK at those tiny stars...that is from the Little Dreamer - Scrapbooking Stamp Set...LOVE them AND it's a part of the Thin Cuts DIE-NAMITE sale right now!!!

Thanks for stopping by my little corner of the world...I hope your week is full of SUNSHINE & RAINBOWS!!!


Please come play along with this week's challenge...you can make any "rainbow" themed project as long as you use some CTMH Products. If you don't have any, please feel free to shop by website for some GOODIES and maybe you'll be able to play with us next time. Head on over to the H2H Challenge Blog and see what the other DT Members are sharing this week!

Saturday, March 17, 2018

Hello Spring and FREE download...

taken from CTMH's blog...

Hello Spring!

hello spring #ctmh #closetomyheart #hello #spring #pennant #banner #wreath #thin #cuts #diecuts #thincuts #dies #alpha #block #letters #alphabet #home #decor #decoration #decorating #diy #easter #hesirisen #myredeemerlives
Even though we knew it was coming, as it does every year, spring is sneaking up on us fast! Technically it won’t be spring for another couple weeks, so there’s still time to pull out and sort through all of those brightly colored decorations. (Phew!)
And because spring is all about new beginnings, we have a few fun things in store for you to add to your stash! Just keep reading! ðŸ˜‰
hello spring #ctmh #closetomyheart #hello #spring #pennant #banner #wreath #thin #cuts #diecuts #thincuts #dies #alpha #block #letters #alphabet #home #decor #decoration #decorating #diy #easter #hesirisen #myredeemerlives
First, we want to show you how to dress up a wreath you may already have with a fun pennant banner made using our Block Alphabet Thin Cuts dies (which are 25% off through the end of the month as part of our Die-namite! sale).
hello spring #ctmh #closetomyheart #hello #spring #pennant #banner #wreath #thin #cuts #diecuts #thincuts #dies #alpha #block #letters #alphabet #home #decor #decoration #decorating #diy #easter #hesirisen #myredeemerlives
If you look closely, you’ll see that we layered each of our letters with silver foil. Using our Thin Cuts, we cut our sentiment out twice, once out of White Daisy cardstock and then again out of silver foil paper. The silver foil letters were cut in half and then attached to the White Daisy using an adhesive runner. Then, we attached the letters with thin 3-D foam tape onto individual pennants that would later form our banner. To make the pennants, we simply cut 1½” x 3¾” rectangles and dovetailed one of the ends.
Attach the pennants to white twine using a hot glue gun to spell out your words—one word per strand of twine. Make sure to leave enough twine on the ends to tie the banners to the wreath.
You can make a banner like this one for pretty much any occasion just by changing the sentiment. From welcoming a new season, to holidays, or birthdays—the Block Alphabet Thin Cuts give you the tools for spelling out whatever it is you want to celebrate in style!
And since we are talking seasonal décor, we have a special treat for those of you who’ve made it this far: two FREE printables for the upcoming Easter season.

Download your 8″ x 10″ printable here:
As we celebrate this season of new beginnings, we thank you for reading and sharing this blog. Our hope is that the inspirational artwork ideas and tips we present here help crafters of all types to discover their creativity and to exercise their creative muscles in new, exciting ways. Happy Easter!

Thursday, March 15, 2018

COOL Block Alphabet Thin Cuts Technique...

TAKEN FROM CTMH'S BLOG...

Block Alphabet Thin Cuts Technique

Block Alphabet Thin Cuts Technique #ctmh #closetomyheart #block #alpha #alphabet #abc #thincuts #thin #cuts #die #diecuts #letters #card #diy #sentiment #hug #gimmesomesugar #give #me #some #sugar #pink #pastel #floral #girly #girl #sparkles #cricut #cuttlebug #fussycutting #technique #bashful #whimsy #fundamental #cardstock #washi #tape
Our Die-namite! sale is in full swing, so why not share yet another way to use our Thin Cuts!
For those of you stumbling across our blog for the first time, Thin Cuts are our special line of metal dies that you can use to cut paper shapes by running them through a die-cutting machine, like the Cricut Cuttlebug™. They come in a variety of shapes and sizes, and some even coordinate with specific stamp sets. You can create exact shapes, over and over again, without using scissors! And the only thing better than that is that they are on sale through the end of the month at 25% off individual sets and 30% off select bundles! (For a complete list of our Thin Cuts, click here.)
Now let’s talk about that super cute card sending everyone out there HUGS. We made the card above using our Block Alphabet Thin Cuts and a partial die-cutting technique. The step-by-step instructions below will guide you through the process of re-creating this card, or one like it with a sentiment of your choice!

Prepare and Cut.
To replicate our card exactly, you will need the following pieces:
  • 1 standard card base
  • 2″ x 4¼” White Daisy cardstock
  • 2¾” x 4¼” light Bashful cardstock (our cardstock is 2-toned and we used the light side for this piece)
  • 3½” x 4¼” Bashful cardstock
  • 4¼” x 4¼” white flowers on Pixie paper from Gimme Some Sugar paper packet

Step 1. Planning your letter placement.
Block Alphabet Thin Cuts Technique #ctmh #closetomyheart #block #alpha #alphabet #abc #thincuts #thin #cuts #die #diecuts #letters #card #diy #sentiment #hug #gimmesomesugar #give #me #some #sugar #pink #pastel #floral #girly #girl #sparkles #cricut #cuttlebug #fussycutting #technique #bashful #whimsy #fundamental #cardstock #washi #tape
With a pencil, lightly draw a line 1″ from the right edge on all four cardstock pieces.

Step 2. Attaching the alphabet Thin Cuts.
Block Alphabet Thin Cuts Technique #ctmh #closetomyheart #block #alpha #alphabet #abc #thincuts #thin #cuts #die #diecuts #letters #card #diy #sentiment #hug #gimmesomesugar #give #me #some #sugar #pink #pastel #floral #girly #girl #sparkles #cricut #cuttlebug #fussycutting #technique #bashful #whimsy #fundamental #cardstock #washi #tape
Again, with a pencil, lightly mark 1 3/8″ from the top of the cardstock. Align the top of the alphabet Thin Cuts with this mark and the left edge slightly over the line you drew in step 1. You should be able to see the pencil line on the inner edge of the die. Once your dies are aligned, secure them with washi tape.
Tip: make sure your letters are in the correct order. The first letter should be on the shortest paper and the last letter on the longest.

Step 3. Partially cutting the letters.
Block Alphabet Thin Cuts Technique #ctmh #closetomyheart #block #alpha #alphabet #abc #thincuts #thin #cuts #die #diecuts #letters #card #diy #sentiment #hug #gimmesomesugar #give #me #some #sugar #pink #pastel #floral #girly #girl #sparkles #cricut #cuttlebug #fussycutting #technique #bashful #whimsy #fundamental #cardstock #washi #tape
As our preferred die-cutting machine, we used a Cricut Cuttlebug™ for this step. If your machine is something different, adjust as needed.
Layer a platform and a C-size plate and align the edges. Place the White Daisy cardstock on top of this combination so that the line you have drawn is about 1/8″ below the bottom of the plate. This will put the right half of the cardstock on the plate and leave the left half of the cardstock hanging off the plate. Adhere the piece in place with washi tape so it will not move when it’s run through the die-cutting machine. Anything below the plate will not cut through.
Layer a B-size plate on top and run the paper through your die-cutting machine. You should end up with a partially cut letter, still attached on the left.
Repeat this step with all of your letters.

Step 4. Trim off the excess.
Block Alphabet Thin Cuts Technique #ctmh #closetomyheart #block #alpha #alphabet #abc #thincuts #thin #cuts #die #diecuts #letters #card #diy #sentiment #hug #gimmesomesugar #give #me #some #sugar #pink #pastel #floral #girly #girl #sparkles #cricut #cuttlebug #fussycutting #technique #bashful #whimsy #fundamental #cardstock #washi #tape
To get a clean, straight edge, trim along the pencil line with a paper trimmer. DO NOT CUT ALL THE WAY THROUGH! Leave the part of the letters that are supposed to be attached uncut.
Tip: for the center line of the S, trim with scissors.

Step 5. Assemble your card!
Block Alphabet Thin Cuts Technique #ctmh #closetomyheart #block #alpha #alphabet #abc #thincuts #thin #cuts #die #diecuts #letters #card #diy #sentiment #hug #gimmesomesugar #give #me #some #sugar #pink #pastel #floral #girly #girl #sparkles #cricut #cuttlebug #fussycutting #technique #bashful #whimsy #fundamental #cardstock #washi #tape
Erase any remaining pencil lines and build your card. Attach your letters to the white flower Pixie paper starting one inch from the left with the S on the bottom, followed by the G, then U, and then the H.
Tip: embellish with twine before attaching this front to the card base.
That’s all, folks! Use this technique to make a standard-sized card with any custom sentiment, anything between 4 to 6 letters long, using our Block Alphabet Thin Cuts!

Thanks for stopping by...REMEMBER to take advantage of these GREAT DEALS on our Thin Cuts, you'll have to get them before March 31st!!! Join my DIE-NAMITE MARCH party for a chance to WIN FREE GOODIES!!!

Wednesday, March 7, 2018

Stacking Die-Cuts...


taken from ctmh's blog...

Stacking Die-cuts In Your Favor


Thin Cuts come in a variety of shapes and sizes. Starsheartscirclesflowersovalsbannerstagsnumbersletters—just to name a few ðŸ˜‰ . Our goal this month is to remind you just how handy these tools can be in creating beautiful artwork that is versatile and, dare we say it—Die-namite!
Stacking Die-cuts #ctmh #closetomyheart #dies #diecuts #thincuts #thin #stars #basic #shapes #primary #colors #red #yellow #blue #sapphire #canary #lemon #stargazer #gazer #SE1 #pacifica #pewter #poppy #scrapping #scrapbooking #memory #keeping #technique #3D #dimension
All of our basic shapes Thin Cuts come in a set of four dies ranging in size, from 1″ to 2½”. In the page above we used our Basic Stars Thin Cuts to create something that literally pops off the page.
Stacking Die-cuts #ctmh #closetomyheart #dies #diecuts #thincuts #thin #stars #basic #shapes #primary #colors #red #yellow #blue #sapphire #canary #lemon #stargazer #gazer #SE1 #pacifica #pewter #poppy #scrapping #scrapbooking #memory #keeping #technique #3D #dimension
First we attached the largest stars to the page. You can use glue dotsthin 3-D foam tape, or both—which is what we did. Add the adhesive only to the center of the shape to keep it from going completely flat.
Stacking Die-cuts #ctmh #closetomyheart #dies #diecuts #thincuts #thin #stars #basic #shapes #primary #colors #red #yellow #blue #sapphire #canary #lemon #stargazer #gazer #SE1 #pacifica #pewter #poppy #scrapping #scrapbooking #memory #keeping #technique #3D #dimension
The smaller stars were stacked on top and then attached with a mini staple—not only functioning as an adhesive but as an added design element. You’ll notice that we only used three out of the four star sizes per stack. We found that doing more than three looked too bulky and didn’t visually work with our page. (If you remember from one of our previous posts, details in odd numbers look better than even!) Lastly, using nothing more than a finger, we lifted the corners up starting with the top layer.
Replicate this user-friendly technique with any of our basic shape Thin Cuts. If you want to achieve a similar effect with a Thin Cut that doesn’t come in a variety of sizes, follow the same steps and stack the same sized shapes on top of each other.
And don’t forget, our Thin Cuts are on sale this month! Save 25% on individual sets and 30% on select bundles! Click here to shop!