Tuesday, September 26, 2017

Check out this FALL-bulous card...

Less than a week left in September which means that you have less than a week to get your hands on this FALL-BULOUS Stamp Set...Feel So Blessed!!!

Some images are colored with ShinHan Markers (feather, tiny heart, swag leaves & "THANK")...and the others are stamped with our Exclusive Inks...


--------------------------------------------
Here's a quick card I made using this versatile stamp set and CTMH's Falling For You line. I also added some twine from the Enchantment Ribbon Pack to break the two B&T patterns up...
--------------------------------------
I hate that you can't see the glittery finish on the feather...I used our Clear Shimmer Brush to add some shine...

Don't forget...this stamp set is only available 'till the end of September and can be yours for ONLY $5 with a qualifying order!

Message me for more details or start shopping {{{here}}}

Friday, September 22, 2017

Blog Hops with Heart - Halloween...

Welcome to this month's Blog Hops with Heart featuring anything and everything Halloween-inspired!

There are only a few of us so it won't take you long to hop all the way through! Don't worry if you're arrived here first...you can visit the other girls by click on the link at the end of my post.

If you've come here from Amie's Blog, you're on the right track...

Here's my project, using the NEW line from CTMH, Cats & Bats...I decided to do a layout using one of my favorite pictures from a couple of years ago.


Here are some close-ups...

This layout use the Cats & Bats Scrapbooking Kit Stamp Set (I also bought the corresponding Thin Cuts but haven't used them yet...hehehehehehe). I doodled some tiny black dots using my Marvy Journaling Pen. The FABULOUS orange dots you see are from the Cats & Bats Dots and come in 3 colors....FAB-U-LOUS!!! 
----------------------------------------
The tiny strips I used to tuck in and around my photo mat come from the Zip-Strips and a piece of the B&T...
--------------------------------------
All these tiny words are cut from one of the B&T pieces that come with the Cats & Bats Paper...fast and easy way to add some titling or embellishment to any layout or card!


Thanks for creeping by...if you want to start from the beginning and check out all the girls' artwork, head on over to Kelly's Blog.

Wednesday, September 6, 2017

Adventure Fundamental Workshop...

Last month, CTMH came out with some new Fundamental lines and it was a pure JOY to work with the Adventure Fundamentals...full of bright colors, perfect for just about any occasion!

Here's a look at what you can make with the kit & cutting diagrams...


If you'd like to purchase the Cutting Diagram (will be e-mailed to you within 24 hours) or the Kit (will be mailed to you within 2 weeks) to make your own, you can do so below:


ADVENTURE


****If you want the kit and do not want to wait, you can order the supplies {{{here}}} - NOTE: this option will only allow you to purchase full packets whereas the "kit" as advertised above, give you only what you will use****


Don't forget to check out my INSTAGRAM POST with closeups of this FABULOUS Kit! While you're there, follow me so you can stay up to date with all my crafty shenanigans...lol 

From the Heart Card Kit for NSM...

Taken from CTMH's Blog...detailing the instructions for putting together this BEAUTIFUL card kit!!!

Step-by-Step Instructions: From the Heart Card Kit

How to assemble the From the Heart cards by Close To My Heart #ctmh #closetomyheart #card #interactive #sliding #cardmaking #stamping
September is National Stamping Month, and we’ve designed an incredible card kit with elegant, layered stamping to celebrate!
It’s called the From the Heart card kit, and if you love stamping, you’ll love all the ways you can play with the interchangeable stamp designs to achieve a variety of looks for your cards.
If the thought of creating cards like these feels a bit daunting, don’t worry! The kit comes with helpful instructions to walk you through the assembly—just take a look!
How to assemble the From the Heart cards by Close To My Heart #ctmh #closetomyheart #card #interactive #sliding #cardmaking #stamping
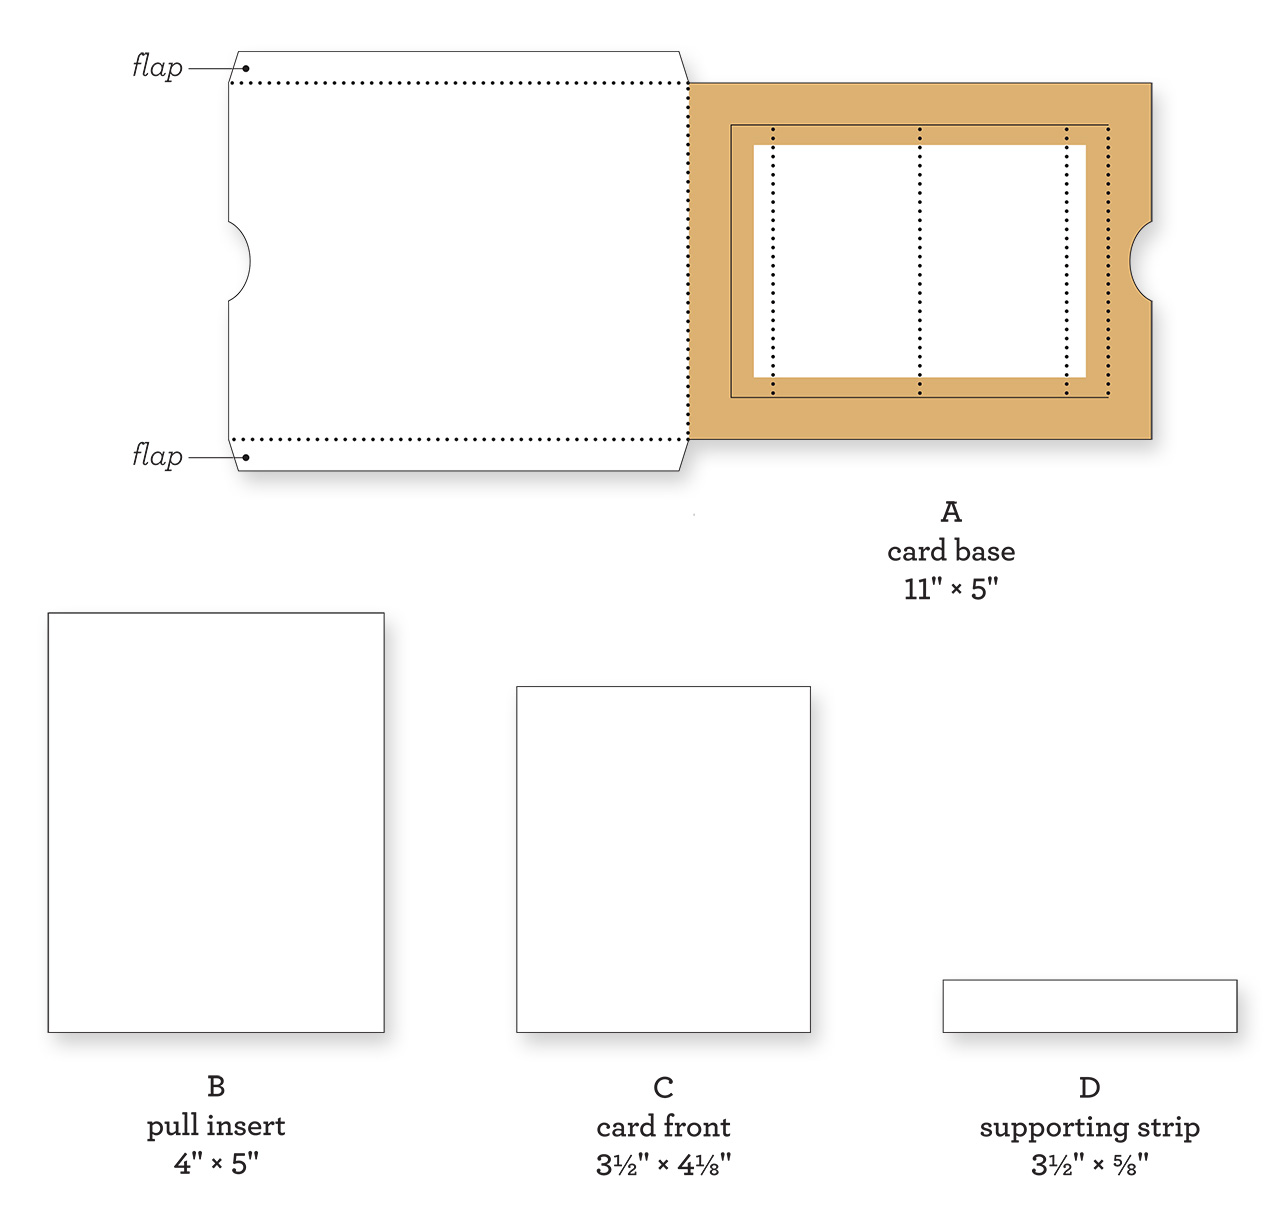
Here are the pieces you get in your kit. You get enough to create 12 cards, plus the beautiful From the Heart stamp set and 12 envelopes. Once you punch out these pieces, follow the instructions below to create your cards.

Step 1

How to assemble the From the Heart cards by Close To My Heart #ctmh #closetomyheart #card #interactive #sliding #cardmaking #stamping
All the folds come pre-scored, so all you have to do is fold along the score lines. Starting with your card base (A), turn the gold foil side down and sharply fold the two outside flaps inward. Add adhesive to the top of these flaps.

Step 2

How to assemble the From the Heart cards by Close To My Heart #ctmh #closetomyheart #card #interactive #sliding #cardmaking #stamping
Fold your card base in half along the score line, attaching the front of the card base to the top of the flaps. This will form a pocket.
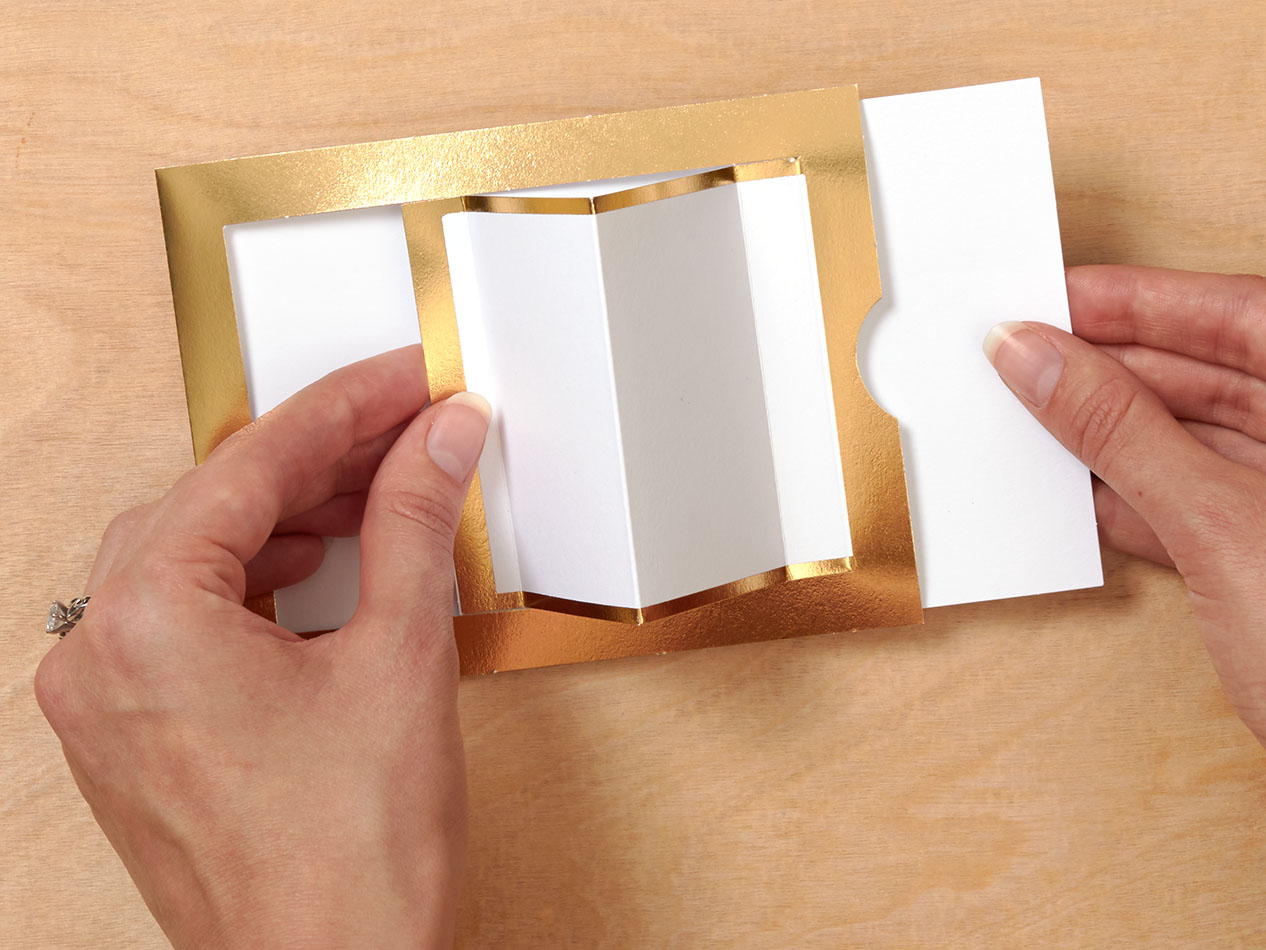
Step 3

How to assemble the From the Heart cards by Close To My Heart #ctmh #closetomyheart #card #interactive #sliding #cardmaking #stamping
Starting with the detached end of the large flap, make sharp folds along the score lines, accordion style, as shown.

Step 4

How to assemble the From the Heart cards by Close To My Heart #ctmh #closetomyheart #card #interactive #sliding #cardmaking #stamping
Add adhesive to the bottom of first fold (the white side).

Step 5

How to assemble the From the Heart cards by Close To My Heart #ctmh #closetomyheart #card #interactive #sliding #cardmaking #stamping
Insert the pull insert (B) into the pocket in your card base (A), keeping B centered. Attach that first fold from step 5 to the edge of the pull insert, keeping the edges flush. Now when you pull on the insert piece in and out, the large flap should pop up and down!

Step 6

How to assemble the From the Heart cards by Close To My Heart #ctmh #closetomyheart #card #interactive #sliding #cardmaking #stamping
Slide your card closed and then add adhesive to top of first fold (over gold foil).
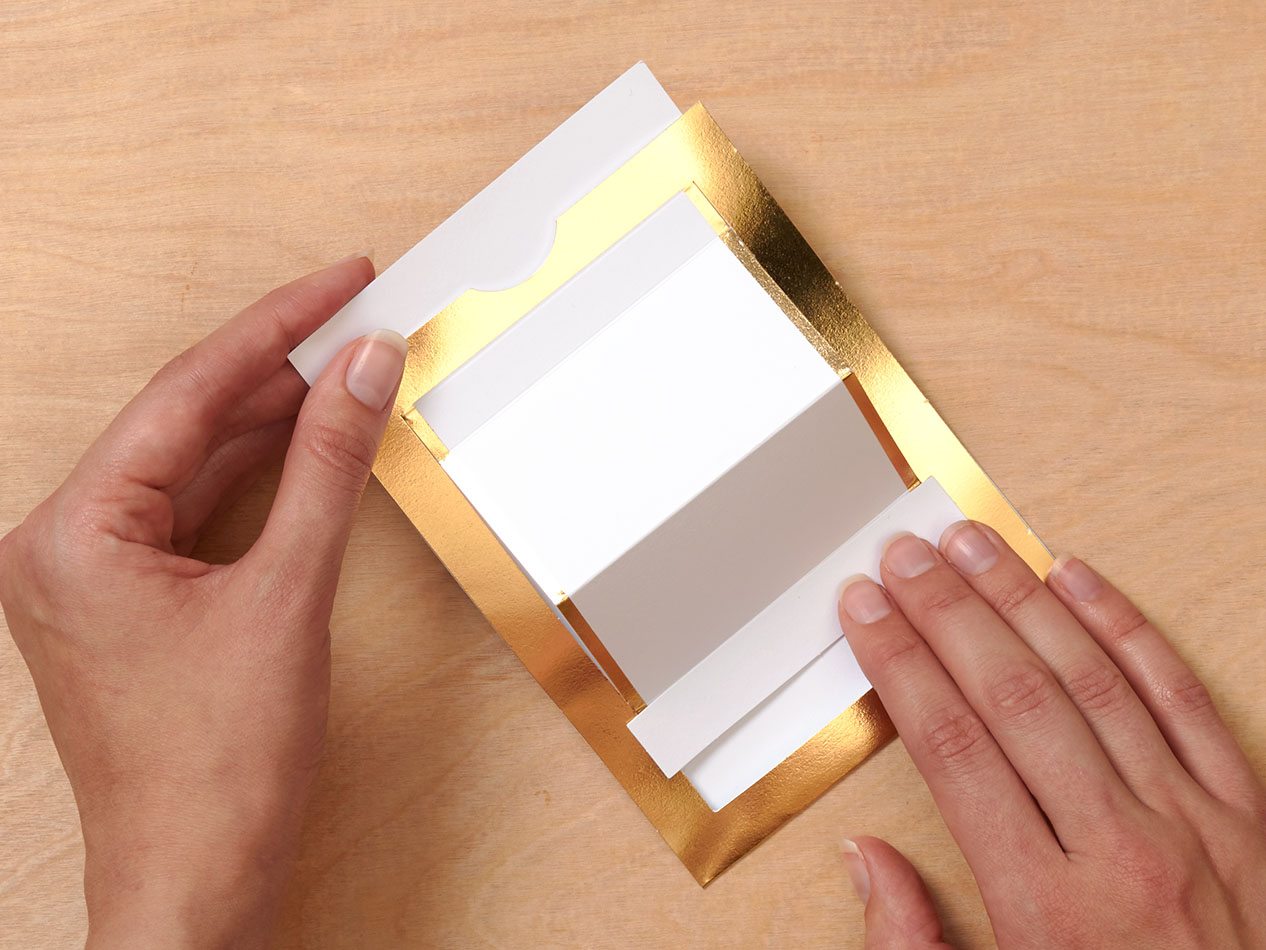
Step 7

How to assemble the From the Heart cards by Close To My Heart #ctmh #closetomyheart #card #interactive #sliding #cardmaking #stamping
Attach supporting piece (D) to the top of first fold. This supporting piece is a little bit larger than the area where you added the adhesive, so keep the top edge flush with the crease and center it on the flap. When it’s in place, the edges of the supporting piece should overlap the gold foil around the edges of your card.
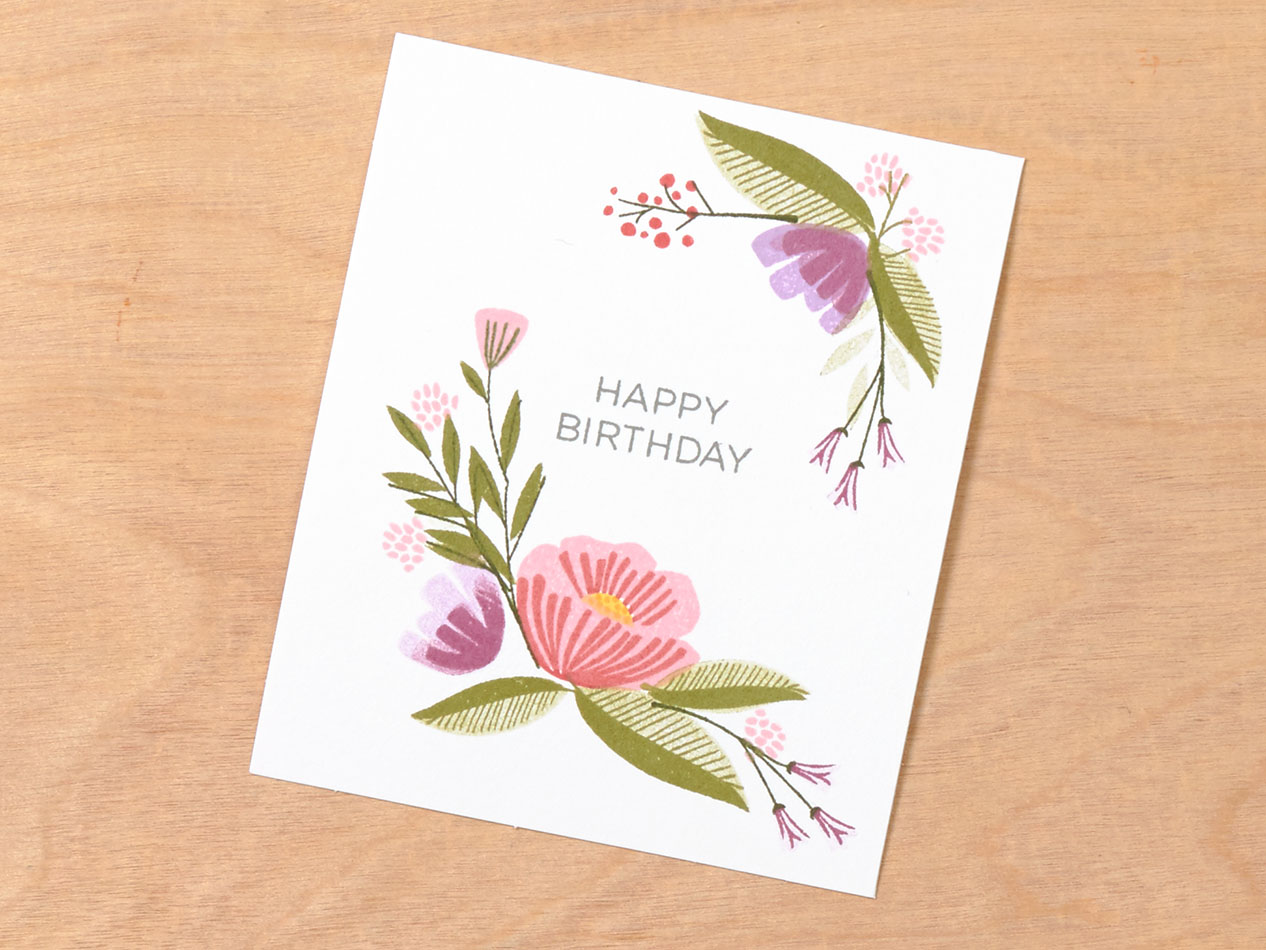
Step 8

How to assemble the From the Heart cards by Close To My Heart #ctmh #closetomyheart #card #interactive #sliding #cardmaking #stamping
Stamp your choice of sentiment and flowers onto your card front (C). When stamping the layers of your flowers, add extra depth by using different colors for each layer.

Step 9

How to assemble the From the Heart cards by Close To My Heart #ctmh #closetomyheart #card #interactive #sliding #cardmaking #stamping
Stamp leaves and twigs in between flowers. Again, add depth by stamping all of the layers in different colors. This stamp set allows you to get incredible detail in your stamp images for a beautiful finished card.

Step 10

How to assemble the From the Heart cards by Close To My Heart #ctmh #closetomyheart #card #interactive #sliding #cardmaking #stamping
Set aside your card front and go back to the base for a moment. Slide your card open, and then stamp your choice of inside sentiment onto the card base. The From the Heart stamp set includes four large sentiments designed especially to fit this space.

Step 11

How to assemble the From the Heart cards by Close To My Heart #ctmh #closetomyheart #card #interactive #sliding #cardmaking #stamping
Once your stamping is dry, slide the card closed and add adhesive to second fold of large flap. This is the section right next to the supporting strip (D) that you attached, and it is where you will attach your card front.

Step 12

How to assemble the From the Heart cards by Close To My Heart #ctmh #closetomyheart #card #interactive #sliding #cardmaking #stamping
Attach your card front (C) to the second fold, lining up the edges with the supporting strip (D).
***REMEMBER*** this kit is only available during the month of September OR while supplies last...so grab yours NOW before it's too late!