Thursday, February 28, 2019

DREAM BIG - Back to Basics with Cricut Design Space


SHARED FROM THE CTMH BLOG...

Back to the Basics with Cricut Design Space™


No matter your comfort level with Cricut Design Space™, it’s good for everyone to revisit the basics. Today, and in a few more blog posts in the upcoming months, we’re going to explain some of the basic tools in Design Space and then illustrate how to use these tools with images from each Close To My Heart Cricut® collection. Making sure you have the basics down will only increase your confidence as a Design Space user, unlocking so many creative options for your crafting!
Cricut Basics #ctmh #closetomyheart #cricutbasics #cricut #scrapbooking #scrapbook #cardmaking #papercrafting #papercrafts #dreambig #memorykeeping
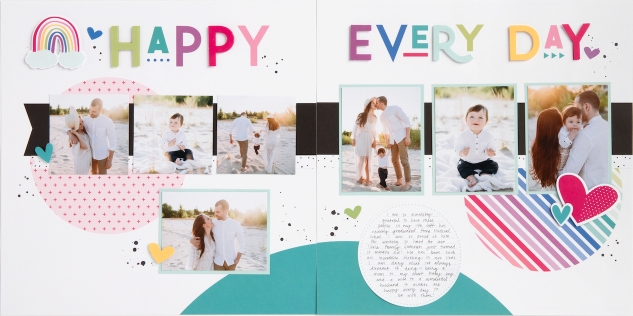
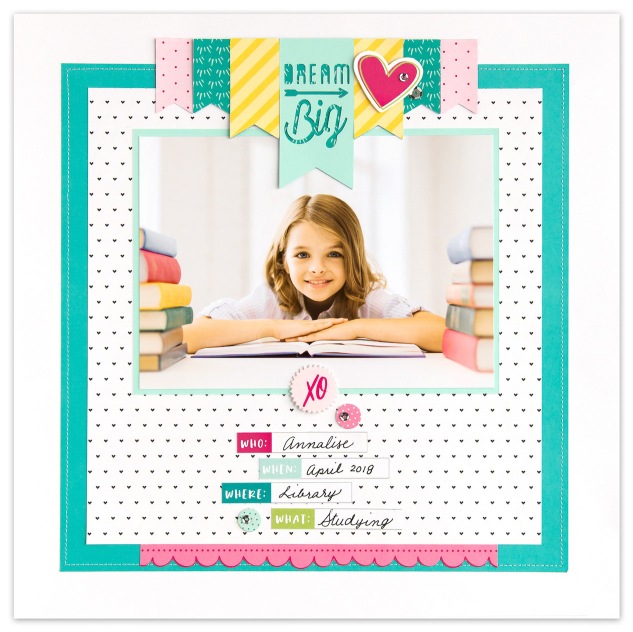
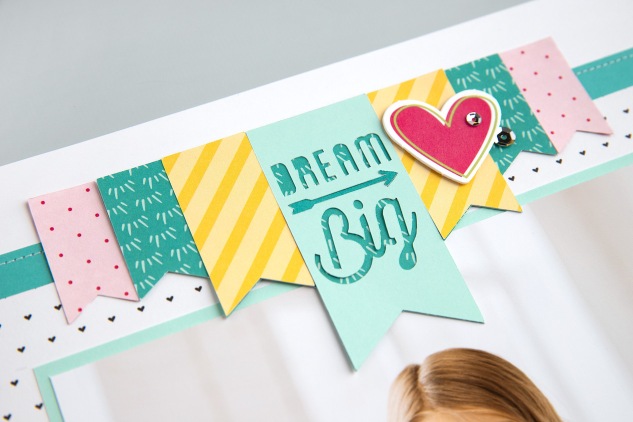
On the page above, we’ve used a banner from the Artistry Cricut® collection to create the title piece. Artistry has a wide variety of words and shapes including titles, sentiments, backgrounds, borders, and banners that you can use for any project theme. Whether you are celebrating a birthday or holiday, or scrapbooking everyday moments, you have lots of choices with this collection, and even more when using the tools in Design Space.
As you read along, remember that the steps below show you how to work in Design Space from a desktop or laptop computer. If you use the app on a mobile device, the buttons and tools will be located in slightly different places on your screen, but the same features are available on any device. Let’s get started by taking a look at the project canvas.
Your Canvas
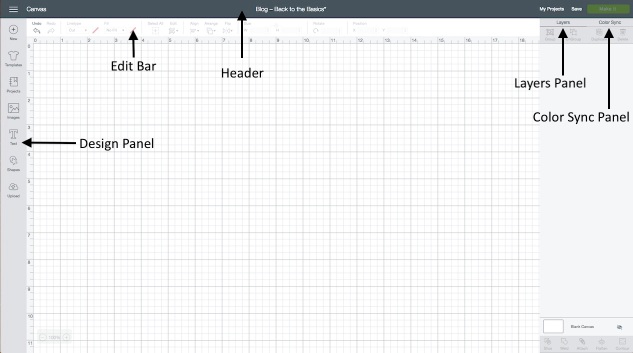
 Whether you are new to Design Space or a seasoned pro, it’s useful to identify the different parts of the canvas and where to find particular functions and tools.
Cricut Basics #ctmh #closetomyheart #cricutbasics #cricut #designspace #scrapbooking #scrapbook #cardmaking #papercrafting #papercrafts #dreambig #memorykeeping
  • Design Panel: This panel, on the left side of the canvas, is where you add new elements to your project like basic shapes, images, text, and more.
  • Header: The Header is just the fancy title for the dark gray strip across the top of the canvas. This is where you can click to view the menu and see your project name. The Header is also where you’ll find a few more VERY useful things, like Save and Make It in the top right corner. ðŸ™‚
  • Edit Bar: Below the Header, you’ll see the Edit bar. This section of the canvas houses many of the tools you’ll need to manipulate specific shapes and text. Here you can find tools like LinetypeSize, and Rotate. There are also options to Align and Arrange shapes, and most importantly, the top left corner is where you’ll find Undo and Redo, just in case you make a mistake. When you are working with text, more tools for adjusting the text will appear in the Edit bar.
  • Layers Panel: The Layers panel holds tools that you might need when working with multiple images together. Tools like GroupUnGroup, and Duplicate are at the top of this panel. These tools let you copy, combine, or separate images. The SliceWeldAttach, and Contourfeatures are at the bottom of the Layers panel.
  • Color Sync Panel: The Color Sync panel and the Layers panel share the same space on the canvas. To see this panel, click Color Sync, instead of Layers. This allows you to match colors used in your project’s shapes. Grouping them together by color makes it easy for you to cut shapes from the same paper.
Searching for Specific Shapes
#M4171A5
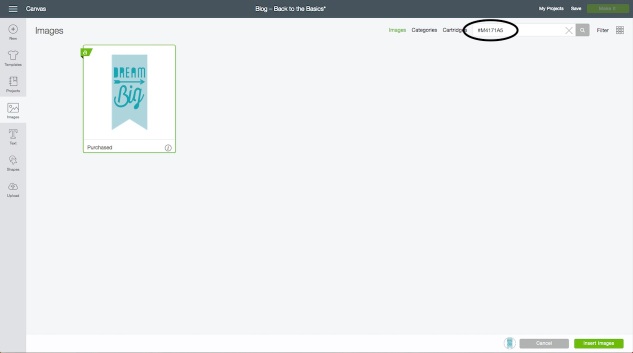
Have you ever wondered what this number means? You might see a number like this one in instructions or recipes we provide for artwork that use Cricut® shapes. This number is the image number in Design Space. When inserting an image on your canvas, you can search for a specific image by entering the entire number in the search box. Make sure to include the “#” symbol when you search.
Cricut Basics #ctmh #closetomyheart #cricutbasics #cricut #designspace #scrapbooking #scrapbook #cardmaking #papercrafting #papercrafts #dreambig #memorykeeping
To search for a specific image, click Images on the left side of your canvas. Then enter the image number in the search box in the top right corner, just like we did to find a the banner used in this project.
Changing the Size of Shapes
Cricut Basics #ctmh #closetomyheart #cricutbasics #cricut #designspace #scrapbooking #scrapbook #cardmaking #papercrafting #papercrafts #dreambig #memorykeeping
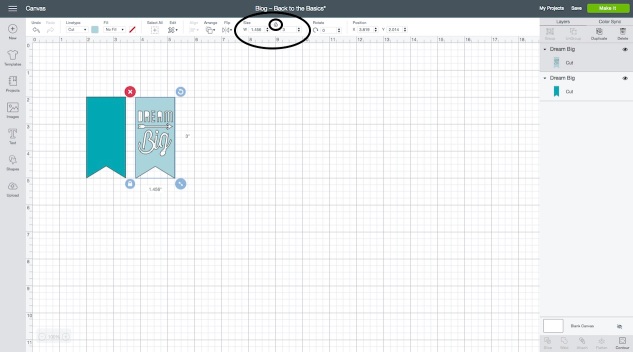
A simple tool you’ll use over and over again is Size. In the Edit bar, you’ll see Size and then the width and height of a selected image. You’ll also notice a lock symbol. When the lock is closed, if you adjust the width of the shape, for example, Design Space will automatically change the height to match the proportions. If you want to change both, simply click on the lock. It will unlock, allowing you to manipulate either one as desired.
Grouping and Ungrouping Shapes
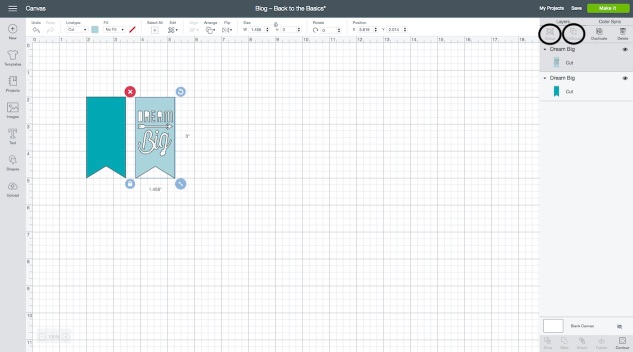
Some images in Design Space have multiple layers. When you insert the image on the canvas, the layers will be grouped together. To manipulate each one individually, you have to use UnGroup. Simply select the image and click on UnGroup.
Cricut Basics #ctmh #closetomyheart #cricutbasics #cricut #designspace #scrapbooking #scrapbook #cardmaking #papercrafting #papercrafts #dreambig #memorykeeping
You can see that this banner image has two layers, one solid base layer and one overlay with the words “DREAM Big.” To make changes to each one individually, we ungrouped the image.
 Duplicating Shapes
Cricut Basics #ctmh #closetomyheart #cricutbasics #cricut #designspace #scrapbooking #scrapbook #cardmaking #papercrafting #papercrafts #dreambig #memorykeeping
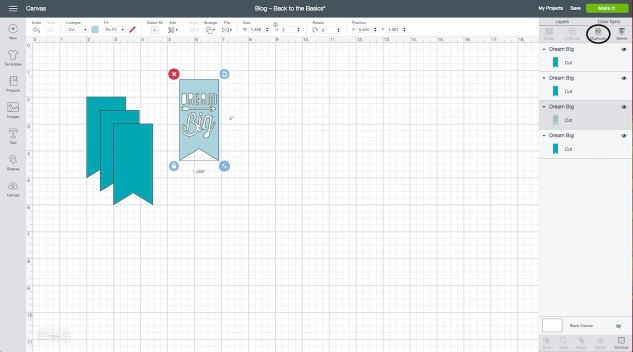
Another frequently used tool in Design Space is Duplicate. This lets you make a copy of any shape or shapes you have selected. Just click on the shape and click Duplicate at the top of the Layers panel.
Welding Shapes
Cricut Basics #ctmh #closetomyheart #cricutbasics #cricut #designspace #scrapbooking #scrapbook #cardmaking #papercrafting #papercrafts #dreambig #memorykeeping
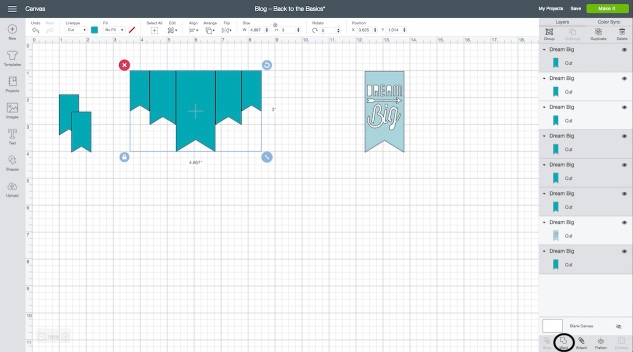
The word weld basically means to unite. While it often refers to metals, in Design Space, when you use this tool, you can combine, or “unite,” multiple shapes into one image, removing extra cut lines. Simply arrange the images as desired. Select all of them at the same time and click Weld. Now, instead of many separate images, they will be combined together as one single shape. This is how we created the solid base piece for our title.
Putting It Together (Search, Size, Duplicate, and Weld)
Cricut Basics #ctmh #closetomyheart #cricutbasics #cricut #scrapbooking #scrapbook #cardmaking #papercrafting #papercrafts #dreambig #memorykeeping
The title at the top of this page is made using the tools we’ve reviewed today to manipulate one image in Design Space.  Follow the steps below to put it all together and make your own!
  1. First, search for the image, #M4171A5, and insert it on your canvas.
  2. Ungroup the image.
  3. Resize the solid banner to a height of 3″, leaving the width locked. Then, duplicate and resize to have six additional banners, two 2″ and four 1.5″.
  4. Arrange the banners like you see on the page with the solid 3″ banner in the center and one 2″ and 1.5″ banner on either side. Click and drag your cursor over all the images to select them all. Then, click Weld. This gives you the solid piece to go behind the remaining banners.
  5. We, then, went ahead and colored the additional 2″ banners light yellow, and the additional 1.5″ banners pink. This just helps you cut the right color of paper or cardstock.
  6. Select Make It in the top right corner and cut your project pieces. Then, assemble your title like you see on the page.
Keep in mind, to use the same image we did, you must own the Artistry Cricut® collection. You will also need a Cricut® machine that is Design Space compatible (any of the Explore or the new Maker machines).

Wednesday, February 27, 2019

MORE LOVE BLOSSOMS...

Today I'm showcasing the LOVE BLOSSOMS stamp set!

I made this layout featuring the LOVE BLOSSOMS and the Feels Like Home paper....just wanted to show you that this stamp set isn't just for cards!

-----------------------------------------------
I loved adding the FRIENDS cut using our Thin Cuts - Block Alphabet...the other parts of the 'tile' are from the sentiments that come with the LOVE BLOSSOMS stamp set...

----------------------------------------------
The flowers are inked up in Sugarplum and Peach with an outline of Heather. I used my watercolor pencils to color the leaves and the flower centers and my Mint Shimmer Brush to color the 'berries'. I also threw in some gold loose sequins for some bling...


Tuesday, February 26, 2019

LAST CHANCE for LOVE BLOSSOMS...

This month is almost over which means the LOVE BLOSSOMS special will be gone!

Here is a card I made using the stamp set (and embossing folder which has since sold out because it is so FABULOUS!!)...

-----------------------------------------
I inked the flower outline image in Heather then used the 'shading' images inked in Peach and Sorbet to color the flowers. The leaves were colored with out watercolor pencils and a waterbrush. The mint berries where colored using my Mint Shimmer Brush. Also...look at that built-in texture on the 'shading' images!!!


----------------------------------------------
The added Silver Embellishing Thread and sequins from the I Heart Us collection add pops of BLING...

---------------------------------------------
I kept the inside very simple...inked up the LOVED with Sorbet ink and kept it at that...


Monday, February 25, 2019

LAST CHANCE for HEART HAPPY...

Several specials are ending this week and I've made a few projects to help you decide whether you RUN over to my website and grab them or regret it come Friday morning...lol

Let's talk about my FAVORITE special....HEART HAPPY! It's full of hearts, pinks, reds but also throws in some non-traditional Valentine colors such as Mint & Sapphire (in fact, I think that's the reason I fell so hard...no pun intended).

Here is a layout I made using a photo of my kids taken on Thanksgiving 1 year ago...

-------------------------------------------
I used the Thin Cuts - Stitched Circles and the Thin Cuts - Stitched Hearts to create the random background...also threw in some tiny Mint hearts from the Shaker Window & Confetti Thin Cut...

-----------------------------------------------
And...if you've seen all my HEART HAPPY projects this month, you KNOW I'm hooked on creating "splatter" with my Red Shimmer Brush...did the same on this layout!


Head on over to my IG and check out how I created these heart circles...follow me to get all the latest and greatest!

REMEMBER...the HEART HAPPY line will be gone after February 28th so head on over to my {{{website}}} to grab you a kit or two...it's NOT just for Valentines (as you can see by me using a Thanksgiving photo) but it is ALL ABOUT LOVE...no matter what you are loving, you can document your story using this line!


Saturday, February 23, 2019

FAST, SIMPLE, EASY scrapbooking with Craft with Heart...

shared from ctmh's blog...

Scrapbook in No Time with Craft with Heart™

Who wouldn’t like to receive scrapbooking kits in the mail—kits that you can literally create in minutes? With Close To My Heart’s Craft with Heart™ subscription, you can actually get Cut Above® layout kits delivered directly to you. These kits make it completely doable for anyone to be a memory keeper!
Does this sound too good to be true? We’re sure you have questions about the Craft with Heart™subscription. What comes in a kit? How easy is it really to put the pages together? Or maybe you’re not even sure what a Cut Above® kit even is? Today we’re giving you a firsthand look at the pages that come with a subscription. You can watch a layout made right before your eyes to see how truly simple it is to put them together. Check it out.
Like Karen explains in the video, the layout kits included in a Craft with Heart™ subscription are Cut Above® kits. That means you don’t have to try to come up with a  pattern for your layout or even cut any paper. All the parts and pieces come in the box for you. That includes die-cuts, stickers, base pages, and even Memory Protectors™. You just need adhesive, thin 3-D foam tape, a journaling pen, and of course, your photos!
With a Cut Above® kit, some of the details that add a little extra pop to your scrapbook pages are already done for you. The pre-printed base pages for your project could have elements like scallop edges, small banners, circles, and other more intricate designs. Even the ink splatters on the layout Karen created in the video, and shown below, are pre-printed on the page.
February’s Craft with Heart™ Layouts
Craft with Heart #ctmh #closetomyheart #ctmhcraftwithheart #craftwithheart #ctmhsubscription #cutabove #scrapbooking #scrapbook #memorykeeping #storytelling #diy #papercraft #papercraftingCraft with Heart #ctmh #closetomyheart #ctmhcraftwithheart #craftwithheart #ctmhsubscription #cutabove #scrapbooking #scrapbook #memorykeeping #storytelling #diy #papercraft #papercrafting
There is a subscription option for everyone. You can choose to sign up for a monthly, 4-month, or 12-month subscription. The longer period of time you choose, the better deal you’ll get! With a 12-month subscription, you’ll receive four layout kits, every four months at a 20% discount, AND you’ll get FREE shipping! And… each 12-month subscription box comes with a discount code from Persnickety Prints for 30 free 4″ x 6″ prints. That means every time you get a box (three times a year), you’ll save on your kits, pay no shipping and handling, and get 30 free 4″ x 6″ prints! To see more details about each subscription option—monthly, 4-month, and 12-month—just click here.
Craft with Heart™ is the perfect solution for those of you that want a quicker way to scrapbook your photos but still create something that’s beautiful and detailed. These layout kits are truly for everyone, whether you are just getting started or have been scrapbooking for years. Memory keepers looking to add their own flair can use the layouts in these kits as a jumping off point for their own creations. You can still take advantage of the pre-printed base pages, die-cuts, and stickers, and then just add a few additional embellishments or paper to make it your own.
No matter the type of crafter you are, a Craft with Heart™ subscription makes preserving the moments you cherish something that anyone can do. In only a few minutes, you’ll have completed layouts for your photos and stories. Click here to sign up today. Then keep an eye on your mailbox for your first delivery! ❤

Friday, February 22, 2019

Happy WORKSPACE WONDER WEEK...

WORKSPACE WONDER™ WEEK

Save 35% on Workspace Wonder™

Celebrate our 35-year milestone with a week of savings on the incredible Workspace Wonder™ line! This customizable system allows you to stack individual components into a configuration that is just right for your craft space. These savings are only available through 11:59 pm (MST) on Friday, February 28, while supplies last.


Head on over to my WEBSITE to see ALL THE WORKSPACE WONDER LINE...here's a screenshot of the kind of prices you'll be seeing...


DON'T FORGET...any order gets you in a drawing to share the HOSTESS FREEBIES this month!


Wednesday, February 20, 2019

Thin Cuts Blog Hop...

Happy hump day!!! Thank you for joining me for a mid-month Blog Hop, brought to you by the SOTM Blog Hop girls, and featuring THIN CUTS!


There are only 19 CTMH Consultants participating this month so it shouldn't take you long and should be PACKED full of inspiration featuring our every-so-popular THIN CUTS!

If you've come from my very talented friend, Carries' Blog, you're on the right track...keep on hopping around 'till you get back to where you started. If you're starting here, WELCOME!

Here's a card I made using the Heart Happy line and the Stitched Hearts Thin Cuts...
------------------------
I used my Red Shimmer Brush to create a splatter effect then finished it off with random-stamping the tiny little heart from the Heart Happy stamp set, A Piece of my Heart...
---------------
And here's a peek at the inside...it's a piece of the B&T with bold stripes...


Thanks for stopping by! Hop on over to Terry's Blog and see what she's made with CTMH's Thin Cut line...there are TONS of choices!

Saturday, February 16, 2019

For the Love of Color...

sharing from ctmh's blog...

For the Love of Color: A New Color Wheel!

It is officially love day, and we couldn’t be more excited! Valentine’s Day is a time designated to focus on and celebrate the relationships that matter most, and, in case you didn’t know, you are at the top of our significant others list as part our beloved crafting community! We simply couldn’t let this special relationship go unnoticed, so we made you a one-of-a-kind Valentine that we hope you’ll enjoy!
For the Love of Color #ctmh #closetomyheart #ctmhloveofcolor #loveofcolor #ctmhexclusivecolorpalette #colorwheel #ctmhcolorwheel #colortheory #colorcombinations #diy #color #colour
Download your new CTMH color wheel, here❤
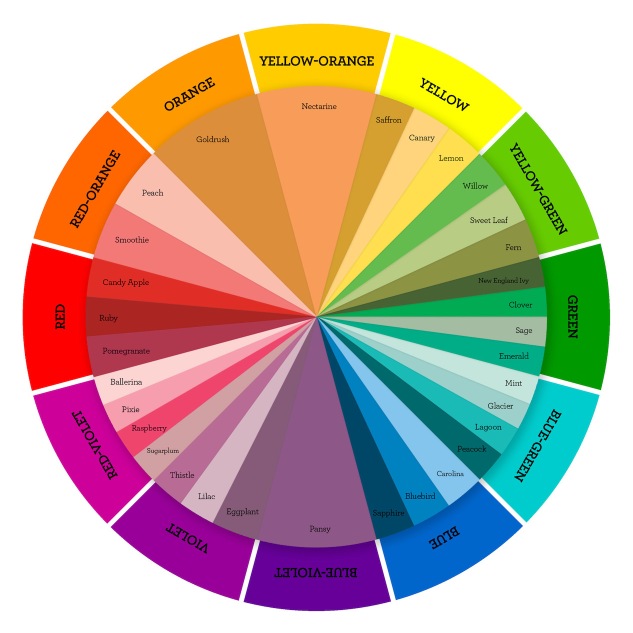
We updated the color wheel we shared with you last year to include this year’s new colors from our exclusive color palette!
Since we’re celebrating relationships today, we thought it would be fun (and practical) to talk about relationships between colors and what makes certain pairings work. We’ve summarized color theory principles from previous blog posts and compiled them, below, to have them conveniently available for review all in one place.
Once you’ve chosen basic colors using any one of these combination options, jump on the Close To My Heart color wheel and take your pick from the exclusive colors that fall into each category. If you’d like to learn more about any of the individual principles or would like to see more artwork examples, click on the provided links at the end of each section. Lastly, if you don’t have the time or would simply rather not read through color theory (we get it ðŸ˜‰ ), skip to the end of this post to see how we make using a full spectrum of color even easier!

Monochromatic and Analogous Colors:

Color Theory #ctmh #closetomyheart #monochromatic #analogous #color #colour #wheel #bashful #pixie #blossom #raspberry #combination #coordinating #coordinate #coordination #theory #pink #shades #variant #variation #pretty #prettyinpink #girl #girly #butterfly #heart #gold #accent #embellishment #complement #pearl
Monochromatic color designs make use of a single color that varies in lightness and saturation. Sometimes, a piece of artwork that we may think is monochromatic is actually following an analogous scheme, which is just a fancy way of saying that the featured colors are next to each other on the color wheel. One color is typically dominant while neighboring colors are used to enhance the design. (Monochromatic and Analogous Colors)

Complementary Colors:

Complementary colors are two colors opposite each other on the color wheel, such as Candy Apple and Clover (red and green), and Goldrush and Bluebird (orange and blue). If you notice, one side of the color wheel is made up of warm colors while the other is made up of cool colors. Complementary colors, since they are across from one another, will have one of each. They create a vibrant contrast, making each other pop without being jarring to the eye. (Complementary Colors and How to Use Them)

Split-Complementary Colors:

Split-complementary colors are pretty much what the name implies. When you are using two complementary colors, split one of them into its two adjacent colors on the wheel to end up with three colors that will visually work. Take red-orange and blue-green, for example. They are opposite each other on the color wheel and therefore complementary. Add a third color using the split-complementary scheme by splitting red-orange into two and use red and orange with the blue-green instead. (Using Split-complementary Colors)

Triadic Colors:

A triadic color scheme is a lot easier to understand than it may sound. Just like some of the other theories, triadic color combinations make use of three colors. This time, instead of being next to or opposite each other, triadic colors are three colors that are equally spaced around the color wheel, and when connected by lines create an equal sided triangle.Triadic Color Combinations #ctmh #closetomyheart #ctmhstargazer #stargazer #star #gazer #colortheory #color #theory #redyelloblue #red #yellow #blue #canary #cranberry #sapphire #scheme #combination #vivacious #bright #harmony #harmonious #balance #balanced
There are only four triadic color combinations on your basic color wheel:
  1. Red, Yellow, Blue
  2. Red-orange, Yellow-green, Blue-violet
  3. Orange, Green, Violet
  4. Yellow-orange, Blue-green, Red-violet.

Double Complementary Colors:


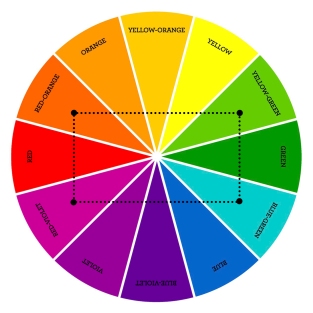
In a double complementary scheme, we use a combination of four colors that, as the name implies, is made up of two complementary color pairs. (Remember, two colors are complementary if they are opposite each other on the color wheel.) To make it even easier, this kind of color combination is also known as rectangular colors because, when the four colors are connected on the color wheel, they form a rectangle. (Double Complementary Color Schemes)
After reading, reviewing, and applying these color principles it’s easy to see that making harmonious color combinations isn’t so hard. Keep that trusty color wheel close by and pick your colors with confidence!
We also know that color theory isn’t for everyone. If you fall into this category or would like to see pages and pages of artwork examples that we’ve come up with using these principles, then Love of Color is for you.

Love of Color

For the Love of Color #ctmh #closetomyheart #ctmhloveofcolor #loveofcolor #ctmhexclusivecolorpalette #colorwheel #ctmhcolorwheel #colortheory #colorcombinations #diy #color #colour
Love of Color is our latest how-to book, and through its pages the exclusive Close To My Heart color palette comes to life! In it, breathtaking artwork illustrates how to create beautiful and perfectly balanced color combinations without any guesswork. Each spread in this book starts out with one exclusive color that is then combined with two, three, and four other exclusive colors, shown in beautifully crafted inspirational artwork.
For the Love of Color #ctmh #closetomyheart #ctmhloveofcolor #loveofcolor #ctmhexclusivecolorpalette #colorwheel #ctmhcolorwheel #colortheory #colorcombinations #diy #color #colour #papercrafting #scrapbooking #cardmaking
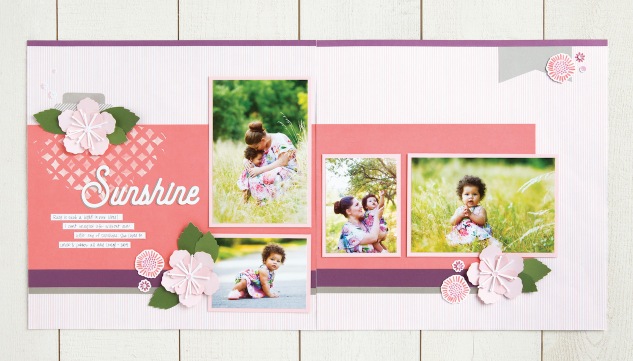
This layout was created using one of the three Smoothie color combination options offered in Love of Color. In this example, Smoothie was paired with Ballerina, Eggplant, New England Ivy, and Heather. Smoothie is the dominant color and the others were used to create accents throughout.

Thank you for being our Valentine today and joining us through this celebration of color! We hope that you are always living your life in full color and that you are moved to do something creative today!