Sunday, October 31, 2010

A Little Thanks....Blog Hop

I can't believe this weekend has been FULL of pumpkins and costumes, candy and sweets....and NOW, it's time for November!?!?!  I'm busy getting into the season of "gratitude" and this month's SOTM is perfect for just that!

We're using "A Little Thanks" stamp set...

If you've come from Annette's Blog then you've seen her SUPER CUTE cards (LOVE that coffee cup), you're on the right track!!! Keep hopping along 'till you see all 60+ consultants' blogs and what they have done with this wonderful stamp set!  If you get lost along the way, you can always go back to Helen's Blog and she'll have a complete list where it'll be easy to pick up where you left off!

Are you ready to see what I've done with this stamp set????  It's one of my FAVORITE things to do with "word stamps"...why pick just one when you can use them ALL!  This little home decor item can be used to display during the month of November for Thanksgiving or you can give it to a coworker, friend, etc. as a "thank you" for taking you out to lunch....maybe carpooling with you...and when the frame cost only $1 at the Dollar Tree...this gift is VERY affordable!


All I did was lay out all the images I wanted to use from this stamp set face down on my piece of paper (this one happens to be a 4x6 picture frame with an opening of about 3-1/2" x 5-1/2").  Once I knew that all my images could fit and where I wanted them, I loaded them onto blocks, one by one, inked them up and stamped them!  HINT:  Cut a second piece of paper measuring 4x6 and use that to stamp on...that way your 1st piece will still contain all the stamps in the exact places you want them! 

That's all I have for you this go-round....make sure you hop on over to Adeline's Blog and see her CUTE card...you're gonna LOVE IT!

Don't forget...this stamp is available all month through your CTMH Consultant.  What...you say you don't have a Consultant???  We can't have that now!  E-mail me to find out how to get this versatile stamp set for FREE!

Wednesday, October 27, 2010

Carving Pumpkins...TIPS

I read many, many blogs each day and SO ENJOY doing it...the hazard is that I often run across something that "sticks" in my head and by the time I get around to create something using their inspiration or post hints and tips (which it is in this case), I forget where I saw it....if you know where I got the following pumpkin carving tips...PLEASE let me know so I can link to their blog!

TIPS FOR CARVING A PUMPKIN:
  • Instead of removing the top for the lid, try cutting around the bottom...it makes it much easier to light the candle (yes, we still use a candle) and then place the pumpkin over the bottom (who would've thought)
  • If you're working with stencils to draw your image, use masking tape...it sticks better
  • When cutting intricate designs, start with the most detailed parts first
  • "THIN" the side you're carving before cutting by taking a spoon and scraping some of the 'meat' from the inside....you have to be careful because if it's too thin, the pumpkin might break but if it's too thick, it makes it hard to cut
  • If you're carving several days in advance, place the CARVED pumpkins in a bathtub full of ice water and they won't "shrivel" and will be good as new when you're ready for them (this locks in the moisture)
  • Rub Vaseline on the carved portions (i.e. inside the holes for eyes, etc.) to keep the moisture in which will make them last longer
Aren't those WONDERFUL tips!!!  We're painting pumpkins this year using glow-in-the-dark paint but next year, I think I'm going to try these tips!!!  Knowing me, though, I'll probably go ahead and carve one THIS YEAR just because I'm curious...lol!

Tuesday, October 26, 2010

Simple Halloween....

I've seen these cards all over the blogs I read...and by "these cards" I mean SIMPLE.  I've tried to do simple before and I usually fall back into the elaborate ones that take hours to make and are too pretty to give to just anyone or too dimensional to mail out.  These are PERFECT for giving and mailing....AND, since I used liquid glass on the eyes, they should fare well in the postal service!

Card size is 4x4 (you know how I love my SQUARES)...lol 


Products used are all CTMH except when noted:
Cardstock: White Daisy
Stamp Set: The Boo Crew
Ink: Black, Gypsy, Pear and Sunset
Licorice Opaques (eyes for the Sunset Pumpkin)
Wiggly Eyes (Michael's)

Monday, October 25, 2010

Happy Haunting - sPookY.....

Here's a card I made this weekend using Captured Moments stamp set, Hooligans Paper Packet, Olivia Paper Packet (the flower), Purple Sparkles, Black Glitter (Michael's) and an altered version of the Recessed Window Card I found at SCS...I kinda regret not making my moon a little "moonier"...it kinda looks like a sun...lol.  This card also qualifies for H2H's challenge of something "Halloween" so be sure to go over there and see what other "Halloween" projects have been linked up.
----------------------------
I'm love with this part of the card...not sure why but I am...I drew the little spider by hand...hehehehe

-----------------------------
I'm hoping with these next 2 pictures you can tell that the window is recessed and adds such dimension to the card...

 ------------------------------
And....here's the inside of the card...SIMPLE but cute!

Sunday, October 24, 2010

Thank You God - You Have Been So Good To Me...

In honor of my Grand-daddy who would've been 89 yesterday, I'm posting the poem he wrote, and that I read at his funeral 12 years ago...I can't believe it's been that long.

My Grand-daddy was a Baptist Preacher, WWII B1 Bomber Pilot, High School Football Coach and Science Teacher...he loved his Country, sports, teaching and traveling but most of all, he loved his family with all his heart and God with all that he had!
-----------------------------------
Here is the layout I did many, many years ago as a tribute to him and this poem (you can read the full poem below the pictures) that he wrote shortly before his death.  I printed the poem on Vellum and then adhered over one of my favorite photos of him.  He's smiling ear to ear which was how he was 95% of the time!


---------------------------------------
Title: Thank You God - You have been so good to me
Written by: N.T. Gault

Sometimes I visit small country cemeteries and look at names and dates on the stones.  So many are children who lived only a day or two.  I bow my head and say - Thank you, God, you have been so good to me.

Sometimes I look at my parents' wedding picture and think of all the things they taught us, and took us to Sunday School and Church each week.  I bow my head and say - Thank you, God, you have been so good to me.

When my war experiences were over and I stood safe on America's shore, I looked up and saw the Stars and Stripes.  I bowed my head and said - Thank you, God, you have been so good to me.

At Christmas time when we celebrate our Savior's Birth, I look at my wife and our family of three children and seven grandchildren and one great-grandson gathered 'round the Christmas tree.  I bow my head and say - Thank you, God, you have been so good to me.

And when life on Earth is over and I meet my Savior face to face, I will bow my head and say - Thank you,
God, you have been so good to me. 

Saturday, October 23, 2010

Pumpkin for my sister...

Here's the "just because" gift for my sister that I gave a sneak peek of yesterday....


I took a small pumpkin (weighing about 3 lbs) and painted it with white paint...let dry for 30 minutes or so, then added second coat...let dry for 30 minutes or so...then added the wood-grain (which kinda resembles Zebra-print) with black paint...let dry and then sprayed with clear enamel.  I added the Dimensional Element and Red Sparkles and adhered with Liquid Glass.

I gave it to her at lunch and she LOVED IT!!!  She was sad to find out that the pumpkin was real and wouldn't last but a few months...:0(

Friday, October 22, 2010

Gift Sneak Peek....

Here's a sneak peek at a gift I finished up last night and will be giving to my sister this afternoon for a "just because" gift.  I try to do that often for her because she's always so appreciative...and the gifts are usually the simplest of things...items on sale, items I want to make so she's my guinea pig, etc.  She LOVES it though which keeps me going!

I'll post the full pic once it's in her hot little hands!

Thursday, October 21, 2010

A birthday that is Magnifique...

On Fridays a bunch of us girls get together and eat lunch...each time it's one of our birthdays, we give a card and some lotto scratch-offs hoping that we'll all get rich and can quit our day jobs...lol. 

Here's one of the cards made last month...I usually just put a sticky on the inside saying "happy birthday" so they can reuse the card for their own purpose.

I used Magnifique paper packet for the card, Cocoa Cardstock for the flower and a Pearl Opaque for the center!  There are many tutorials out there but my fellow CTMH Consultant and friend, Tracey, has a really good one...so, head over there and take a look!
-------------------------------
Open it up and waalaaaaa....

Don't you just LOVE these colors!!!


Tuesday, October 19, 2010

Spook Alley Bag...

I just love these little bags!  I did this one for Christmas a couple of years ago....and couldn't pass up the chance to do one using Spook Alley and Hooligans!


-----------------------------
I added shading to the web using a Grey Flannel Marker
-------------------------------
His eyes are actually our NEW Opaques....Pearl and Licorice...I used Liquid Glass to make sure they would stay in tact.

Monday, October 18, 2010

Skeleton Wall Decor...

This project cost me a whopping $3....can you believe it!!?!!?!!

I saw the idea HERE at Eighteen25...LOVE their ideas! 

I did a pumpkin one that I will post later but since Halloween is right around the corner, I thought I'd post this skeleton one.  I know some of you may not be fond of "skeletons" but they are the hot trend right now and this one is all glittery and I jazzed it up with our Sparkles so it's not so scary!  I also LOVE the Hooligans Gypsy-colored polka dot B&T as the backdrop...LOVE, LOVE, LOVE this paper! Oh...and the BEST part is that the frame only cost me a DOLLAR at the dollar tree...it was a gold color and I sprayed it with silver paint!

 --------------------------
lol...I didn't even know that he was missing a tooth 'till I took these photos


Sunday, October 10, 2010

Spiderman Birthday - the PARTY....

Even though the day started out rough for the birthday boy (see previous post here), we managed to still have a GOOD TIME!!!

I made the invites which I posted here....

I made the cupcakes using white chocolate in a piping bag for the webs and luckily it's Halloween so I just bought some plastic black spider rings and cut off most of the ring part and inserted into the cupcake...

-------------------------
Just in case some people didn't want webs, here are some without....


TK loved us singing Happy Birthday to him (although he did get embarrassed and hid by his brother) and he LOVED blowing the candle out...


---------------------------------
We ordered pizza and TK had a blast opening presents....

Thanks to everyone who came and celebrated turning 3 with us!!!


Friday, October 8, 2010

Jack....

This is a repost of some Haloween gifts from last year....I thought some of my new readers might enjoy seeing them!  Heck...maybe even some of you that have been following for years would like to see it again! 
-----------------------------------------
I have a lot of projects that just need finishing touches on them...I'll be doing those this weekend and posting next week so be on the lookout!
-----------------------------------------
I just LOVE a candle company called Scentsy.  It's a system of meltable wax and the cutest warmers!!!  A little goes a long way so they are very affordable!!!  Every once in a while, they will have seasonal warmers and this Halloween, they came up with "JACK" (go check out the 2010 Warmer...it's SO CUTE and I've been fighting myself NOT to order it!!!)  and he's the cutest pumpkin you've ever seen (I wish I had taken a picture of him but I didn't).  We purchased this for a good friend who LOVES Halloween and gave it to her this week.
------------------------------------------
Here's the cute packaging (which was the bag my Scentsy order came in and I just added the paper shreds, the card and the bow).....

And of course, I had to make a card to go along with it!!!
Here's the inside.....
---------------------------------
Reese's Peanut Butter Cup cover....
 -----------------------------
And Mr. Googly Eyes...made from some mints and black punched circles...I hate that I didn't take a picture of the front :0(
 -----------------------------------
Here's the CUTEST holder for licorice or pencils...whatever your fancy!


Monday, October 4, 2010

It's My Party.....

....and I'll cry if I want to....

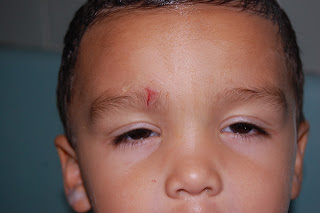
TK's birthday party was on Saturday and it seemed like everything went wrong!!!  He rolled off the bed at about 4am and did this....

--------------------------
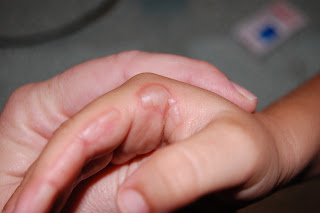
And then...mid-morning, he found the iron which was left plugged in and he did this...

-------------------------
The party did turn out good and CUTE....I will post more SOON!