
shared from ctmh's blog...
All Around Creativity: Adding A Splash of Color

We’re jumping right into the new year and celebrating National Papercrafting Month with the All Around Creativity special, featuring four gorgeous wreath kits that are only available from Close To My Heart through the end of the month. There are so many different ways to embellish these beautiful wreaths, so we figured we’d have some fun and share with you four simple ways that we’ve added color to the plywood bases.
Adding color to wood doesn’t need to be super messy or take a huge amount of time. It can be quick, easy, and clean. To start off, we’ll take a peek at one of the easiest wood-coloration techniques. This method uses an Exclusive Inks™ stamp pad and will only take you a few minutes from application until it’s completely dry!

Simply select the ink color you’d like to use and gently swipe the stamp pad over the surface of the wood with quick, dabbing motions, going with the grain. Going with the grain helps you to emphasize the natural beauty of the wood, while also protecting your stamp pad from getting scratched up or caught on the wood. As you’ll see in the video below, we left some of the wood grain visible for a more stained look, but you can make it as light or as dark as you’d like.
To achieve a softer, mottled look, try sponging the ink onto the wood.

Cut a Round Sponge into quarters. While gripping the point of one quarter with your fingers, gently load your sponge with ink by pouncing it on your stamp pad. Because the sponge absorbs the ink, it may not look like you have a lot on there, but you’ll have more ink than you think!
Once you’ve got your sponge inked and ready to go, use the same pouncing motion you used on the stamp pad to apply the color to the plywood. The ink will dry lighter than it looks while you apply it. For a darker, richer tone, you will have to apply additional layers of ink.
This next technique uses TriBlend™ markers. When using an alcohol-based marker to color wood, you’ll want to go in the direction of the grain and use a steady hand to achieve even color throughout.

Because you have greater control over color distribution when you use this method, you also have more control over the appearance of the colored wood. For instance, if you want a softer, lighter look, use a light hand and don’t go over the same spot too many times. For darker and richer tones, add more color layers to really get the pigment into the wood.
If you’re going for a darker color, don’t jam the marker tip into the wood, as this may damage your marker. Instead, go over the same area of the wood multiple times for color layering and try using a lighter shade of your TriBlend™ marker.
The last technique we’re showcasing today adds a bit of sparkle to your art. Heat embossing! (We went there, and it’s beautiful!)
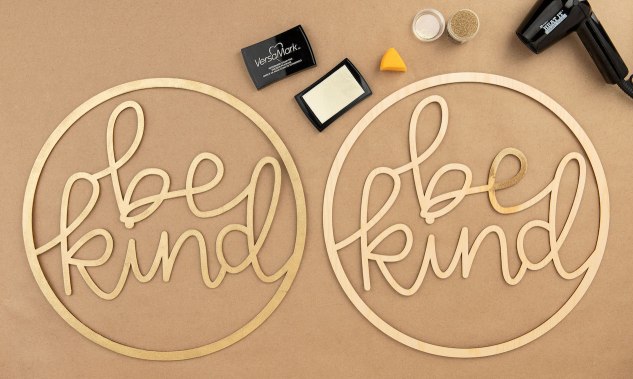
First, place your wreath over a piece of scratch paper so you can catch any excess embossing powder. Then, begin by rubbing the surface of the wreath with an anti-static pouch. Apply VersaMark™ ink to the wreath, a few sections at a time, using the same pouncing motion you saw in our first technique. While the ink is still wet, sprinkle embossing powder over it, shake off any excess powder onto your scratch paper, and heat set with a heat tool. (Use your scratch paper to easily funnel your excess embossing powder back into its container for future use.)
We absolutely love these wreaths and National Papercrafting Month, because it really gets us thinking outside the box! We can’t wait to see all the different ways you choose to add color to your wreaths.
Remember, you can only get these gorgeous wreath kits until January 31, and if you buy four or more you even get a discount! Make sure to take full advantage of the All Around Creativity special while you still can.
No comments:
Post a Comment
Thanks for showing some {{{love}}}....