Sunday, August 31, 2014

PML with Family is Forever...

This month's SOTM Blog Hop features over 60 Consultants...


If you've come from Sarita's Blog, you're on the right track...keep on hopping around 'till you get back to where you started.  

I decided to make some PML cards using the stamp set and Pathfinding Paper Packet. I think these will be perfect for family get-togethers!

--------------------------------------------------
Here are some close-ups of the individual cards...


-------------------------------------------
I used our NEW Thin 3D-Foam Tape...just enough dimension for the tight pockets...

-------------------------------------------
I used some retired resitibilties to add the brackets...

--------------------------------------------------
I used the "FAMILY" portion of the stamp to random stamp all over this house shape that was created when I cut a bunch of houses out for another stamp set...LOVE finding uses for all the "left-overs"!
-------------------------------------------------------
One of our NEW M-size stamp sets this year is the Mini Calendar Set...at only $2.95, it's a GREAT deal!!!
-----------------------------------------------------------
This is perhaps my favorite card...I love the washi I used and the little cork chevron circle from the Pathfinding Assortment...


Thanks for stopping by...you're next stop is Lori's Blog...go show her some love!

Don't forget...you can order this stamp set for as little as $5 during the month of September!!! If you don't have a consultant, you can shop {{{here}}} to find all these wonderful CTMH goodies and lots more!

Thursday, August 28, 2014

#tbt CTMH Style - Chantilly....

I loved these layouts then and I love them still...


 You can find the original post {{{here}}} with lots of photos.

Tuesday, August 26, 2014

It's Your Day Wedding Card...

I attended a wedding a couple of weeks ago and of course had to make a card for the happy couple! 

When I make cards for occasions such as these, I usually try and make the colors match their theme.  Her colors were Chocolate, Ivory & Coral...so I broke out the CTMH colors to match: Chocolate, Colonial White, Sorbet and I threw some Glacier B&T from the NEW Seaside Paper Packet and some flowers left over from this project!

---------------------------------------------------
The honeycomb paper is from our Whimsy Fundamentals Assortment...it's cardstock weight with the same design on both sides, one side with glossy pattern and the other with a side that can be inked (like I did here)...after sponging Desert Sand Ink all over it, the white spaces in between the honeycombs became muted and fit the colors of the card more.
-----------------------------------------------
I used the new stamp set, You Mean the World to Me (a MUST HAVE if you ask me!!!)...and added a flower center cut from the Brown & Tan Glitter Paper.  It cuts like no other glitter paper in my Cricut Explore.

-------------------------------------------
I added my new FAVORITE product...CTMH's Thin 3-D Foam Tape...I can't sing enough praises for this product!  As you can see in the photo below, by adding it between the flower layers, it gives just enough dimension without having my flower stick up too much!

Monday, August 25, 2014

Creative Big Blog Tour Nomination - August 25th...

I am really excited to be nominated as a Creative Blogger by a very talented scrapbooker, Carole Wright...you can visit her over at The Pretty Paper Patisserie.
Carole is a fellow DT Member for Stuck on U Sketches (SOUS)...you can find her on the Sketch Team and her artwork is FULL of embellishments and to-die-for color combos!
We are joining up as a chain of fun blog hop tours where we will get to meet new bloggers, get new inspiration and connect with blogs that will open up our creativity.

This blog hop is sure to be a great inspiration. 

I hope you hop along with us.

Here are my 4 questions that I need to answer before I pass along my nominations..
(I will then send you to 3 amazing artists you will love visiting!)
1. What am I working on?
Currently, I have several things in the works...some CTMH SOTM (Stamp of the Month) artwork that will go live on the 1st and I'm also trying to revamp an old weekly calendar so I will have a better handle on all of my obligations...I seem to be getting busier and busier...but that's no problem for me!  I love the opportunity to post to my blog more often!
2. How does my work differ from others of its genre?
I pay a lot of attention to details!  I think my artwork is full of little touches that may not mean that much to the average scrapbooker or card maker but I know those details belong there so I go the extra minute (or ten...lol) to make sure it's put there!
3. Why do I create what I do?
My craft room is a hide-away (except it's wide open to the living space in our house) for me to retreat to when nothing else seems to be going right.  I get lost in all my ribbons and paper and then I seem to forget that I have a headache or that my full-time job stunk that day or that I burnt our dinner...it's a stress reliever!
4. How does my creative process work?
I pin A LOT of stuff!!!  But...I rarely ever copy something exactly...I'll take a little bit of this and a little bit of that and bring it all together!  The end result may not turn out the way I had it in my head, but I still enjoyed the process.  I also do a LOT of trial and error.  I'll lay something down, take a photo of it with my phone...move it around, take another photo...move it again and take another photo.  This process is repeated 4 or 5 times...a lot of times, it's one little button or brad or journalling spot.  After I've taken photos of all my "options", I'll look through them all and pick the one that looks the best.  You would be surprised how much stepping away and getting the prospective of a photo can change the look of something you thought you loved!
Now...it's time to make my nomiation:

Please go visit Amie Kiger's Blog...here's what I love about her:
  • She is a fellow CTMH Consultant
  • She is a consistent blogger...she hardly ever goes two days in a row without posting
  • Her style is clean and innovative
  • Her tender heart exudes through her blog, her content and her comments
Go check her out!!!!
Amie...you will post on your blog September 1st, answer these same questions and nominate up to three fellow bloggers.

Friday, August 22, 2014

Have a Happy Day...

This card just makes me smile...

Not sure if it's the fresh CTMH colors or the layout of the card, but whatever it is, it makes my HAPPY!!!

-------------------------------------
The colors I used are from CTMH's IG #colorcrush challenge - Whisper, Topiary, Canary & Glacier...I used one of our NEW stamp sets Have a Happy Day, our NEW Woodgrain Embossing Folder and Whimsy Fundamentals Assortment...
  -------------------------------------------
I also used our NEW Thin 3-D Foam Tape...already have to reorder that because I've been using it so much!  It adds the perfect dimension...especially when you're planning on mailing your card!
----------------------------------------
Here's a peek at the inside...finished it off with some of the extra woodgrain pattern and some more stamped images from Have a Happy Day...
------------------------------------------
I'm linking up to Seize the Sketch #27...here's the sketch!

Don't forget...you have 'till the end of the August to take advantage of the PML/Memory Protector Special. You can see all my PML artwork {{{here}}}

Make a Wish - SOUS Die-Cut Challenge...

This week's SOUS Die-Cut Challenge is "Blow Out The Candles"...

Of course, I had to use this ADORABLE cake from Miss Kate Cuttables.

I know...it seems like I'm always using her cuts but she does have some of the CUTEST images!  This card measures 8-1/2" x 4 so my over-sized cake would fit.  I also random stamped the Kraft background piece using Lovely Birthday stamp set and some Bamboo Ink.  It's such a subtle touch but one that needed to be added, I think!

---------------------------------------
I added Liquid Glass to all the "icing" parts much like I did for this SOUS card last month!  I also used quite a bit of B&T and cardstock on this one.  You will see Seaside, Scaredy Cat, Brushed...

----------------------------------------
One of the things I love about svg cuts is that all the layers create so much added dimension!  I added some more dimension by using CTMH's Thin 3D-Foam Tape....LOVE that stuff!!!

--------------------------------------------
Here's a peek at the inside...and a view from the front that shows some more dimension.  The sentiment "make a WISH" comes from CTMH's Artbooking Collection.

----------------------------------------
Here's a full view of the inside...


Don't forget to check out the other Die-Cut DT members and their "Blow Out the Candles" artwork...sure is a lot of inspiration in one place!

Thursday, August 21, 2014

Mix Media with UYSBH...

Welcome to this month's Use Your Stash Blog Hop where we show you what's been hanging around our craft rooms and hope to inspire you to use up your stash!

If you've come from Theresa's Blog, you're on the right track!!!

This month's theme is Mixed Media...which means you can use varying types of scrapbooking supplies.  I chose to use paper (of course), sequins (metal I guess you could say) and paint.

This card is a 4" x 6" card...one of my favorites if I'm not layering a bunch of B&T because it's easy to cut!

 --------------------------------------
I've been eyeing and pinning some artwork that uses Gesso. And I knew there had to be some way to make it using CTMH products!  So...I came up with Pearl Paint (retired) and White Embossing Powder (the kind I used is retired)...one part each.
---------------------------------
Mix it up and paint it on...don't worry about it getting outside the "lines"...it only makes it looker cooler!  I used my stash of old Cricut cuts...an extra row of stars used for this card!
-----------------------------------------
I used some PML cards from the Babycakes Kit...a 2"x3" on the bottom of the front and a larger 4"x6" on the inside (you'll see that down below)...
-------------------------------------------------
Here's a peek at the side...I pop-dotted the front PML card using CTMH's NEW Thin 3D-Foam Tape...LOVE THAT STUFF!!!
----------------------------------------------
And here's a look at the inside...I just cut the top off a 4"x6" PML card so I could mimic the Gold Shimmer Trim on the inside bottom just like the front.


Thanks for stopping by!  I hope you enjoyed seeing me use up some of my stash...some of which has been in there for years!

You can hop on over to Shirley's Blog...she's the start of thing so if you started somewhere in the middle, you can catch up.

Here's the full list in case you missed anyone:

Monday, August 18, 2014

Inspired by a Book - H2H...

This week at H2H, we are still keeping with this month's theme of "Inspired by"....and this week, it comes in the form of a BOOK!!!

As you can probably see...the DT has varying takes on this challenge!!!

My inspiration comes from {{{this book}}} pinned to my Mini-Album Board...

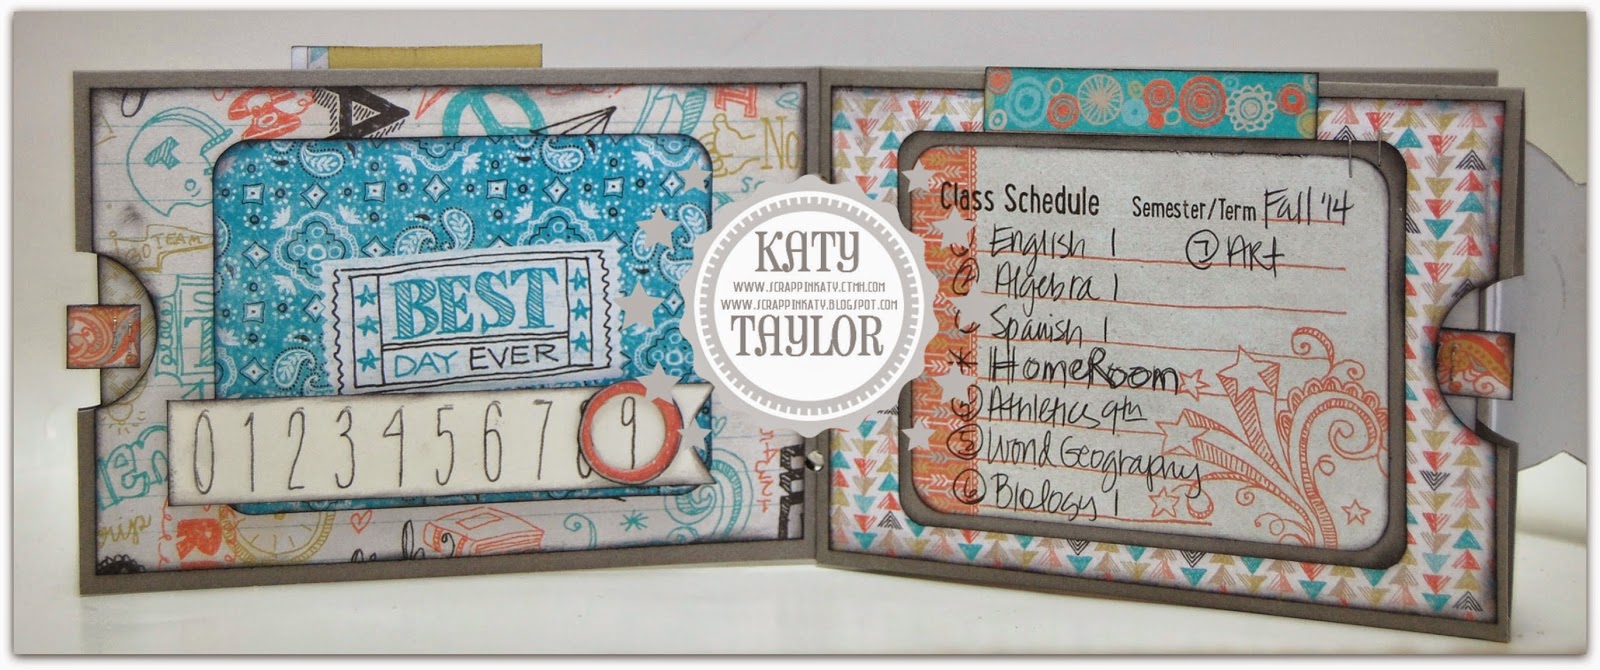
I bought the svg but in the end, I really wanted to use CTMH's Chalk It Up PML Cards Since CTMH has an AWESOME deal this month (see the very end of my post) so I came up with my own template and cut it by hand (templates are at the end of this post).  I used the Chalk It Up WOTG and the Chalk It Up Complements to embellish!


Here are a BUNCH of close-ups...make sure you look at all the pull-outs and details...


------------------------------------
Pages 1 & 2


----------------------------------------------
This is one of the 2" x 3" PML Cards...already prompted with Class Schedule...so, I just filled it in then created a pull-out to name the teachers and room #'s...

----------------------------------
Pages 3 & 4


-------------------------------
Pages 5 & 6

------------------------------------------------
This PML card is actually from the Laughing Lola PML Kit...LOVE that I can combine Kits and it still looks like they go together!
-----------------------------------
Here's a close-up of the 4x6 Chalk It Up PML Cards that I used for pull outs...


Ok...as promised here is the cutting diagram for the mini-album...

This is the outside cover...it's a little larger so when folded the inside pages won't still out.

Here's the inside pages...

Then decorate with 3-7/8" x 5-5/8" B&T and add as many embellishments as you'd like.  Don't forget the PML Card for the pull-outs...you might have to cut them down just a tad so they won't stick out of the pockets!

DON'T FORGET during the month of August, you can get any package of Memory Protectors for only $3 with ANY Picture My Life Kit purchase!

Thanks for stopping by...don't forget to make your own "Inspired by a BOOK" project using CTMH products and link up to our H2H Challenge before the end of the month!