Wednesday, December 18, 2019

Quick Holiday Favors with CTMH...

SHARED FROM CTMH'S BLOG...

Quick Holiday Favors for a Party, the Office, or School Class!

Christmas Treats #ctmh #closetomyheart #cricut #designspace #ctmhphilosophy #ctmhartiste #Christmas #holiday #treat #treatbox #papercrafting #partyfavor #stockingstuffer #schooltreat #gingerbreadhouse #santahat #Christmasmouse
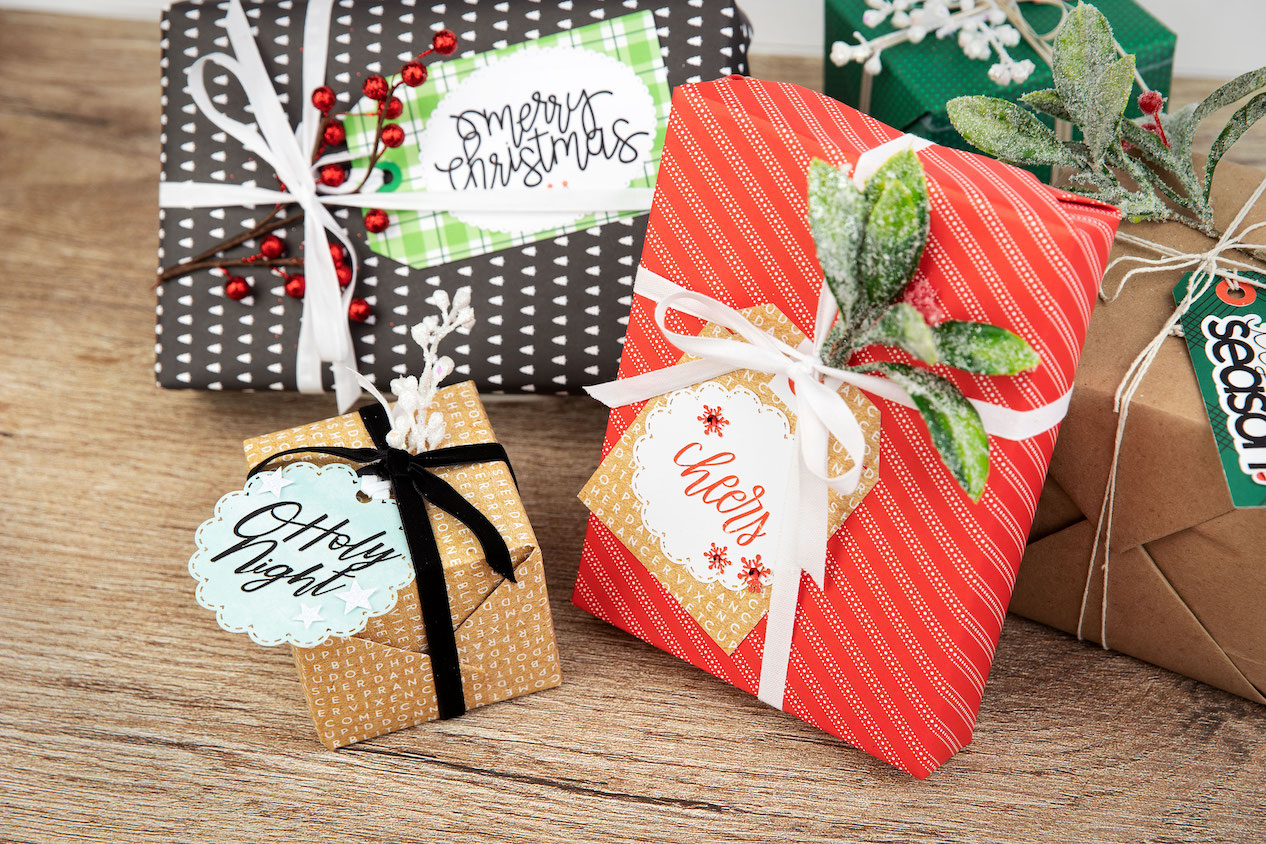
Christmas time is officially here, and in the midst of all the hustle and bustle, most of us still have some last-minute holiday prep to take care of. Everyone wants to have the perfect Christmas; whether you’re still trying to find a gift for your neighbors, come up with favors for a Christmas party, or searching for the perfect stocking stuffer, we want to help out with a few last-minute Christmas treat ideas!
To create these fun projects, we used shapes from our Cricut® Art Philosophy and Artiste collections. These collections include a wide variety of shapes for any project and are available for purchase through your local Consultant.
Before you start on these projects, make sure you have all the tools you need to complete them. A few of the Cricut® shapes will require a scoring tool. If you don’t have a scoring tool, you can add your own scoring lines with a bone folder after the shape has been cut.
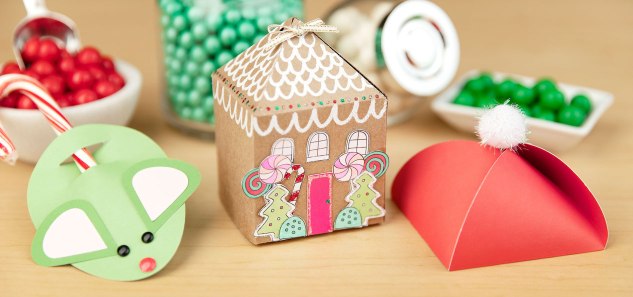
The first treat idea we’ll be showing you today is an adorable Christmas mouse. This treat idea is great for all ages! After all, who wouldn’t love a cute little mouse with a candy tail?
Christmas Treats #ctmh #closetomyheart #cricut #designspace #ctmhphilosophy #ctmhartiste #Christmas #holiday #treat #treatbox #papercrafting #partyfavor #stockingstuffer #schooltreat #gingerbreadhouse #santahat #Christmasmouse
To make your very own Christmas mice, cut out an egg shape (#M4462D) for the body and two droplet shapes (#M462B8) for the ear pieces, both from our Art Philosophy Cricut® collection. When cutting the body, be sure to include two small slits in the middle of each body piece. This allows you to easily attach and remove the candy cane tail. To form these slits, insert two small lines (#M369889) from the Basic Shapes tab to your design before cutting. (If you’re going to cut these pieces by hand, use a crafting knife to make these two cuts.)
Christmas Treats #ctmh #closetomyheart #cricut #designspace #ctmhphilosophy #ctmhartiste #Christmas #holiday #treat #treatbox #papercrafting #partyfavor #stockingstuffer #schooltreat #Christmasmouse
Once you’ve got all your pieces cut, gently thread a candy cane through the slits on each mouse and attach the ears. For the finishing touch, add some black and white dots to create a nose and eyes. We colored our noses red with an alcohol marker.
 With a few of these mice, you’ll have a gift or party favor that is sure to delight!
The next treat idea we have for you today is a mini gingerbread house treat box, made to hold all kinds of yummy surprises.
Christmas Treats #ctmh #closetomyheart #cricut #designspace #ctmhphilosophy #ctmhartiste #Christmas #holiday #treat #treatbox #papercrafting #partyfavor #stockingstuffer #schooltreat #gingerbreadhouse
With white embossed “icing” on the roof and tiny stamped candies flanking the door, this gingerbread house looks good enough to eat, right along with the tasty treats inside!
Christmas Treats #ctmh #closetomyheart #cricut #designspace #ctmhphilosophy #ctmhartiste #Christmas #holiday #treat #treatbox #papercrafting #partyfavor #stockingstuffer #schooltreat #gingerbreadhouse
Before you start making your gingerbread house, note that this particular cut includes score lines. You will need to adjust the cutting tools on your machine accordingly.
To create this too-cute gingerbread house, cut a pyramid box (#M440E0) from our Artiste collection using Kraft paper. Fold along the score lines included in the Cricut® shape and then, attach the sides of the box together with adhesive. Tie the top with some of your favorite ribbon and embellish it with layers of embossed icing and some stamped images from the My Acrylix® From Candyland stamp set.
Christmas Treats #ctmh #closetomyheart #cricut #designspace #ctmhphilosophy #ctmhartiste #Christmas #holiday #treat #treatbox #papercrafting #partyfavor #stockingstuffer #schooltreat #gingerbreadhouse #fromcandyland
The last treat we have for you today is a Santa-hat inspired box. This little box packs a whole lot of cheer and makes a fun and festive party favor or stocking stuffer. Just like the gingerbread house, this treat box includes a few score lines and will require you to adjust your cutting tools to create them.
last-minute-treats-santa-hat
To make your own Santa hat treat box, cut out a pinwheel (#M38DAA) from our Artiste Cricut® collection and fold along the score lines provided in the shape. Once you’ve made your folds, tuck the pinwheel arms behind each other to form the box.
Christmas Treats #ctmh #closetomyheart #cricut #designspace #ctmhphilosophy #ctmhartiste #Christmas #holiday #treat #treatbox #papercrafting #partyfavor #stockingstuffer #schooltreat #Santahat #treatbox
Once you’ve got your treats inside and the box is fully formed, stick a pom-pom on top for a festive finishing touch. This treat box is the perfect size to slip into a stocking and cute enough to give out all on its own. No matter how you gift it, or to whom, it’s sure to be a hit! 🙂
We hope you’ve enjoyed these quick Christmas treat ideas and wish you the sweetest holidays!

Sunday, December 15, 2019

Season to Sparkle Technique Blog Hop...

Thank you for joining us for this month's Technique Blog Hop featuring SEASON TO SPARKLE!

We have 11 CTMH Consultants participating this month so let's get started!


If you've come from Tamara's Blog, you're on the right track...keep hopping until you get back to where you starte . If you're starting here, WELCOME!

I have a card to share using the Complete Creativity Cricut Collection exclusively from CTMH.


 Thank you so much for stopping by! I hope you'll take a second to check out my process video on YouTube to see how easy everything came together!


Don't forget to head on over to Michelle's Blog and see what she has to share!


Thursday, December 12, 2019

Days of December Album - Days 1 - 6...

I have added YouTube process videos for my Days of December Album from CTMH.

Days 1 thru 6 are uploaded and Days 7 & 8 are close behind so don't forget to SUBSCRIBE while you're there so you won't miss a thing!

If you purchased your Days of December Kit, I invite you to create along with me...if you didn't, you can always get your own Christmas paper from your stash (I know you have some...hehehehehe) and create!

Here are Days 1 & 2 to get you started!


Tuesday, December 10, 2019

Christmas Tags & a FREE Cut File from CTMH...

SHARED FROM CTMH'S BLOG...

Free Cricut Design Space™ File for Holiday Gift Tags

Complete Creativity Gift Tags #ctmh #closetomyheart #completecreativity #cricut #designspace #free #gift #tags #presents #Christmas #holiday
There are only 15 days between now and Christmas day…EEK! Is anyone else bursting with anticipation? By now (crossing our fingers), all if not most of the gift shopping is done and taken care of, and it’s time to start thinking of gift wrapping and accessorizing these sought after treasures into the decorative masterpieces that we’ll place under our trees or personally hand deliver.
With our love for paper, ribbon, and celebrating anything that allows us to apply both in a meaningful way, we could not help but create some beautiful gift tags using shapes from our newest Cricut® collection, Complete Creativity.
Complete Creativity Gift Tags #ctmh #closetomyheart #completecreativity #cricut #designspace #free #gift #tags #presents #Christmas #holidayComplete Creativity Gift Tags #ctmh #closetomyheart #completecreativity #cricut #designspace #free #gift #tags #presents #Christmas #holiday
If you’re not familiar with the Complete Creativity Cricut® collection, this collection is divided up by whole card and scrapbook projects, providing all the shapes you need to create complete cards and scrapbook pages for a variety of themes and occasions. Each project is made up of components that can also be used independent of the layout or card they were designed for.
To illustrate the flexibility of this collection, we pulled individual icons, shapes, and sentiments from several of the projects, manipulated their orientation and size, and then grouped them to create the 15 delightful tags you see here!
Complete Creativity Gift Tags #ctmh #closetomyheart #completecreativity #cricut #designspace #free #gift #tags #presents #Christmas #holidayComplete Creativity Gift Tags #ctmh #closetomyheart #completecreativity #cricut #designspace #free #gift #tags #presents #Christmas #holiday
All of the shapes, including the tag bases, come from separate projects in the Complete Creativity collection. As a special Christmas treat from us to you, we’re giving you our design space file so you, too, can create these little beauties and can use them in your holiday gift decorating!
To give you an idea of their size, the “Merry Christmas” tags are approximately 5¼” x 3⅛” and the “tis the season” tags are 4½” x 1¾”. If you look closely at each of the pictures above, you will see that there is a total of five tag designs created with three different sets of patterned papers and cardstock. The Design Space file provided will recreate all 15 tags, so you will see 19 different paper requests from your machine as you go through the “Make It” process. (Take a look at our “recipe” below for a complete list of the papers we used in our tags.)
Complete Creativity Gift Tags #ctmh #closetomyheart #completecreativity #cricut #designspace #free #gift #tags #presents #Christmas #holiday
In the provided file, you may also notice a green stand-alone T-shape only in the middle set of tags. This shape is the background ribbon for the small present in the tag next to it. Both, the “Merry Christmas” tag and the T-shape are cut from the same patterned paper in all three sets of tags. Since the patterned paper used for these two shapes in the middle set of tags is a plaid pattern, we wanted to cut it straight in the tag base but not in the ribbon, because we liked the effect of cutting the pattern at an angle better. Therefore, we straightened the tag shape out on the Design Space Canvas Grid and removed the T-shape from the present at the angle shown. This way, the ribbon will be cut with the pattern at the preferred angle as well.
We hope you enjoy putting this fun Christmas project together and sharing it with friends. As always, make sure you let us know if you have any questions in the comment section below! Happy Holidays!

Monday, December 9, 2019

Anything Goes with H2H...

HAPPY MONDAY (after this, there are only TWO left before Christmas...can't believe it!)

It's Monday which means that we are over at the H2H Challenge Blog with an ANYTHING GOES CHRISTMAS challenge!

So...here's my contribution!

These are made with the Craft With Heart Scrabpooking Subscription layouts for December and photos from LAST YEAR! That's the beauty of documenting your memories...there's no rule that you can't go back YEARS and scrapbook those memories!

These two beauties are my son and his girlfriend...I cannot believe how well the colors in these photos went with the Craft With Heart layouts! Another reason waiting paid off...lol


Don't forget to go play along with us...you have until December 31st to link up your project!

Check out my project video and don't forget to Subscribe :0)

Sunday, December 1, 2019

Reindeer Crossing SOTM Blog Hop...

Am I the only one you cannot believe it's already December...and secretly JUMPING UP FOR JOY because it's already December!

Before the hustle and bustle of the Christmas Season gets underway, several CTMH Consultants are joining in this month to show you this month's SOTM, Reindeer Crossing! It's a PERFECT stamp set for all thing Christmas...whether it be for your annual Christmas cards or a Christmas layout!


If you've come from Gina's Blog, you're on the right track...keep on hopping around until you get back to where you started! If you get lost along the way, you can always head on over to Melinda's Blog to get back on track. And...if you're starting here, WELCOME!

I wanted to make a snowy Christmas card using this stamp set because, although the deer appear to be eating grass, they look all "wintery" to me...lol.

--------------------------------------------
Let's look a little closer at the details. I used some Linen Cardstock with the White Daisy to set it apart and add the slightest color variation...the B&T in the shaker window is from the Mix-In paper packet a catalog or so ago (you can still find it in the ONLINE ONLY section of my website). Then of course, I used the Shaker Window & Confetti Thin Cuts (even used the little stars that pop out of the die cut) with the Silver Loose Sequins to create my little window into the winter wonderland behind the deer. The ribbon is some of my FAVORITE ribbon from CTMH. Although I used it "as-is" here, you can color with your ink pads or markers.
----------------------------------------
And here is the inside...kept it simple to match the front...


Thanks for stopping by! Don't forget to head on over to Haley's Blog and see what she has to share!

And...REMEMBER...you can only get this stamp set during the month of December AND you can get as low as FIVE DOLLARS with a qualifying order! 

Wednesday, November 27, 2019

Adding Color to Vellum with CTMH...

shared from ctmh's blog...

Adding Color to Vellum

Adding Color to Vellum #ctmh #cloestomyheart #vellum #coloringvellum #colouringvellum #greetingcards #cardmaking #diy
Vellum paper is a great addition to any project, but it can sometimes get a bit tricky figuring out how to incorporate it in fun and different ways. Somewhere between transparent and opaque, using vellum paper in your projects is an easy way add a touch of sophistication. From markers and ink pads to re-inkers and shimmer brushes, today we’re walking through a few ideas for adding a dash of color to vellum paper.
In this first example, we sponged the edges with the Mint and Lagoon Exclusive Inks™ Stamp Pads using a round sponge. By gently dabbing the ink onto the page with the sponge, you can create the perfect blend of gentle color on the vellum for a fantastic colored overlay! While it may not look like much on its own, this technique is a great way to finish off the vellum work in your projects for a subtle flair.
Adding Color to Vellum #ctmh #cloestomyheart #vellum #coloringvellum #colouringvellum #greetingcards #cardmaking #diy
This sponging technique is also great for larger surface areas, as you can see in this next card. Here, we used a sponge dauber to spread the ink over the entirety of each present overlay piece. We still concentrated more color at the edges, but we also spread the ink over the rest of the overlay to put more pigment in the finished piece.
Adding Color to Vellum #ctmh #cloestomyheart #vellum #coloringvellum #colouringvellum #greetingcards #cardmaking #diy
In our next example, we’ve used TriBlend™ markers to add a few pops of color to this cheery birthday card. First, we created the fun candles on the front side of the vellum paper with silver embossing powder. Then, we flipped the vellum paper over and colored in the gaps with the CitrusBright PinkBlue Turquoise, and Hydrangea markers on the back side of the vellum piece. This way, you get the illusion of soft candlelight on varicolored birthday candles that look so good, you almost want to blow them out!
Adding Color to Vellum #ctmh #cloestomyheart #vellum #coloringvellum #colouringvellum #greetingcards #cardmaking #diy
Tip: To prevent warping or curling in your vellum paper, move your heat tool in small circles as you set the embossing powder and avoid focusing the stream of the heat tool in one spot for too long.
For this next card, you’ll want to make sure you have your re-inker stash handy. To create this adorable sentiment and wreath on our vellum circle, we used gold embossing powder for the center and Black StazOn™ Ink for the wreath. Once the ink was dry, we flipped the vellum circle over and colored in the leaves on the wreath with re-inkers, again on the back side, using a regular paintbrush as an application tool. This technique gives you a rich saturation level on your color for consistency and vibrancy.
Adding Color to Vellum #ctmh #cloestomyheart #vellum #coloringvellum #colouringvellum #greetingcards #cardmaking #diy
Our last example today features the Julep Shimmer Brush. To start, we cut our vellum piece out with a bone folder and a paper trimmer to create the rough edges you see. (Instead of running the blade down the paper, run the bone folder in the crease of the trimmer to cut the paper.) Once we cut this large vellum piece, we heat-embossed oak leaves on it with gold embossing powder and colored them in with a Julep Shimmer Brush.
Adding Color to Vellum #ctmh #cloestomyheart #vellum #coloringvellum #colouringvellum #greetingcards #cardmaking #diy
Tip: When using a shimmer brush to add color to vellum, be sure to keep the coloration consistent throughout. Otherwise, you may end up with some blotchy patches.
With the subtle shine of the shimmer brush, these leaves are the perfect finishing touch for this card!
Impress your friends and loved ones this season with beautiful handmade cards that include some color treated vellum. The subtle sophistication that a little dash of color adds goes a long way!

Monday, November 25, 2019

Best Friends Furever Blog Hop...

Welcome to this month's product-focus Blog Hop featuring artwork from 10 CTMH Consultants using the Best Friends Furever Special!


If you've come from Gina's Blog, you're on the right track...if you get lost along the way, head on over to Melinda's Blog for a complete list. If you're starting here, WELCOME!

We are new pet-owners but I am LOVING this line because it's so FUN and whimsical AND it is for dogs AND cats alike!

I decided to document a recent hair cut that our little man got. He is a poodle but we wanted him to be long-haired. Well....the pet groomer didn't quite understand that...lol.

----------------------------------------
Here are some closeups...
----------------------------------
Aren't those saying from the Eat, Play, Love stamp set PERFECT for this 'mistake'...

Thanks for stopping by! I hope you'll head on over to Haley's Blog and see what she has to share! Then come back and check out my YouTube process video on this layout!


Black Friday with H2H...

I cannot believe it's already THANKSGIVING...I am soooo EXCITED!

It's also the weeknofbthe biggest shopping day of the year and H2H is celebrating by challenging you to create using the theme BLACK FRIDAY!

I try to avoid the stores on Black Friday at all costs so I use this theme to create a layout that is predominantly black!

Here's a look...
--------------------------------------------
The majority of the products used are from the ONLINE ONLY portion of my website. I used the Mix-Ins from the last catalog, the polka dot B&T is from Spooktacular and the embellishments are the Hello Pumpkin Shapes, Craft On Rubber Shapes, Every Little Thing Complements, and Craft On Complements...


Thanks for stopping by!

I hope you'll swing by the H2H Challenges Blog and check out the other DT Members! Don't forget to link up your project(s) before the end of the month!

Here is a link to my process video on YouTube...head on over to watch AND subscribe while you're there so you don't miss a thing!


Wednesday, November 20, 2019

A FREE Scrapbook Pattern for the Holidays...

shared from ctmh's blog...

A Free Scrapbook Pattern for the Holidays!

Free Holiday Scrapbook Pattern #ctmh #closetomyheart #ctmhhawthorn #ctmhcedarandpine #thanksgiving #christmas #holidayscrapbooking #scrapbooking #freepattern #freescrapbookpattern #makeitfromyourheart
With Thanksgiving just a little over a week away, and Christmas shortly after, we thought we’d share in the holiday spirit with a free downloadable scrapbook pattern! ❤
Free Holiday Scrapbook Pattern #ctmh #closetomyheart #ctmhhawthorn #ctmhcedarandpine #thanksgiving #christmas #holidayscrapbooking #scrapbooking #freepattern #freescrapbookpattern #makeitfromyourheartFree Holiday Scrapbook Pattern #ctmh #closetomyheart #ctmhhawthorn #ctmhcedarandpine #thanksgiving #christmas #holidayscrapbooking #scrapbooking #freepattern #freescrapbookpattern #makeitfromyourheart
This timeless pattern made its original debut with our Back Country collection a few years ago but, as you can see, it can be used with any papers and for any occasion. Above, we paired the pattern with the Hawthorn paper collection from our September–October Catalog. (For those of you who didn’t get a chance to purchase the collection during these months, you are in luck! We recently started offering product on our website under an Online Only menu, and there are a few Hawthorn Paper Packets left—so grab one while you still can!)
Believe it or not, the layout below was created following this same pattern and paired with the Cedar & Pine collection.
Free Holiday Scrapbook Pattern #ctmh #closetomyheart #ctmhhawthorn #ctmhcedarandpine #thanksgiving #christmas #holidayscrapbooking #scrapbooking #freepattern #freescrapbookpattern #makeitfromyourheart
If you look closely, you’ll notice that all we did was turn the pattern upside down. When you do flip or rotate a pattern, just make sure that the title and journaling fall somewhere on the page where it visually makes sense (to you). We didn’t like where the journaling box landed when we flipped our pattern and created this second layout, so we moved it. We also added another photo to this Christmas layout by splitting one of the designated 4″ x 6″ photo spots into two 3″ x 4″ photos.
At Close To My Heart, we take pride in providing the most comprehensive patterns for scrapbook layouts. When you download this pattern, you will notice that it also comes with cutting diagrams to make it even easier to create these pages!
Download this free scrapbooking pattern below and have a wonderful holiday season full of memories worth preserving!
Free Scrapbook Pattern #CTMH #CloseToMyHeart #CTMHMoreMagical #MoreMagical #freepattern #freescrapbookpattern #scrapbooking #free #download #scrapbooklayout #magical #adventure #dreamscometrue #MakeItfromYourHeart #howtobooks


For even more scrapbook patterns, check out our Make It from Your Heart™ pattern book series. If you love the free patterns on the blog, you’re sure to be blown away by all the patterns offered in our beautiful how-to books!