Wednesday, October 31, 2018

Last-Minute Halloween Projects for the kiddos...

Taken from CTMH's Blog...

Halloween Slime Kits with Shaker Window!

We are so excited to have the talented Amy Robison as a guest blogger today! Not only is she a contributing artist for Silhouette, but is also somewhat of an expert at designing children’s themed parties, gifts, and crafts. Don’t take our word for it, see for yourself!
Halloween Slime Party #ctmh #closetomyheart #shakerwindow #ThinCuts #Halloween #HelloPumpkin #shakercard #diy #kidsparty #kidshalloween
Hey! Amy Robison here! I’m so excited to share a fun party I created this week with the Shaker Windows & Confetti Thin Cuts, loose sequins, and Hello Pumpkin collection. If you follow me onInstagram stories then you already know that I am obsessed with the shaker windows after trying them out this week. I want to use them on everything! I already have a million ideas for Christmas. I’m getting a little ahead of myself, so I’ll calm down and focus on the party I’m sharing today— a slime making party. If you’re like me, then you hate this slime craze that has been going on for a few years. (It’s the worst!) Who started this? haha! My kids still love it though, so I decided that I just have to embrace it occasionally. Plus, how perfect is it for a Halloween party?
Halloween Slime Party #ctmh #closetomyheart #shakerwindow #ThinCuts #Halloween #HelloPumpkin #shakercard #diy #kidsparty #kidshalloween
I started out by designing a few characters I could use with the shaker windows that would be festive for the holiday. I’m loving their simplicity and how they turned out. Once they were all designed, I added the shaker windows to each one. If you haven’t used the shaker windows before, I included a simple tutorial. They are a piece of cake and you’ll absolutely love them!
Shake Window Tutorial
Halloween Slime Party #ctmh #closetomyheart #shakerwindow #ThinCuts #Halloween #HelloPumpkin #shakercard #diy #kidsparty #kidshalloween
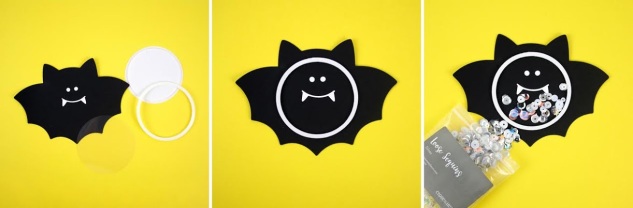
Step 1: Remove the outer foam ring leaving the middle square foam adhesive to use for other projects. (Such a genius design so all that empty space isn’t wasted.)
Step 2: Place the foam shaker window ring on your project. It is very sticky, so you know it will stay right where you put it!
Step 3: Fill with sequins, glitter, sprinkles or any other fun media. This loose sequins mix is so beautiful! I can’t get enough of it, and it’s available in gold too!
Halloween Slime Party #ctmh #closetomyheart #shakerwindow #ThinCuts #Halloween #HelloPumpkin #shakercard #diy #kidsparty #kidshalloween
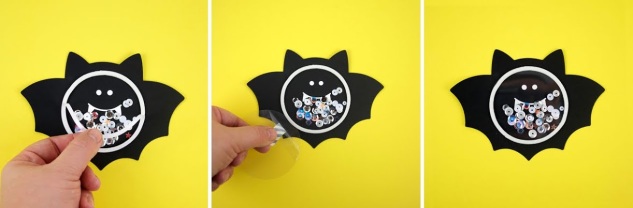
Step 4: Remove the protective paper on the ring to reveal the adhesive.
 Step 5: Peel the protective film off of the acetate circle. Use washy tape to help peel it off. This was a little tip I learned from the Close to my Heart creative team. Such a huge help!
Step 6: Place the acetate sheet on top. Press down to make sure everything is sealed in place.
Halloween Slime Party #ctmh #closetomyheart #shakerwindow #ThinCuts #Halloween #HelloPumpkin #shakercard #diy #kidsparty #kidshalloween
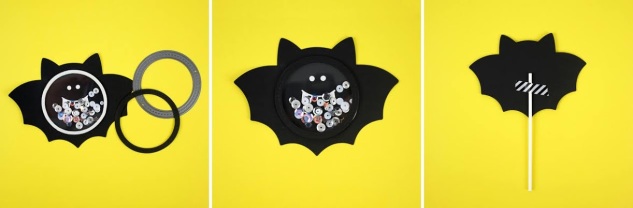
Step 7: Using the Shaker Window Thin Cuts, cut out the finishing border in your choice of coordinating paper.
Step 8: Glue the border on top to finish.
Step 9: I taped a sucker stick to the back so that I could place them in my kits. These would be cute in gift baskets, too, as a tag to the recipient.
Halloween Slime Party #ctmh #closetomyheart #shakerwindow #ThinCuts #Halloween #HelloPumpkin #shakercard #diy #kidsparty #kidshalloween
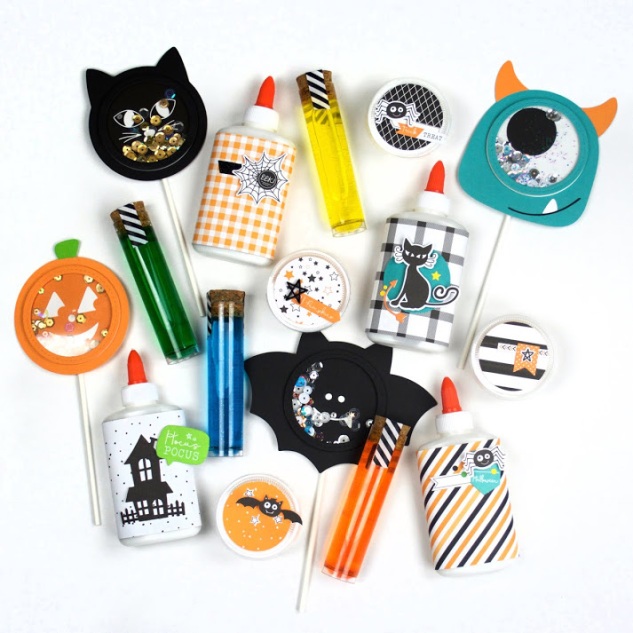
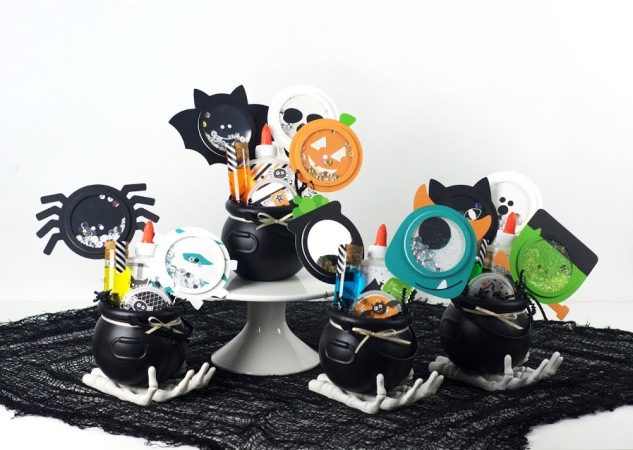
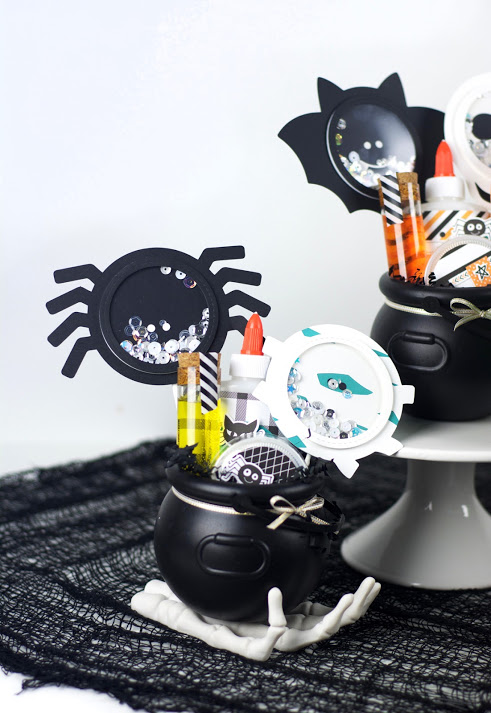
Once I finished all the shaker window characters, I gathered the supplies for the slime kits. I used the Hello Pumpkin collection to wrap and embellish the supplies and containers to make them look more cohesive and “pretty” everything up a bit.
Halloween Slime Party #ctmh #closetomyheart #shakerwindow #ThinCuts #Halloween #HelloPumpkin #shakercard #diy #kidsparty #kidshalloween
Each kit has everything needed to make slime including fun sequins to mix inside to make it extra special. I love making each guest feel important and special. My guests are usually small children and I love the look on their faces when they see what is waiting on the table just for them. It’s the best and keeps me doing all these crazy parties.
Halloween Slime Party #ctmh #closetomyheart #shakerwindow #ThinCuts #Halloween #HelloPumpkin #shakercard #diy #kidsparty #kidshalloween
Have you used the shaker windows before? Hopefully I have sparked some ideas of fun new ways you can use them in your next project.
Thank you Amy for all of your creative ideas! Please show our new friend some love in the comments below!

SCARY good day...

Are you guys "Halloween people"...well, I'm not really...but I do LOVE having cute photos of my children to scrapbook and stories to tell...lol. 

This is one of those layouts...I mean, what other pictures could you put on a layout with a big pumpkin cut with the Artistry Cricut Collection AND some CUTE Hello Pumpkin paper to go with it...


Thanks for stopping by and I hope you have a very safe and FUN Halloween!!!

Monday, October 29, 2018

Pumpkin Spice and NOTHING Nice...

Welcome to this week's H2H Challenge featuring everything PSL!

I'm not a fan of pumpkin unless it's in pie...lol...but this year, I thought I'd give it a try. I went into my local starbucks, asked if I could have a sample (which was pretty generous, I might add) and it tasted alright. Sooooo, I decided to order a Tall Pumpkin Spice Latte. It was "okay" for a few sips and then the pumpkin FLAVORING and "spice" got a little too much. I also drink my coffee pretty much black so all the sweetness was an OVERLOAD for me.

I love that scrapbooking allows to tell this story in pictures AND in gorgeous Grateful Heart paper and Sequins...

---------------------------------------------------------
I wanted to create a FUN element to my coffee cup (cut using the Artistry Cricut Collection) so I added a Shaker Window and more sequins! I also HAD to alter the saying on the PML Card from Hello Pumpkin because this PSL was NOT "everything nice"...lol


-------------------------------------------------------
I used our NEW Texture Paste to create a fun border AND the Loose Gold Sequins stuck to the wet paste and I filled in the holes later by using Liquid Glass to adhere them...


Thanks for stopping by...I hope you'll go visit the H2H Blog and see what the other DT Members created AND play along with us!

Monday, October 15, 2018

Paste-fully Creative - CTMH Technique Blog Hop

Welcome to this month's TECHNIQUE BLOG HOP featuring our NEW Texture Paste

We have 18 Consultants participating this month so it will be FUN, QUICK & FULL of Inspiration!

Let's get started! If you've come from Valerie's Blog, you're on the right track...keep hopping around 'till you back to where you started. If you're starting here, WELCOME!!!

-----------------------------------
I created a heart template and used the transparent matte to go over the heart edges to create a subtle heart on the back ground of this Boutique B&T...


Thanks for stopping by...your next stop is wonderfully talented Shirley Ross!


H2H Sketch Challenge...

Yayyyy...my FAVORITE part about any Monday is H2H Challenges...and THIS TIME we have a wonderful CTMH Sketch for you to try!

Here's my take on the sketch...which is originally a 2-page spread but I used to make this one-page layout featuring my daughter and a couple of pictures taken with SnapChat...

-----------------------------------------
I used the Boutique line fo bring out the pinks and girly little flowers....


I hope you'll stop by the H2H Blog and check out the other DT Members and what they've done with the sketch...and if you're inspired, I hope you'll play along with us!


Wednesday, October 10, 2018

Color My Heart Color Dare #311 WINNER....

Woke up this morning to find out I was the DIAMOND WINNER of the Color My Heart Color Dare #311 - let's recap my card...


Please go check out the other WINNERS for this challenge and play along with Color Dare #311...it's a beauty!

Tuesday, October 9, 2018

Beautiful Together...

I {{{love}}} finding extra ways to use my CTMH stamps! And...this month's SOTM, Thanks & Giving, is a perfect example!

Here's a look at a layout I did using the backside of the heart image in Thanks & Giving to make a background for these beautiful kiddos...
-------------------------------------------------------
The Boutique line coupled with Sugar Plum and gold sequins is heavenly...and I used the Shimmer Brush to add a little sparkle to that one heart!
----------------------------------------
I am STILL LOVING...and STILL USING the Thin Cuts - Decorative Borders on almost EVERYTHING I create these days...LOVE!!!
----------------------------------------------
And, I hid my journalling as always...

I posted a video showing you how versatile this stamp set is by stamping with the backside of a couple of images. It can be found on my FB VIP Group! If you're not a member yet, order anything from my website and I'll add you!

Thanks for stopping by...have a GREAT rest-of-the-week!


Thursday, October 4, 2018

Mini-Album Tutorial...

I made a FRIGHTFUL little mini-album from one 12x12 sheet of B&T and some scrap Complements and embellishments from the NEW Hello Pumpkin line...I got so many questions about it so I decided to make a video showing you how to make your own!

Here are the pictures of the one I made...


And...here's the video showing you how using the BOUTIQUE line...instead of sewing down the middle, I show you how to use liquid glass...enjoy!


Monday, October 1, 2018

Thanks & Giving SOTM Blog Hop...


HAPPY OCTOBER, everyone! After getting a TASTE of Fall last week, I am so ready for cooler temperatures, crisp air, leaves falling and NO MOSQUITOES...hehehehehe.

Well, you all know what October 1st means...a NEW Stamp of the Month from CTMH...and this one is all about Thanks & Giving!


To give you TONS of inspiration this month, I am joining 23 other consultants and we are going to overload your Pinterest Boards with cards, tags & layouts! The hop is one big circle so you should hop until you get back to where you started. If you're starting here, WELCOME! If this isn't your first stop, you should be coming from Vickie's Blog and if you get lost along the way, you can always see a complete list of participants {{{here}}}.

Now...let's get on to the FUN stuff! I made a layout using Boutique (I know...I'm still hooked on the soft colors even though Grateful Heart would totally go with this set!)...I added the new Watercolor Impressions (A NEW FAVORITE) to add some background color to the white base...


I used zip strips, the washi Complements and a string of Gold Sequin Ribbon for the side...


Those adorable little flowers come with the Thanks & Giving stamp set and I inked them up with SURGARPLUM ink and Charcoal as the outline image...ADORBS!!!


I just LOVE how that fringe makes this layout...it's made using our NEW Thin Cuts - Decorative Borders...you guys, the borders this come with are VERSATILE and if you HOST A PARTY, you can get this for 50% off with a qualifying party!!!


And...here is the picture I need to have printed in 4x4 format...and if you notice, I hid my journaling on the pull-out tag which was made from one of the PML cards. This picture was taken a couple of weeks ago for my mom's birthday...those other two people are my siblings (in case you couldn't tell...lol)


Thanks for stopping by...I really appreciate see all your faces :0) Don't forget to leave some love and then head on over to Michelle's Blog and see what she has to share!


Hello Pumpkin with H2H...

Thanks for visiting me for another H2H Challenge...this week's challenge is a color one and it's GOOD!!!

Here's a look at the colors...if you don't have these exact CTMH colors, it's all good...just use a CTMH stamp or some paper on your project to qualify your submission!


And...here's a look at my card using the NEW Hello Pumpkin line which is perfect for Halloween or even a Fall-ish pumpkin like this one using the Hello Pumpkin-Cardmaking stamp set...


Thanks for stopping by! And, don't forget, you have the entire month of October to play along with us over on the H2H Blog.