Tuesday, March 26, 2019

Story by Stacy with CTMH...

shared from ctmh's blog...

Memory Keeping with a Theme

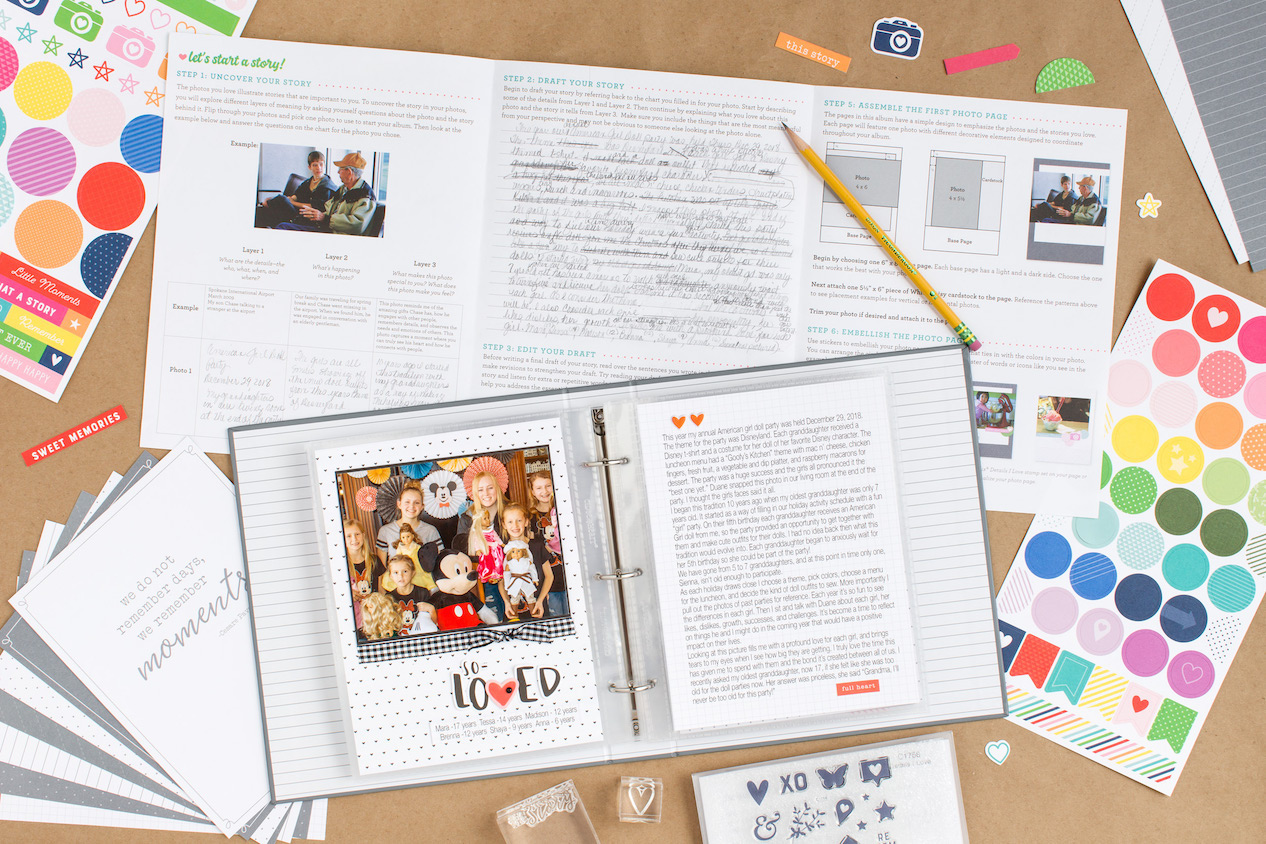
Do you ever look at all your photos and wonder where to even begin? Do you go chronologically, starting at the beginning? Do you try to scrapbook the most recent ones? Do you stick to special events? It can be hard to choose, and that’s why we are loving the newest Story by Stacy™ workshop kit, Stories I Love. Stories I Love encourages all of us to focus on the photos and stories we treasure the most. Using just one photo and story at a time, the workbook included in the kit walks you through how to write a personal story exploring all of the layers behind that single photo. With this kit, you’ll have nine photos and stories documented in one special place.
Memory Keeping with a Theme #ctmh #closetomyheart #ctmhstorybystacy #storybystacy #ctmhstoriesilove #storytelling #memorykeeping #scrapbooking #themescrapbook
Choosing just nine of your most favorite photos for a Stories I Love album might still seem like a daunting task. You definitely don’t have to choose your top nine all at once. You can give yourself time to consider which photos you want to include, but we also have another approach to share with you today. You can use this approach with Stories I Love or apply it to any memory keeping project. Here’s the secret… choose a theme to help you get started. Instead of looking at all your thousands of photos (we’re confident you have that many), help yourself narrow it down by sticking to one theme or subject. Having a few parameters will make it easier to get started.
We asked three of the artists from our art studio to consider a Stories I Love album theme that they’d like to use to document stories and photos that are meaningful to them. You can use their ideas below to try this on your own! Remember, these themes are great for a Stories I Love album or you can use them in any size format. Even a 12″ x 12″ themed album can help you narrow your focus and get your memories in a scrapbook.

#1 Travel Adventures

Memory Keeping with a Theme #ctmh #closetomyheart #ctmhstorybystacy #storybystacy #ctmhstoriesilove #storytelling #memorykeeping #scrapbooking #themescrapbook
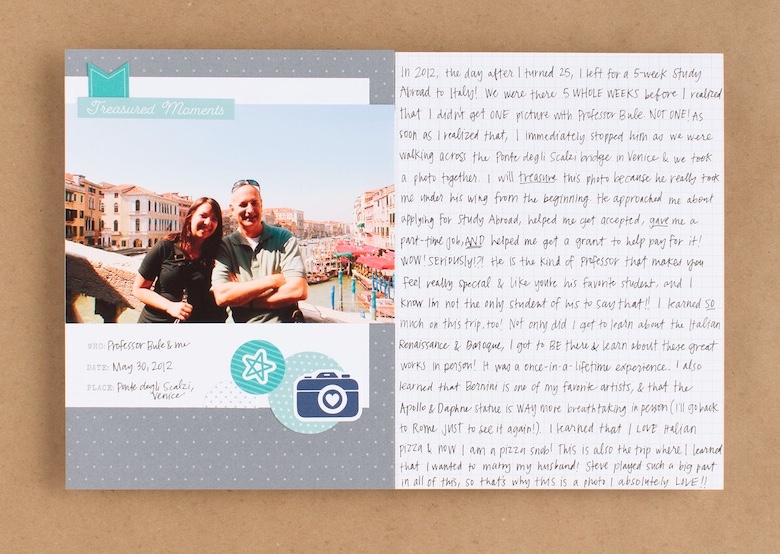
In this type of album, you can gather the stories and photos you love the most from places you’ve been, or you can choose your favorite photos from just one trip. For her travel album, our artist used the pages and stickers included in the Stories I Love workshop kit to document a treasured moment from a study abroad adventure in Italy. The layouts in her album include special photos from other places that she’s traveled, near or far, and the stories that go with them.
Memory Keeping with a Theme #ctmh #closetomyheart #ctmhstorybystacy #storybystacy #ctmhstoriesilove #storytelling #memorykeeping #scrapbooking #themescrapbook
You can see how she’s used the process outlined in the workbook to draft and even edit her story. This is part of what makes each Story by Stacy™ kit so usable. It takes you through the steps of both writing and creating. It’s ok if your workbook gets messy. It’s there to give you the space you need to draft and adjust the story before you write it on your album page.

#2 Family Traditions

Memory Keeping with a Theme #ctmh #closetomyheart #ctmhstorybystacy #storybystacy #ctmhstoriesilove #storytelling #memorykeeping #scrapbooking #themescrapbook
Another approach is to focus on family traditions. With this Stories I Love layout, our artist has highlighted a photo she loves of her family at Easter, and her story explores some of her favorite family traditions during Easter time. This artist kept her pages simple, letting the story and the black and white photo remain the most important parts of the layout, with stickers and just a few added silver glitter gems. You could use a Stories I Love album for photos about family holiday traditions or even things your family likes to do together. Do you go camping every summer? Do you have special family events that happen at Christmas time? Odds are that for these moments you also have photos of them that are particularly meaningful to you. Use this type of themed album to gather them all in one place.

#3 Relationships

Memory Keeping with a Theme #ctmh #closetomyheart #ctmhstorybystacy #storybystacy #ctmhstoriesilove #storytelling #memorykeeping #scrapbooking #themescrapbook
A different way you can theme your album is by focusing on a particular relationship. It could be with a parent, sibling, friend, or child. The photos in the album could highlight fun moments together or things you especially love about that person. For this album, our artist decided to work with photos just of her granddaughters. In her layout, she described one of her favorite things she does with her granddaughters and the special moments she gets to share with them. You can see how she’s added some other paper and embellishments to her pages. They don’t distract from the story and photo but do give her layout a different look.
It’s exciting to see how these stories and photos from our artists can come together to create a uniquely themed album for their memories. Just in case you need a few more ideas, here’s a handful of others you can try.
  • Baby album: Haven’t had time to finish your child’s baby album? That’s ok! Choose nine favorite baby photos and use the Stories I Love approach to tell those stories. This is an easy way to create a baby book that includes the best moments and stories in your own words.
  • Childhood album: Choose a few stories and photos from your own childhood. You may not have time to go back and scrapbook every photo, but this way you can gather the stories and photos that you love the most in one place. You’ll be able to write your favorite stories from your growing up years and share them with your family. This is something you could also do with your own kids. Have them choose their favorite photos and help them write the story behind one photo at a time. Not only is this a fun project to do together, but you’ll have a story told from their “kid” perspective.
  • Graduation album: Graduation season will be here soon. A Stories I Love album can be a great way to celebrate your graduate. Share a handful of stories and photos about that person over time. You can highlight moments from their life, big events, or simply what you love about the person they are becoming. This type of album is great to give as a gift to commemorate their special moment. You could do the same type of album for someone that’s retiring or reaching a milestone birthday or anniversary.
  • Pet album: Many of us have a furry friend in our lives. Use a themed album to gather photos of your pets and the stories that go with them. This could be an album you leave in process. Add some stories and photos in a Stories I Love album and then leave a few pages empty. This way you have space to include a few more the next time your pet does something new, silly, or even naughty that you want to remember with a story and photo. ðŸ™‚
The most important thing you can do is tell the stories and share the photos that you love. Those are stories that only you can tell, and starting with a theme can help you get rid of distractions or even scrapbook guilt (the guilt that memory keepers sometimes feel when they don’t have time to scrapbook EVERY SINGLE PHOTO). Give yourself permission to start with the ones that are the most important to you. That’s exactly what a Stories I Love album is for. We hope you’re inspired today to give the themed album approach a try, and we’d love to hear what theme you plan to use. Share them with us in the comments below!

Monday, March 18, 2019

Favorite Tool with H2H...

This week over on the H2H Challenges Blog, it's all about your FAVORITE TOOL!

While I have MANY favorite tools, I had to choose our THIN CUTS - the Shaker Window & Confetti one to be exact.

Check out this card I made using the Thin Cut...


Friday, March 15, 2019

Emboss It! - CTMH Technique Blog Hop...

Welcome to this month's TECHNIQUE BLOG HOP featuring EMBOSSING!

We only have 8 CTMH Consultants participating this month so hopping around and seeing everything we have to share won't take long.

If you've come from Maz's Blog, you're on the right track...keep hopping until you get back to where you started! If you're starting here, WELCOME! 

Let's look at the card I have to share using our Simple Chevron Embossing Folder ***ON SALE RIGHT NOW*** and the So Much Happy line from CTMH...

--------------------------------------------
Here's a closeup of the chevron embossed pattern...I just ran my Mint Ink pad over the embossed lines and voila...a pretty, subtle pattern...

----------------------------------------------------
And...our embossing folders are rather big (5x7) so if you're making a standard-size card, like this one, you have some leftovers - PERFECT for the inside of the card!


Thanks for stopping by! Head on over to Lauren's Blog and see what she has to share!


Wednesday, March 13, 2019

CTMH Cards with Cricut Design Space...

SHARED FROM THE CTMH BLOG...

Back to the Basics with Cricut Design Space™—Card Edition!

Often the tools we show you in Design Space are illustrated with a scrapbook page or layout, but not today! In this next back to the basics post, we want to remind you that these tools can be used for many, many projects, including custom cards and envelopes. As we continue our review of basic tools in Design Space, you’ll see that it’s easy to create cards and envelopes that are both beautiful, unique, and most importantly, easy!
Design Space™ Basics #ctmh #closetomyheart #ctmhcricut #designspace #cardmaking #cards #diy #ctmhsomuchhappy
On the cards above, all of the shapes we used, including the sentiments, flowers, and even the envelopes, come from the Flower Market Cricut® collection. Flower Market has both flat and 3-D shapes, and you can see we’ve used both types on these cards. This makes it a truly versatile collection, useful for an entire year’s worth of seasons, celebrations, and creativity!
The steps below show you how to work in Design Space from a desktop or laptop computer. If you use the app on a mobile device, the buttons and tools will be located in slightly different places on your screen, but the same features are available on any device.
Basic Shapes
Design Space has a “basic shapes” feature in the Design Panel. The shapes in this section are available to you for free, and it’s an easy way to add simple shapes like circles, rectangles, hearts, or diamonds and also use them as a base for other projects. For example, you could insert a square and then size it for a variety of things, and this is exactly what we did to create our cards.
Basic Shapes Screenshot
To create a card front in Design Space, insert a square shape from the Shapes section. Adjust the size to 4.25″ x 5.5″. If you wanted to cut an entire card base, insert a square shape and size it to 8.5″ x 5.5″. In the next section, we’ll tell you how to add a score line to the card base.
Cut Lines and Score Lines
When you insert a shape on your canvas, the line of that shape is typically a solid cut line, but you’ll notice when you add an image, like the envelope from the Flower Market collection (#MD38C82) ←MAKE SURE YOU INCLUDE THE "#" WHEN TYPING THE TAG INTO THE SEARCH BAR IN DESIGN SPACE, there is a dash line as well.
Score Screenshot
This is a score line. Your Cricut® machine will both cut and score the envelope for you. You just need a scoring tool or scoring wheel, depending on the type of machine you have. You can change lines to cut, score, or even draw. If you aren’t sure what type of lines you have on your shape. You can always look in the Layers panel. It will tell you which ones will score or cut, and you can change the line type in the Edit bar.
Card Base Screenshot
To complete your card base, insert a score line. Score lines can also be added from the same Shapessection of the Design panel. Resize the score line to 5.5″, move it over your card base, and select both images. Then under Align in the Edit bar, select Center. Once the score line is centered, keeping both the line and the card base selected, click Attach in the Layers panel. Using Attachkeeps your score line exactly where you want it, even if you move the shape on the canvas.
Using the Slice Tool
We used the Slice tool to create the sentiments for our cards. The Slice tool is one of the functions at the bottom of the Layers Panel, next to others like Weld and Contour. With Slice, you can cut an image or text out of another shape. Simply place your word or image over the one you want to cut it from. Select both shapes, and click Slice in the Layers Panel.
Slice Screenshot
Initially, it might not look like anything happened, but if you click on your images, you’ll have two of whatever you cut. One is the shape itself, and the other is the shape you cut from the background.
Image 2
There are a few important things to keep in mind. First, you can see in the “Thanks a Bunch” banner on this card, we sliced the sentiment from Lagoon paper and attached that to a solid White Daisy banner. For something like this, before you slice in Design Space, make sure you ungroup the image. Images that have multiple layers can’t be sliced. If your sentiment image has multiple pieces grouped together as one shape, like this one does, you’ll need to ungroup them and slice using just one image.
Another thing to remember is to duplicate the solid shape that goes behind whatever you’re slicing, if applicable. If you are slicing into the card base, you wouldn’t need a duplicate piece, but if you’re slicing into another shape, like the banner on this card, you’ll want to have a solid shape to layer behind it.
The last important tip we have for you is that you want to make sure when cutting your project that you keep small pieces that go inside letters or other shapes. With this card, that means you want to set aside the inside of each “a” and the “B” to attach to the banner.
Image 3
If you look closely, you’ll notice a similar thing happening on the Happy Easter card, but it’s also a little bit different. We sliced the sentiment from the card base, but instead of saving the inside pieces, we cut the sentiment separately and layered a solid piece of White Daisy cardstock on the back, behind the sliced shape.
 Put It Together (Basic Shapes, Score, and Slice)
Image 4
All of the cards in our post today use the tools we’ve talked about including a basic rectangle shape, inserting a score line, and slicing a sentiment. Follow the steps below to put it all together and make the Sending Sunshine card!
  1. First, search for the sentiment, #MD38CC3 (include the "#" when searching), and insert it on your canvas.
  2. Ungroup the sentiment, and delete only the “Sunshine” image. Then resize the sentiment to a height of 1.75″, leaving the width locked.
  3. For the card base, insert a square shape from the Shapes. Adjust the size to 8.5″ x 5.5″. Don’t insert a score line yet. You have to use the slice tool first, before attaching a score line.
  4. Slice the sentiment from right side of the card base. This is your card front. Place the sentiment where you want it, select both images, and click Slice in the Layers panel.
  5. Keep both extra sentiments. You’ll cut them from Lemon cardstock and layer the two in another step.
  6. Now insert a score line, also from the Shapes section of the Design Panel. Size it to 5.5″. Place it over the card base, and select both images. Then, under Align in the Edit bar, select Center, and then select Attach in the Layers panel.
  7. Insert other flowers and leaves on the canvas as desired. For our card, we used the Daisy image (#MFADCF2) cut in three different sizes, and we paired it with the Rhododendron leaf (#MD37FB).
  8. Color your project pieces to make it easy to cut on the right color of paper or cardstock. Then select Make It in the top right corner and cut your project pieces.
  9. Attach one 4″ x 5¼” piece of Mint cardstock behind the sliced portion of your card (on the inside of the card). Then layer the two Lemon sentiments and attach inside the sliced section.
  10. Embellish with stamped images, 3-D flowers, sequins, and more!
**Bonus Tip!
Are you unsure how to add a Close To My Heart digital collection to your Cricut® account? Simply visit www.cricut.com/CTMH and sign in to your account (or create one if you haven’t already). In the list of options in the menu on the left, you’ll see the last one is Redeem Promotion. Select that option. Then enter the code, click Redeem, and you’ll be on your way. Not sure if you’ve already linked your physical cartridges? In that same menu, you can select Linked Cartridges. This will show you the ones you’ve already linked to your account.
Next month, we’ll look at ways to manipulate text in the Edit bar on the canvas with the shapes and unique font from the You Are Here collection. Check back in April for more Design Space fun!

Friday, March 8, 2019

Know that I Care Card Kit...

I am offering my first card kit in a long while and YOU'RE GOING TO LOVE IT!

Here's a look at the cards...


Want to make your own???

When you purchase the Stamp Set - Know That I Care AND Adhesive Runner, I will mail you the pre-cut kit! If you don't have the inks used, you might want to grab those too (Raspberry, Ballerina, Fern & Black).

If you don't need the stamp set, just pick any other stamp set valued at $14.95 or more and you'll still get the pre-cut kit! Don't forget to add that Adhesive Runner!

If you just want to purchase the Cutting Diagram, do so below!


Wednesday, March 6, 2019

FREE Scrapbooking Pattern...


SHARED FROM CTMH'S BLOG...

It’s Paper Party Time with a Free Scrapbooking Pattern!


So glad you are joining us today because we are having a paper party All. Month. Long. What does that mean? It means that this is the time to stock up on your favorite patterned papers and coordinating cardstocks because they are all on saleWhen you buy any one of our patterned paper packets or coordinating cardstock packs you can get a second one, of equal or lesser value, at 50% off! The best part, you can mix and match your packets to get exactly what you want. Visit our website, here, for a closer look at our beautiful papers and to get additional details on this party worthy event!
As a party favor, we are giving you a free scrapbook pattern for you to download and take home with you!
Free Scrapbook Pattern #ctmh #closetomyheart #paperparty #scrapbooking #scrapbookpattern #freepattern #ctmhfeelslikehome
Free Scrapbook Pattern #ctmh #closetomyheart #paperparty #scrapbooking #scrapbookpattern #freepattern #ctmhIHeartUs
This pattern originally debuted with our Roxie paper collection, but, as you can see, we updated the instructions so they can be used with any papers and for any occasion. Above, we paired this timeless pattern with the I Heart Us paper packet and coordinating cardstock, and below we paired it with the Feels Like Home paper packet and coordinating cardstock.
Free Scrapbook Pattern #ctmh #closetomyheart #paperparty #scrapbooking #scrapbookpattern #freepattern #ctmhfeelslikehome
With our pattern papers and cardstock, you can achieve effortless color coordination in all of your crafting. The patterns featured in each paper collections are designed using the same exclusive color palette as our two-toned cardstock, ensuring that each paper element in your projects comes together for a flawless match.
We take pride in providing the most comprehensive patterns for scrapbook layouts. When you download this pattern, you will notice that it also comes with cutting diagrams to make it even easier to create these pages!
Download this free scrapbooking pattern, and have yourself a paper scrappin’ party!
Free Scrapbook Pattern #CTMH #CloseToMyHeart #CTMHMoreMagical #MoreMagical #freepattern #freescrapbookpattern #scrapbooking #free #download #scrapbooklayout #magical #adventure #dreamscometrue #MakeItfromYourHeart #howtobooks


For even more scrapbook patterns, check out our Make It from Your Heart™ pattern books. If you love the free patterns on the blog, you’re sure to be blown away by all the patterns in our how-to books!